On-device Asset Polices
Description
The On-device Asset Policy specifies whether or not assets can be downloaded or deleted, when they are updated, and optional confirmation messages to show the user. In addition, you can also white-list images, lock down access to web services, and customize the search and filter behaviors in the TransForm app.
Discussion
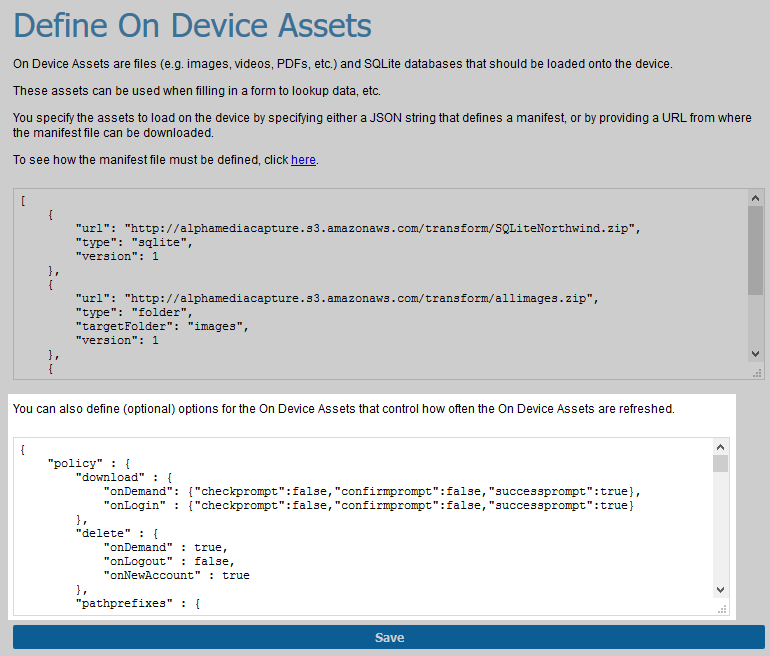
Files, such as images, videos, PDFs, and SQLite databases can be downloaded into the TransForm app for your account to provide dynamic lookups or additional reference information in a form. The files to download are defined by the On-device Assets Manifest, found in Developer Options > Define on device assets section of the Home tab in TransForm Central.
On-device assets are tied to you TransForm account and are available for use in all form types. However, on-device assets will not be downloaded to the TransForm app unless you define an On-device Assets Policy.
The On-device Assets Policy is a JSON string that defines whether or not on-device assets for your account should be downloaded to the TransForm app. The policy also defines if or when assets associated with your TransForm account should be deleted from the mobile device. By default, on-device assets will not be downloaded if no policy is defined.
In addition to specifying how assets are downloaded and when they are deleted, you can also white-list images, lock down access to web services, and customize the search and filter functionality in the TransForm app for your account.
To add a policy to your TransForm account, enter the On-device Asset Policy in the text box below the On-device Assets Manifest and click the Save button.
Downloading & Deleting On-device Assets
SQLite databases and media files can be downloaded to the TransForm app and referenced in your applications. The On-device Assets Manifest defines what resources to download and where to store them. The Policy for On-device Assets specifies when the assets should be downloaded, how they are updated, and when they should be removed from the user's device.
Downloading Assets
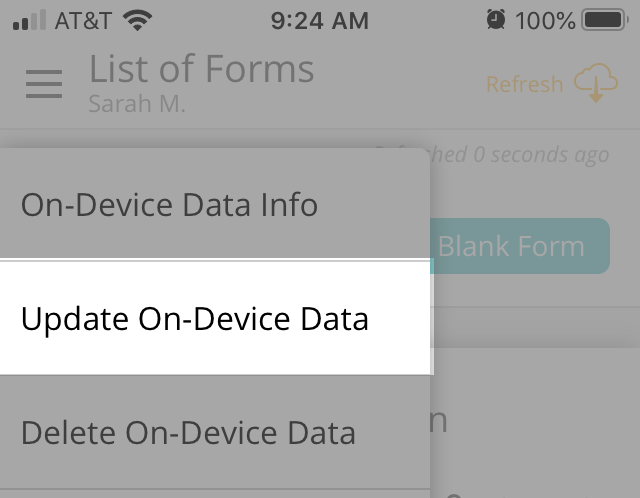
Assets can be downloaded on demand and/or on login. Assets downloaded on demand are done so using the "On-Device Data" > "Update On-device Data" menu option in the TransForm app.
If assets are configured to download on login, all files and resources defined in the On-device Assets Manifest will be automatically downloaded to the TransForm app when the user logs in or when the user re-confirms login.
Assets will only be downloaded if you explicitly define a download policy. By default, assets are never downloaded. The default policy is shown below:
{
    "policy": {
        "download": {
            "onDemand" : false,
            "onLogin" : false
        }
    }
}
Three messages can be shown to the user when downloading assets:
- Check Prompt
This message prompts the user to confirm checking to see if there are new assets to download
- Confirmation Prompt
If new assets are available for download, this message will ask the user if they would like to download the assets
- Success Prompt
This message notifies the user that new assets were downloaded successfully
{
    "policy": {
        "download": {
            "onDemand" : {
                "checkprompt": false,
                "confirmprompt": false,
                "successprompt": true
            }
        }
    }
}
You must specify whether or not each of these messages should be shown for your chosen download methods.
{
    "policy": {
        "download": {
            "onLogin" : {
                "checkprompt": false,
                "confirmprompt": false,
                "successprompt": true
            }
        }
    }
}
download Settings Reference
- onDemand
Defines the on demand download policy. Either an object with three prompt properties (described in Prompt Properties) or the value false. If false, on-device assets cannot be downloaded on demand using the "Update On-device Data" menu action in the TransForm app.
- onLogin
Defines the on login download policy. Either an object with three prompt properties (described in Prompt Properties) or the value false. If false, on-device assets will not be downloaded when the user logs into the TransForm account in the TransForm app.
Prompt Properties
The prompt properties define what messages to show to the user when on-device assets are downloaded.
- checkprompt
A true or false value. If true, the user will be asked if they would like to check to see if new assets are available for download.
- confirmationprompt
A true or false value. If true, the user will be asked if they would like to download new assets.
- successprompt
A true or false value. If true, the user will be shown a "success" message after assets have been downloaded to the device.
Removing Assets
In addition to specifying when assets are downloaded, you can also control when they should be deleted from the device. Assets can be removed on demand, on logout, or when the user logs out of your TransForm account and logs into another account. If delete on demand is enabled, users can use the "On-Device Data" > "Delete On-device Assets" menu option in the TransForm app to delete all assets associated with the TransForm account from the device.

It is recommended that you allow deleting assets on demand as well as when the user logs into another TransForm account on the device.
{
    "policy": {
        "delete": {
            "onDemand" : true,
            "onLogout" : false,
            "onNewAccount" : true
        }
    }
}
delete Settings Reference
- onDemand
A true or false value. If true, the user can use the" Delete On-device Assets" menu action to delete assets from the TransForm app.
- onLogout
A true or false value. If true, all on-device assets will be deleted from the device when the user logs out of the TransForm app.
- onNewAccount
A true or false value. If true, on-device assets will be deleted if the user logs out of the current TransForm account and logs into a different TransForm account. The TransForm account is the account to which the assets belong, not the user's login username.
Images, Data Encodings, and Web Services
If you want to embed images served from a third-party website or use web services with the TransForm Programming Language (TPL), you must define a white-list of allowed sites or encodings using path, data, or ajax prefixes. Prefixes can be used with HTML commands or TPL functions to embed images or fetch data from a web service. All prefixes are defined in the policy as a set of name-value pairs, *[json:"prefixName" : "fullPathPrefix"]. For example:
{
    "policy": {
        "pathprefixes" : {
            "examplePrefix" : "https://www.example.com/"
        }
    }
}
White-listing Images
By default, no images can be displayed from other sites in a TransForm form. The HTML command disallows displaying images from other sites unless the image's domain has been white-listed.
In order to white-list images, you must add a path prefix for the image's location to the on-device assets policy. Path prefixes can be added for domains or on-device assets. The full path to the image must be specified in the path prefix in one of the following formats:
- "http://.../"
A URL that begins with "http://" and ends with "/".
"http://www.myapp.com/images/"
- "https://..../"
A URL that begins with "https://" and ends with "/".
"https://www.allapps.org/"
- "#fileSystemFolder/"
A local file system folder as specified in the On-device Assets Manifest that begins with "#" followed by the folder name and ending with a "/".
"#images/"
For example:
{
    "policy": {
        "pathprefixes" : {
            "mysite" : "https://www.mysite.com/images/",
            "images" : "#products/"
        }
    }
}
In the definition above, two path prefixes have been specified: "mysite" and "images". The "mysite" prefix specifies a URL and "images" specifies a local directory, products, from the On-device Assets Manifest where files have been downloaded.
Path prefixes are used in the src attribute for an <img> tags in the HTML command as follows:
Image from a website: <img src="mysite.logo.png" /><br/>
Image from On-device Assets: <img src="images.4529.jpg" />
The HTML command does not permit "/" characters in the src property. This means that the path prefix must specify the full path to the image's location. For example, let's assume we defined "mysite" as follows:
{
    "policy": {
        "pathprefixes" : {
            "mysite" : "https://www.mysite.com/"
        }
    }
}
If you wanted to display the "logo.png" image located inside the sub-directory at www.mysite.com, you may be tempted try this:
Image from a website: <img src="mysite.images/logo.png" /><br/>
This will not work because the "/" character is not permitted in the src property for the <img> tag in the HTML command. Therefore, the full path to the image must be defined in the path prefixes.
Adding a cloudpath Policy to display assets in the Web Filler
The TransForm Web Filler does not support downloading and storing on-device data. This includes local SQLite databases, files, and images downloaded to the device. While assets cannot be downloaded in the Web Filler, some assets can be hosted on third-party sites and used the Web Filler.
The cloudpath policy enables support for canned images and other assets. In the mobile filler, assets are downloaded and stored in the local filesystem. The Web Filler does not have this capability. Assets, such as images, used in forms in the Web Filler must be hosted on an external server. The cloudpath policy defines the URL where those assets are hosted.
To add a cloudpath policy, add the following JSON to the policy object in the On-device Data Policy:
{
    "policy": {
        "cloudpath": "some url"
    }
}
For example:
{
    "policy": {
        "cloudpath": "https://www.example.com/myImages/"
    }
}
When the form is used in the Web Filler, the cloudpath URL is used to resolve pathprefixes defined as a file system folder in the mobile filler. For example,
{
    "policy": {
        "pathprefixes" : {
            "mysite" : "https://www.mysite.com/images/",
            "images" : "#products/"
        }
    }
}
On the mobile filler, "#products/" resolves to a folder on the local file system. In the web filler, however, "#products/" resolves to "https://www.example.com/myImages/products/" using the cloudpath policy in the previous example.
You can only specify one cloudpath URL, so all assets used in your form must be stored at the same location. The server hosting the assets must also support CORS for canned images and be publicly accessible from the TransForm web filler.
Data URLs
Data URLs in HTML allow you to embed content directly into a web page, rather than referencing an image file. Data URLs are frequently used to embed image content directly into a web page. Data URLs can be used with the HTML command to embed images into your TransForm apps, however you must first white-list them by adding a data prefix for each data URL type you wish to use.
For example, in a traditional web page, you would embed a base64 encoded PNG image as follows:
<img src="data:image/png;base64,iVBORw0KGgoAAAANSUhEUgAAAAUAAAAFCAYAAACNbyblAAAAHElEQVQI12P4//8/w38GIAXDIBKE0DHxgljNBAAO9TXL0Y4OHwAAAABJRU5ErkJggg==" />
This produces an image of a red dot:

To embed this image in your form type, you must first declare a data prefix for the encoding:
{
    "policy": {
        "dataprefixes" : {
            "datapng":"data:image/png;base64,"
        }
    }
}
The data prefix can then be used in an HTML command to embed the image. The data prefix is specified before the base64 encoded data as "prefixName.":
<img src="datapng.iVBORw0KGgoAAAANSUhEUgAAAAUAAAAFCAYAAACNbyblAAAAHElEQVQI12P4//8/w38GIAXDIBKE0DHxgljNBAAO9TXL0Y4OHwAAAABJRU5ErkJggg==" />
Web Services
The TransForm Programming Language (TPL) can be used to integrate web services into any form using the ajaxGET() or ajaxSendRequest() TPL methods. By default, TPL permits full access to any URL. If you wanted to ensure that Form Designers could only build out forms that connected to specific sites, you need to define ajax prefixes for your TransForm account.
An ajax prefix specifies the URLs that can be accessed by your TransForm forms. By default, all URLs are white-listed:
{
    "policy": {
        "ajaxprefixes" : {
            "*":"*"
        }
    }
}
You can lock down your applications by explicitly specifying the URLs that can be accessed. For example:
{
    "policy": {
        "ajaxprefixes" : {
            "mySite" : "https://www.mysite.com/",
            "staticMap" : "https://maps.googleapis.com/maps/api/staticmap?key=YOUR_API_KEY&",
            "currentWeather" : "https://api.openweathermap.org/data/2.5/weather?appid=YOUR_API_KEY&"
        }
    }
}
The above definition defines three ajax prefixes: "mySite", "staticMap", and "weatherAPI". "mySite" permits access to anything under the www.mysite.com domain. "staticMap" and "currentWeather", however, only allow access to the Google Static Maps API and OpenWeatherMap's current weather data API.
The ajax prefix is used in lieu of the website URL. For example:
*ON button_getWeather
    lat_lon = "lat=" & #latitude & "&lon=" & #longitude
    weather = ajaxGET("currentWeather." & lat_lon)
ENDON
Note that the "*":"*" was not specified in the ajax prefixes definition. "*":"*" allows access to any URL. If you wanted to continue to allow access in TPL to any URL, you must include "*":"*" in the ajax prefixes definition.
Ajax prefixes are useful not only to lock down your account, but to also simplify URLs. For example, if no prefix was defined for OpenWeatherMap's current weather API, TPL programmers would have to manually type in the URL every time they wanted to use the API. This can increase the risk of errors introduced through accidental typos. It also allows you to define API keys in one place, making it easy to update them later.
Searching and Filtering Forms and Form Types
Searching and filtering forms in the TransForm app can be customized for each TransForm account.
Customizing Search
By default, search in the TransForm app only searches the form name for the keyword. You can customize search for your TransForm account to include additional fields, including system fields (form status, has errors, date) and specific fields in a Form Type.
The default search specification is shown below.
{
    "policy": {
        "searchspec" : [
            { "field" : "*formname" }
        ]
    }
}
The search specification is an array of fields and Form Types to search. The above search definition defines a field search on *formname, a system filed that contains the form's name as defined in the Form Type definition. An optional formid property can be specified that defines the Form Types to search. For example:
{
    "policy": {
        "searchspec" : [
            { "field" : "#address", "formid" : "eqInspection,solarInstall,medical" }
        ]
    }
}
Using the above searchspec definition, the TransForm app will search the address field in the forms with a form id of "eqInspection", "solarInstall", or "medical". Forms with any other id will not be included in the search, even if they contain an address field.
You can use * to specify the search applies to all form ids that start with a specific string of characters. For example:
{
    "policy": {
        "searchspec" : [
            { "field" : "#azimuth", "formid" : "solar*" }
        ]
    }
}
The above search specification will search the azimuth field in all forms with a form id that begins with "solar".
Filters for Forms and Form Types
In addition to searching forms, you can also filter forms in the Forms list. When filtering forms, a form only matches if it meets all of the specified criteria.
The form filter options are defined by the filter specification. For each filter, you must define a filter id, a title shown in the filter options list that describes the filter, the user roles that have permission to use the filter, the filter type, whether or not the filter should be enabled by default, the operation as well as any filter choices that are required. The settings for defining a filter specification are described in the filterspec and filterdefspec Settings Reference.
If no filterspec is defined, a default set of filter options will be created for you that allow you to filter on forms that are unsaved, forms that contain errors, forms that have required fields that are missing (blank), and the form type. The default filterspec is shown below.
{
    "policy": {
        "filterspec" : [
            {
                "id" : "unsavedonly",
                "title" : "Unsaved forms",
                "roles" : "user",
                "type" : "hasValue",
                "field" : "*unsaved",
                "enabled" : false
            },
            {
                "id" : "haserrors",
                "title" : "Has errors",
                "roles" : "user",
                "type" : "hasValue",
                "field" : "haserrors",
                "enabled" : false
            },
            {
                "id" : "missingrequired",
                "title" : "Required fields are missing",
                "roles" : "user",
                "type" : "hasValue",
                "field" : "missingrequired",
                "enabled" : false
            },
            {
                "id" : "formname",
                "title" : "Form Type (current forms only)",
                "roles" : "user",
                "type" : "currentValues",
                "field" : "*formname",
                "enabled" : false,
                "op" : "matchText"
            }
        ]
    }
}
Filtering can also be done on Form Types list by defining a filterdefspec. The default form type filter definition, shown below, lets you filter the form types list by form type name. The properties for defining a filterdefspec are the same as the filterspec.
{
    "policy": {
        "filterdefsspec" : [
            {
                "id" : "formid",
                "title" : "Form Type ID",
                "roles" : "user",
                "type" : "valueList",
                "field" : "formid",
                "enabled" : false,
                "op" : "matchText",
                "list" : [
                    {"value": "d*", "text": "Form ID starts with 'd'"},
                    {"value": "eqInspection", "text": "Equipment Inspection"}
                ]
            }
        ]
    }
}
filterdef and filterdefspec Settings Reference
- id
A unique identifier for the filter definition.
- title
The label for the checkbox for the filter in the filter screen.
- roles
The user role ids that are allowed to access the filter. Can be any user role defined in the Permissions settings for your TransForm Account (the Role ID property). Multiple roles are defined as a comma-delimited list. For example,
"roles":"user,FormDesigner,AccountAdmin"
- type
Defines how the filter is applied. Can be one of the following values:
- hasValue
The field contains a non-null (i.e. non-blank) value.
- hasNoValue
The field contains no value (i.e. blank).
- valueList
The filter is based on a set of defined values. Filter values used are specified in the list setting.
- currentValue
The filter is based on current values in the field. The user will be presented with a list of choices in the filter dialog.
- date
The field's value is compared to a date. The date compared to the value is specified in op.
- field
The field the filter is applied to. The field can be a field in the form or a system field:
- *unsaved
The form's saved state. Contains a value if the form contains unsaved edits (changes that have not been uploaded to TransForm Central).
- missingrequired
Contains a value if the form contains any fields that require a value and are blank.
- *formname
The form name.
- formid
The form type id.
- user1, user2, user3, user4, user5
User defined fields.
- userlabel1, userlabel2, userlabel3, userlabel4, userlabel5
Fields that contain the label (i.e. field title) for the corresponding user1 through user5 fields.
- duedate
The form's due date in the format YYYY-MM-DD.
- #fieldname
The name of a field in the form. Replace fieldname with the Field's name as defined in the form type definition.
- enabled
A true or false value. Sets the initial state of the filter option. If true, the filter option will be enabled by default. If false, it will be disabled.
- op
If the type is set to currentValue, op defines how to compare the value to the field. Can be one of the following:
- matchText
The filter value matches the text in the field exactly.
- containsText
The filter value is contained in the field.
In addition to the options listed above, the following options are available for doing date comparisons. Date comparisons are supported for the duedate field and any form field that stores the date using the format YYYY-MM-DD.
- pastDue
The value in the date field occurs before the current date.
- due
The value in the date field occurs before the current date or is the current date.
- today
The value in the date field is the current date.
- nowOn
The value in the date field is the current date or is after the current date.
- future
The value in the date field occurs after the current date.
- last7
The value in the date field is within the last seven days, including the current date.
- next7
The value in the date field is within the next seven days, including the current date.
- list
One or more values used to compare the field's value if the filter type is set to valueList. Each entry in list contains the value to filter on (i.e. value) and a description of the filter's action (i.e. text) that is shown in the TransForm app. For example:
"list" : [
    {"value": "d*", "text": "Form ID starts with 'd'"},
    {"value": "eqInspection", "text": "Equipment Inspection"}
]
If the value ends with an asterisk *, the filter will do a "starts with" comparison (instead of an "equals" comparison) when comparing the value in the field to the value defined in the list.
If op is set to containsText, the * is treated as part of the search value.
Custom Sorting and Grouping
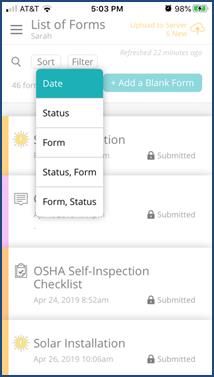
Form sorting in the TransForm app can now be customized for your TransForm Account. The Sort menu in the TransForm app includes several additional options for sorting and grouping forms: "Date", "Status", "Form", "Status,Form", and "Form,Status".
Sorting options can be customized by defining a grouping specification in the On-device Assets Policy for your TransForm Account. The default grouping specification is shown below:
{
    "policy": {
        "groupingInfo": [
            {
                "sortid": "none",
                "text": "Date",
                "levels": 0,
                "fields": []
            },
            {
                "sortid": "status",
                "text": "Status",
                "levels": 1,
                "fields": [
                    {
                        "field": "*statusname",
                        "text": "Status",
                        "ascending": true
                    }
                ]
            },
            {
                "sortid": "form",
                "text": "Form",
                "levels": 1,
                "fields": [
                    {
                        "field": "*formname",
                        "text": "Form",
                        "ascending": true
                    }
                ]
            },
            {
                "sortid": "statusform",
                "text": "Status, Form",
                "levels": 2,
                "fields": [
                    {
                        "field": "*statusname",
                        "text": "Status",
                        "ascending": true
                    },
                    {
                        "field": "*formname",
                        "text": "Form",
                        "ascending": true
                    }
                ]
            },
            {
                "sortid": "formstatus",
                "text": "Form, Status",
                "levels": 2,
                "fields": [
                    {
                        "field": "*formname",
                        "text": "Form",
                        "ascending": true
                    },
                    {
                        "field": "*statusname",
                        "text": "Status",
                        "ascending": true
                    }
                ]
            }
        ]
    }
}
The grouping specification is an array of one or more sort definitions that define the sortid, the text shown for the Sort menu in the TransForm app, how many levels data is sorted, and the fields to sort on. The sort definitions can also include an optional icon which is shown in the Sort menu next to the text.
groupingInfo Settings Reference
- Setting
- Description
- sortid
REQUIRED, string, The sort id. The id must be unique within your TransForm Account. Set to "none" to use as the default sort.
- text
REQUIRED, string, The text shown in the TransForm app sort menu.
- levels
REQUIRED, number, The number of grouping levels. If levels is 0, forms are not grouped but are sorted using the rules defined in fields.
- icon
Optional, string, An icon shown next to the text in the TransForm app Sort menu. Can be "up" or "down".
For example:
"icon":"down"
- fields
REQUIRED, object array, An array of zero or more objects that defines how the forms are sorted. If fields is empty, the forms are sorted by Date Created in ascending order. See the default grouping specification above for an example.
Each object in the array must define the following settings:
- field
REQUIRED, string, The form field to sort. This can be a field in the form, a special form field, or a system field.
- text
REQUIRED, The label shown next to the group field value.
- ascending
REQUIRED, boolean, A true or false value. If true, forms will be sorted by the defined field in ascending order. If false, forms will be sorted in descending order.
For example:
"ascending":false
- options
Optional, object, Contains details about how to treat the sort value and how to display the sort value in the Group. The object can define the following settings:
- first
Optional, number, The number of characters from the sort field to use in the sort comparison.
- format
Optional, string, The format for the sort field data. The format can be one of the following values:
- "date" - Formats sort field value as a date. Uses the format "Mon d, yyyy"
- "longdate" - Formats sort field value as a date. Uses the format "Mon d, yyyy"
- "shortdate" - Formats sort field value as a date. Uses an abbreviated format.
- "first" - Displays the first X characters of the sort field value where X is the value of options.first.
Customizing Filler Tabs
Portions of the TransForm filler app can be optionally hidden using listheaderoptions. For example, the Add a Blank Form button can be hidden:
"listheaderoptions": {"hideAddForm":true}The listheaderoptions specification is added to the policy in the On-device Assets Policy:
{
    "policy" : {
        "listheaderoptions" : { ... }
    }
}
listheaderoptions Settings Reference
- hideAddForm
Defines whether or not the Add a Blank Form button should be hidden. If true, the Add a Blank Form button will not be shown unless the user is a member of a role with the ID "addform". See Permission Roles for more info.
Queues
When a new form is added in the TransForm app, the form is automatically assigned to the user who created it. If a form is created using the Management Console or TransForm API, however, the form can be assigned to a queue.
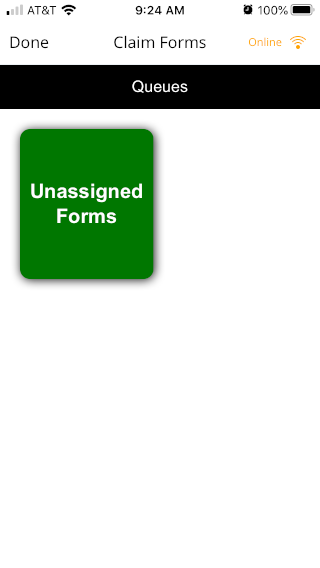
Forms assigned to a queue are listed in the Claim Forms section of the TransForm App.
Users can claim forms from a queue by tapping on the form, which assigns the form to the user.
Users must be logged in and online to claim forms.
Every TransForm account is configured with a basic "Unassigned Forms" queue. The default queue specification is shown below:
{
    "queues" : {
        "listOfQueues" : [
            {
                "queueID":"default",
                "name":"Unassigned Forms",
                "roles":"*",
                "template":"",
                "color":"#070"
            }
        ]
    }
}
The queue specification is an array of queues. Each queue has an id, name, the button color for the queue, a list of user roles that are allowed to access the queue, and optional form heading template. The default queue specification shown above defines one queue named "Unassigned Forms" with an id of "default", a button color of "#070" (green), and allows anyone to access to the queue ("roles":"*").
Access to a queue can be restricted by explicitly listing the user roles allowed to access the queue. For example:
{
    "queues" : {
        "listOfQueues" : [
            {
                "queueID":"default",
                "name":"Unassigned Forms",
                "roles":"supervisor,AccountAdmin",
                "template":"",
                "color":"#070"
            }
        ]
    }
}
You can also define a form heading template. The template, if defined, overrides the default heading template for a form.
The queue settings are defined in the On-device Assets Policy at the root level. In other words, queue is a sibling to the policy settings:
{
    "policy" : { /* policy settings */ },
    "queue" : { /* queue settings */}
}
listOfQueues Settings Reference
- queueID
A unique string that identifies the queue. For example, "default" or "queue1".
- name
The queue name. The name is the name shown in Claim Forms in the TransForm app.
- roles
A comma-delimited list of user role ids that have permission to access the queue. A value of * means all users have access. Role ids are listed on the Permissions tab in TransForm Central.
- template
An optional template used in the form listing. template overrides the heading template defined for a form. See TPL Templating for more information on how to define a template.
- color
The background color shown for the queue on the Claim Forms screen.
If you change the queue specification for your TransForm account, users may need to log out of the TransForm App to update the queues listed in Claim Forms.
Appendix
Sample Policy
{
    "policy": {
        "download": {
            "onDemand": {
                "checkprompt": false,
                "confirmprompt": false,
                "successprompt": true
            },
            "onLogin": {
                "checkprompt": false,
                "confirmprompt": false,
                "successprompt": true
            }
        },
        "delete": {
            "onDemand": true,
            "onLogout": false,
            "onNewAccount": true
        },
        "pathprefixes": {
            "media": "http://alphamediacapture.s3.amazonaws.com/transform/",
            "images": "#images/"
        },
        "cloudpath":"",
        "dataprefixes": {
            "datapng": "data:image/png;base64,",
            "datajpg": "data:image/jpg;base64,"
        },
        "ajaxprefixes": {
            "*": "*"
        },
        "searchspec": [
            {
                "field": "*formname"
            }
        ],
        "filterspec": [
            {
                "id": "unsavedonly",
                "title": "Unsaved forms",
                "roles": "user",
                "type": "hasValue",
                "field": "*unsaved",
                "enabled": false
            },
            {
                "id": "haserrors",
                "title": "Has errors",
                "roles": "user",
                "type": "hasValue",
                "field": "haserrors",
                "enabled": false
            },
            {
                "id": "missingrequired",
                "title": "Required fields are missing",
                "roles": "user",
                "type": "hasValue",
                "field": "missingrequired",
                "enabled": false
            },
            {
                "id": "formname",
                "title": "Form Type (current forms only)",
                "roles": "user",
                "type": "currentValues",
                "field": "*formname",
                "enabled": false,
                "op": "matchText"
            }
        ],
        "filterdefsspec": [
            {
                "id": "formname",
                "title": "Form Types",
                "roles": "user",
                "type": "currentValues",
                "field": "*formname",
                "enabled": false,
                "op": "matchText"
            }
        ],
        "groupingInfo": [
            {
                "sortid": "none",
                "text": "Date",
                "levels": 0,
                "fields": []
            },
            {
                "sortid": "status",
                "text": "Status",
                "levels": 1,
                "fields": [
                    {
                        "field": "*statusname",
                        "text": "Status",
                        "ascending": true
                    }
                ]
            },
            {
                "sortid": "form",
                "text": "Form",
                "levels": 1,
                "fields": [
                    {
                        "field": "*formname",
                        "text": "Form",
                        "ascending": true
                    }
                ]
            },
            {
                "sortid": "statusform",
                "text": "Status, Form",
                "levels": 2,
                "fields": [
                    {
                        "field": "*statusname",
                        "text": "Status",
                        "ascending": true
                    },
                    {
                        "field": "*formname",
                        "text": "Form",
                        "ascending": true
                    }
                ]
            },
            {
                "sortid": "formstatus",
                "text": "Form, Status",
                "levels": 2,
                "fields": [
                    {
                        "field": "*formname",
                        "text": "Form",
                        "ascending": true
                    },
                    {
                        "field": "*statusname",
                        "text": "Status",
                        "ascending": true
                    }
                ]
            }
        ]
    },
    "queues": {
        "listOfQueues": [
            {
                "queueID": "default",
                "name": "Unassigned Forms",
                "roles": "*",
                "template": "",
                "color": "#070"
            }
        ]
    }
}
Videos
Webinar: Loading OnDevice Assets using an Amazon S3 Bucket and Alpha Anywhere
TransForm Tuesdays Webinar from 2021 Jan 19 - Dave McCormick shares a presentation about Loading OnDevice Assets using an Amazon S3 Bucket and the Alpha Anywhere Tool: OnDevice Data Builder for TransForm.
Webinar: OnDevice Assets Part 2, Canned Images, and OnDevice Policies
TransForm Tuesday Webinar from 2021 Jan 26 - OnDevice Assets part 2, Canned Images, and OnDevice Policies. In this episode, Dave and Sarah discuss part 2 about OnDevice Assets. Dave explains the process for setting onDevice policy and using the Canned Images feature in Alpha TransForm.
Webinar: TPL Part 6: Local Database Access with SQLite
TransForm Tuesday for 2021 Apr 20 - Dave and Sarah teach us how to connect and store data with a SQLite database on your handheld device.