Using Forms
- Working With Forms
- Using the Form Editor
- Using the Form Design Toolbar
- Editing the Default Form
- Aligning Objects
- Left
- Right
- Top
- Bottom
- Center width
- Center height
- Width
- Height
- Size
- Horizontal
- Vertical
- Creating Form Objects
- Selection tool
- Horizontal Shift tool
- Vertical Shift tool
- Text object
- Type-In Field
- Radio Button
- Check Box
- Combo Box
- List Box
- Tree Control
- Record List-List Box
- Drop-Down Tree object
- Record-List Edit Combo Box
- Two-State Push Button
- Multi-State Push Button
- Button
- Rich Text object
- Browse
- Sub-Form
- Bitmap object
- OLE object
- Frame object
- Line object
- Page Break
- Conditional object
- Tabbed object
- Hotspot object
- User Control
- Active X Control
- Creating a New Form
- Blank
- Default Form
- Custom Form
- Summary
Description
Forms provides a detailed, one-record-at-a-time view of data in a table or set, and are most commonly used for data entry. Forms also make it easy to enter and modify data stored in multiple tables in a database. In this lesson, you learn how to create and use basic Forms.
Working With Forms
In addition to the Default Browse for entering data, Alpha Anywhere also provides a Default Form that you can use for data entry. Working in Form view is like working in browse view; you can perform the same operations, including entering, editing, deleting, and sorting records. The toolbars are very similar and the menus offer most of the same features. In form view, you can use the same navigation options to display and navigate records, that you use in Browse view.
Using the Form Editor
In the first procedure, you examine a Default Form in AlphaSports and modify it using the Form Editor. Using the Form Editor, you can insert fields, display calculations, and add graphics and other design elements. To open an AlphaSports Default Form :
Open the AlphaSports database.
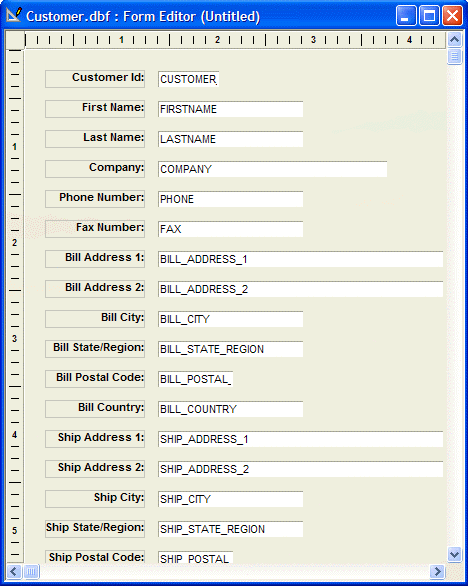
In the Control Panel, right-click on the Customer table, and select Open Default Form from the right-click menu. The Customer table Default Form appears.
The Default Form displays the field values of one record, with each field on a separate line.
Press F8 to switch between form view and browse view.

Click the following or select Form > Design Mode.

The Customer Default Form appears in the Form Editor.
The Form Editor displays the Form fields and field names arranged in a vertical layout.
In addition to the Form Editor, the Toolbox appears. If the rulers are not present, select View > Rulers to display them.
To aid in form design, select Form > Grid. The Grid dialog box appears.
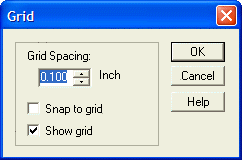
Select Show Grid, and click OK.
Using the Form Design Toolbar
The Form Design toolbar contains commands and options that let you create and modify the structure and appearance of a form.

The following table describes the functions of the Form Design toolbar buttons.
Display table records in Form view.

Create a new Form.

Open an existing Form.

Save the Form layout.

Print Form data.

Preview Form data.

Define print settings; for example, printer, # of copies, and page orientation.

Remove the selected information (cut) and copies it to the clipboard.

Copy the selected information to the clipboard.

Insert (paste) clipboard contents at the cursor position.

Delete the selected object(s).

Undo an action.

Redo an action.

Define Form or object properties.

Define Form or object events.

Display rulers.

Display Toolbox floating toolbar.

Display DragDrop List window for inserting objects on the Form.

Toggle Text Toolbar on and off.

Toggle Border Toolbar on and off.

Toggle Arrange Toolbar on and off.

Toggle Copy Format Toolbar on and off.

Group selected objects together as a single unit.

Un-group selected object(s).

Create or modify calculated fields.
Create or modify variables.

Display the Control Panel.

In the following procedures, you learn to move, edit, delete, resize, format, and add Form objects.
Editing the Default Form
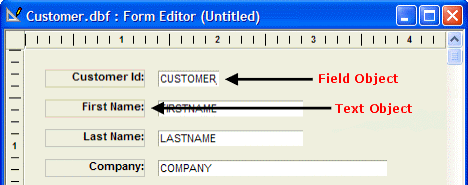
To edit a form object, you must first select it by clicking on it. When you select an object, selection handles appear, small black boxes in each corner and one at the center of each side. You can select more than one object by using one of the following procedures.
Holding down the Shift key while clicking the objects.
Holding down the left mouse button and dragging to draw a rectangle (lasso) through or around the objects.
Select all objects on the form, by selecting Edit > Select All, or pressing Ctrl+A.
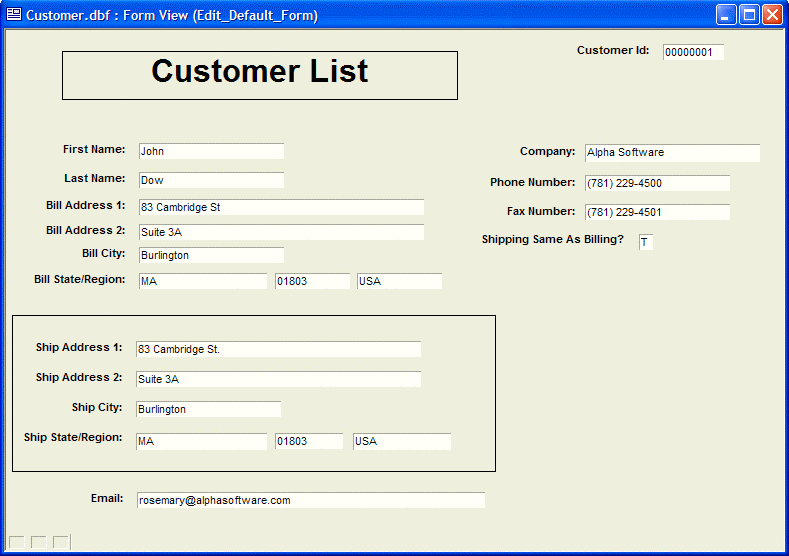
To edit the Customer Default Form :
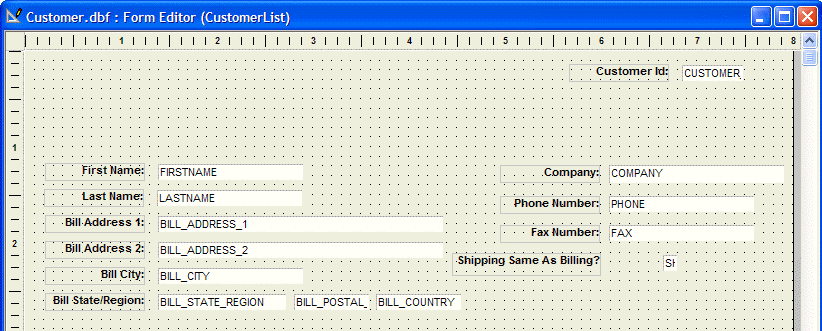
Open the form, and click the button on the toolbar. The Customer Default Form appears in the Form Editor. In modifying the Default Form, you arrange the form fields into two columns. In the next steps, you resize the form to accommodate both columns.
Position your cursor over the right edge of the Form Editor window. The cursor becomes a two-headed, horizontal arrow.
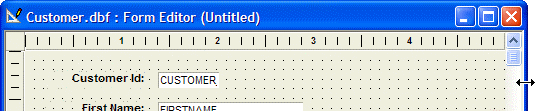
Click and drag the right edge of the window to the right, past the eight inch mark on the ruler.
Position your cursor over the right edge of the form.
Click and drag the right edge of the form to about eight inches, to widen the form.
Click on the Customer ID field. If the objects are grouped, selection handles appear around the Customer ID field and title.

Note that when the fields are grouped, and you click a second time on one of the fields, black selection handles appear around the object you clicked, and grey selection handles appear around the other object or objects.

You have selected an individual object within the group. You can then right-click on the individual object, and examine its properties and events. This is called drilling down within a group. If you right-click on a group of objects, you can only examine the properties common to the group. If you ungroup and then select both label and field, black selection handles appear separately around each object.

You can specify the following Alpha Anywhere setting to group fields and titles, however, this setting has no effect on the current form.
Select View > Settings.
Expand the System settings, and click Styles.
Select Forms under Layout Type, and select Automatically Group Fields & Titles.
Click OK. Use the Shift key to group the fields and titles that you reposition in the following steps.
Click on the grouped Customer ID field and title text, and drag them to the upper right corner of the form.
To move a field in small increments, press the Shift key and use the Up and Down arrows.
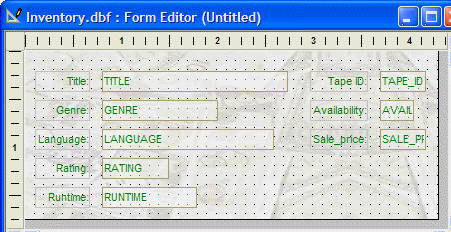
Using the following screen shot as a guide, select the fields and move them to new locations.
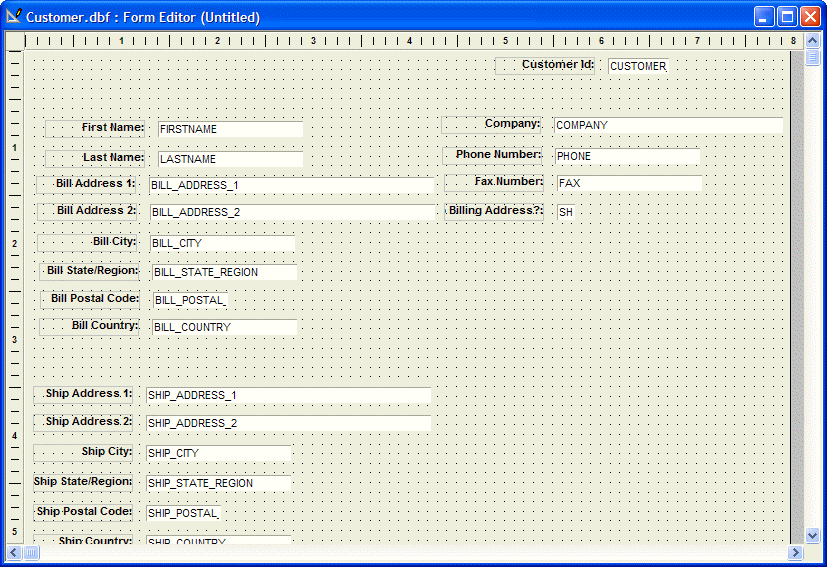
Select Edit > Select All, and click Arrange > Ungroup (or on the toolbar). The field and label title objects appear selected separately.
Delete the field title objects for Bill Postal Code and Bill Country, by selecting them, and pressing the Delete key.
Place the data fields next to the Bill State/Region field.
Repeat steps 9 and 10 for the Shipping Postal Code and Country. Leave space near the top of the form for a title, and in between the billing address group of fields and the shipping address group. In the next steps, you edit and resize a text label object.
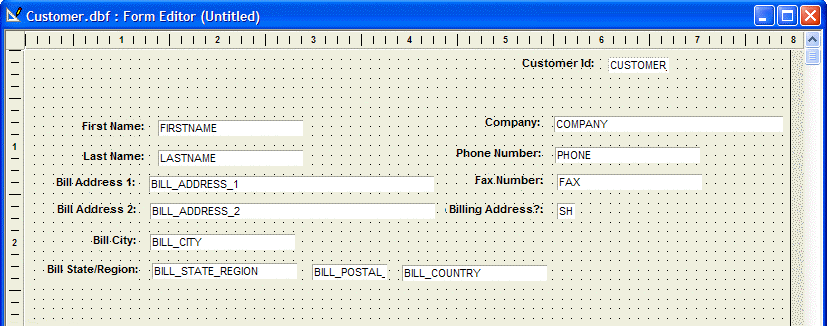
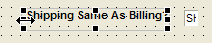
Double-click on the Billing Address? text field. The text becomes highlighted and editable. You can also make text changes by right-clicking on the text object, and selecting Properties from the right-click menu.
Enter "Shipping Same as Billing?". In the next step, you enlarge the text field to accommodate the new label text.
Select the Shipping Same as Billing label field. Selection handles appear around the object.
Position the cursor over the left-side selection handle. The cursor becomes a two-headed, horizontal arrow.
Click and drag to the left, to enlarge the text field.
Click Save, enter the name "CustomerList", and click OK.
In the next sections, you use other Design toolbar options to align, format, and add a new object to the Form.
Aligning Objects
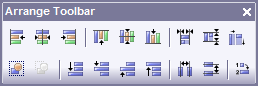
The Align Positions, Align Sizes, and Align Spaces commands, also found in the Arrange menu, let you align multiple objects' positions, sizes, and spaces. You access the Arrange Toolbar by clicking the Toggle Arrange Toolbar button . The Arrange Toolbar appears below.
The Align Positions command has the following options. When two or more objects are aligned, the first selected object stays put, and the others move into alignment with it.
Left
Align selected objects to the left edge of the first selected object.

Right
Align selected objects to the right edge of the first selected object.

Top
Align selected objects to the top edge of the first selected object.

Bottom
Align selected objects to the bottom edge of the first selected object.

Center width
Move selected object horizontally, so they are centered using the first selected object as the point of reference.

Center height
Move selected object vertically, so they are centered using the first selected object as the point of reference.

The Align Sizes command has the following options. When you size two or more objects, the first selected object stays the same, while the rest change.
Width
Resize objects so they are as wide as the first selected object.

Height
Resize objects so they are the same height as the first selected object.

Size
Resize objects so they are the same size as the first selected object.

The Align Spaces command has the following options. When you adjust spacing between objects, the spacing between the first two objects remains the same, while the others are moved.
Horizontal
Move objects horizontally, creating an equal amount of space between them, left to right.

Vertical
Move objects vertically, creating equal space between them, top to bottom.

To align form objects:
Open the AlphaSports database.
In the Control Panel, select the Forms tab.
Right-click the "CustomerList" form, and select Design from the right-click menu. The CustomerList form appears in the Design Editor.
Click the Toggle Arrange toolbar button. The Arrange Toolbar appears.
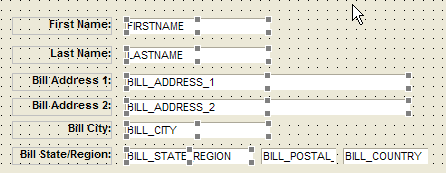
Hold down the Shift key and select the following label text fields: First Name, Last Name, Bill Address 1, Bill Address 2, Bill City, and Bill State/Region.
On the Arrange Toolbar, click the Right Align button . The selected label fields appear aligned by their right edges.
Select the corresponding field objects, and click the Left Align button . The selected label fields appear aligned by their left edges.
Similarly, right and left align the Company, Phone Number, Fax Number, and Shipping Same as Billing? label text fields and field objects.
In the next procedure, you add a title and border to the form.
Creating Form Objects
First, you use the Toolbox floating toolbar to create a title text object for the form, then you use the Text Toolbar to format its appearance. The Text Toolbar is a shortcut for some commonly used formatting options. To access all the options, right-click on the object, and select Properties. The Toolbox is a floating toolbar that contains buttons representing the objects you can place inside a form. You can also select Object > New to select and create an object for a form. To display the Toolbox :
Click the Toolbox button on the Toolbox, or select View > Toolbox.
The following image shows the Toolbox, which has the same functionality.
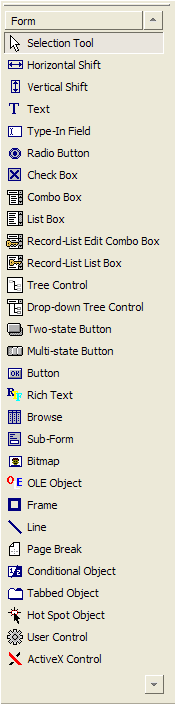
The following table lists the Toolbox tools and describes their function.
Selection tool
Select objects for sizing, moving, and editing.

Horizontal Shift tool
Move selected objects horizontally in the Form Editor window.

Vertical Shift tool
Move selected objects vertically in the Form Editor window.

Text object
Create a text object.

Type-In Field
Create a type-in (text) field object.

Radio Button
Create a radio button object.

Check Box
Create a check box object.

Combo Box
Create a drop-down list object, from which you can select from a list of values.

List Box
Create a list object, from which you can select from a list of values.

Tree Control
Create branched values, mimicking a directory structure.

Record List-List Box
Create a list box that is populated with data from a table or set.

Drop-Down Tree object
Create a drop-down tree list object.

Record-List Edit Combo Box
Create a drop-down record list object.

Two-State Push Button
Create a toggle button by which a yes/no value or an option can be selected.

Multi-State Push Button
Create a group of button objects from which one option can be selected.

Button
Create a command button object.

Rich Text object
Create a framed object that can display multi-line, formatted text, complete with word-wrap, and can contain field objects.

Browse
Insert a browse object on a form.

Sub-Form
Create a frame in which you can embed another Form in the current form.

Bitmap object
Create a frame that displays an image.

OLE object
Insert an OLE object, such as a worksheet or chart; integrated information that is processed in other applications.

Frame object
Create a frame object.

Line object
Create a line.

Page Break
Create a page break.

Conditional object
Create a frame in which you can conditionally hide and show groups of fields or objects.

Tabbed object
Create a tabbed object used to present several pages of information as a single set.

Hotspot object
Create a Hotspot object that executes a script when activated.

User Control
Create a User object.

Active X Control
Create an Active X object.

In the next procedure, you add a form title, in the top area of the CustomerList form, by adding and formatting a text object. To add a form title:
Open the CustomerList form in Design Mode. The CustomerList form appears in the Design Editor.
Click the Toolbox button, or select View > Toolbox. The Toolbox floating toolbar appears.
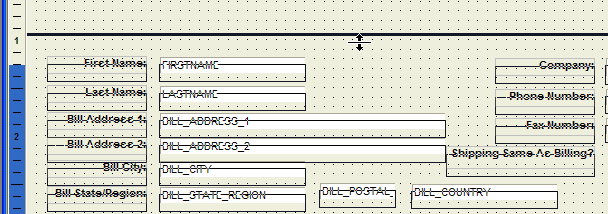
If you do not have space at the top of the CustomerList form, select the Vertical Shift tool.
The Horizontal Shift and Vertical Shift tools let you insert space in your layout by moving groups of objects horizontally or vertically.
Click above the First Name field in the form, and drag the fields downward.
The Vertical Shift tool selects and moves all the fields below the bar downward. The Vertical Shift tools select the fields in the direction of the first mouse movement. Nudge downward to select fields below the Vertical Shift tool bar, or upward to select fields above the bar. Once selected, you can move the fields in the opposite or same direction. Another way to select and reposition multiple fields at one time, is by using the rulers. When you left-click in the top or side ruler, a line appears on the form. The line selects and can move all the objects it touches. If you right-click in a ruler, you can use the right-click menu options to align the objects that the line touches.
Select the Text object tool from the Toolbox, and position the mouse pointer in the Form Editor window. The mouse pointer becomes a cross-hair connected to the letter A.
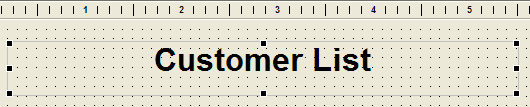
Draw a rectangle with the tool, to establish the location and dimensions of the text object. When you release the mouse button, the cursor is positioned inside the text object, where you can enter the title text.

Enter the text "Customer List" and click outside the text object frame.
Click the Selection tool on the Toolbox, and select the text object. Selection handles appear around the title text object.
Click the Text toolbar button to display the Text Toolbar.
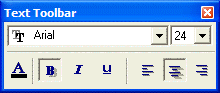
Set the font to "Arial", and font size to "24".
Click the B button to make the text bold.
Click the Align Center button.
Alternatively, you can right-click on a text object, and use the Properties dialog box to designate font, size, and style. You access more options by using the Properties dialog box.
Click the Border toolbar button to display the Border Toolbar.
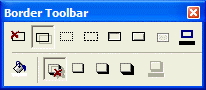
With the title text object selected, click the Single-line Border button. A border appears around the title text object.
From the Toolbox, select the Frame object.
Draw a rectangle around the shipping address fields. A frame appears.
Click Save.
Click the Form View button on the Design Toolbar to see the finished form.
You will enhance forms with other objects in later lessons. In the last exercise, you learn how to create a new Custom Form.
Creating a New Form
In the next procedure, you create a custom form for AlphaMovies using the New Form Genie.
To create a new form:
Open the AlphaMovies database.
In the Control Panel, click the Forms tab, and click New. The New Form Genie appears.
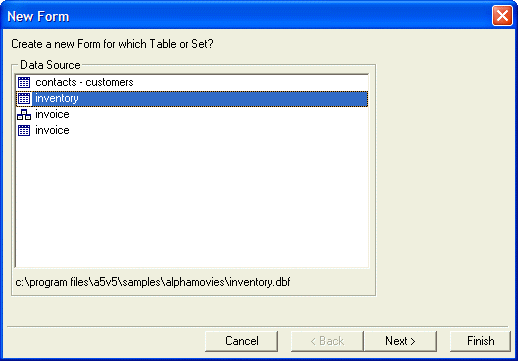
First, you select the table or set on which to base the Form.
Select the "Inventory" table, and click Next.
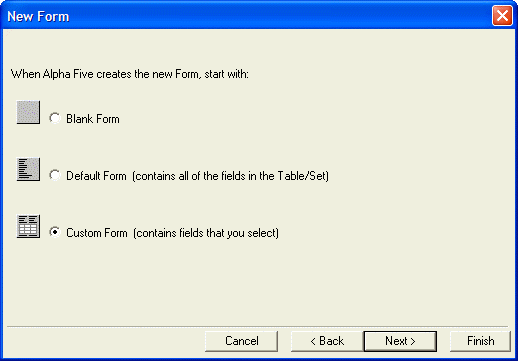
Next you select the form type to create. You can choose from three Form types, described in the following table.
Blank
A new form without any objects appears in the Form Editor.
Default Form
A new form with all table/set field objects appears in the Form Editor.
Custom Form
A new form appears in the Form Editor. This option lets you select the form layout style and field objects.
Select Custom Form and click Next.

In the Layout Style drop-down list box select "Multi-Column" and in Number of Columns select "2". Picture
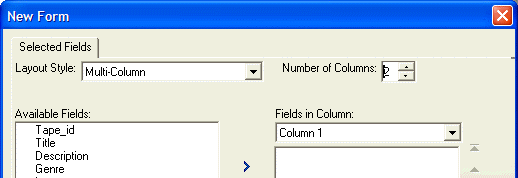
Now you can select the fields for each column. For "Column 1", select "Title", "Genre", "Language", "Rating", and "Runtime".

For "Column 2", select "TapeID", "Availability", and "Sale Price", and click Next.
You can select a style for the form from a list of predefined styles in the Stylesheet list. Preview the styles and select one you like.
Click Next, and then click Finish. Your custom form appears in the Form Editor.
Click the Save button, and enter the name "InventoryList".
You can click the Form View button to see the finished product, or further edit your form using the Form Editor.
Summary
In this lesson, you learned how to edit and create a basic Form. You worked with a Default Form, and learned how to move, edit, delete, resize, format, and add form objects. You learned how to use the Design toolbar, the Text, Border, Format, and Arrange toolbars, and the Toolbox floating toolbar, when working with form objects. You learned how to select, move, and align multiple form objects, and how to access object properties using the Properties dialog box. You created a new Custom Form. Using the New Form Genie, you selected fields, specified a layout, and applied a stylesheet.
See Also