Web Socket Server
- Simple Web Socket Server
- Scalable Web Socket Server (Redis Implementation)
- Picking an implementation
- Turning on Socket Support for a Web Application
- Relative Socket Port Assignment
- Changing Settings for the Web Socket Server Implementation
- Modifying Settings for Profiles.
- Installing Redis as a Service.
- Running under IIS
- Defining message types
- Other Message Configuration Options
- Comparison Between Patterns
- Queue Pattern
- Leaderboard Pattern
- Quick Start to Using WebSockets.
Description
The Web Socket Server allows you to build 'connected' application (like a message board) where all of the clients are permanently connected to the Web Socket Server. To enable the Web Socket Server you must turn it on in the Project Properties dialog (accessible from the Web Applications Control Panel). You must also enable Web Socket support in any UX or Grid component that will communicate with the Web Socket server.
Discussion
When Web Socket Support is enabled, Web Applications are capable of broadcasting JSON packets between the active users in an application, which means that in addition to implementing features like message boards, applications that once required polling to check for updates can be notified when a change occurs. This can reduce traffic to the application server.
The Web Socket Implementation supports the concept of Message Queues - this is important for applications like message boards, where a new user joining a discussion needs to receive the most recent postings to the message board.
Simple Web Socket Server
The simplest supported Web Socket Server implementation (when using the stand-alone Application server -- not the IIS plugin) uses a single Node.js process to handle broadcast of messages between all open connections. All the memory of queue contents, and all the broadcasting of messages is handled by a single instance of Node.js.

Scalable Web Socket Server (Redis Implementation)
When Redis is used for the Web Socket Server implementation (with the stand-alone Application Server), the broadcasting of messages, as well as queue memory, are offloaded to Redis. The Node.js process only manages the connections for the instance of Alpha Anywhere, which allows for multiple instances backed by a single Redis instance.

Picking an implementation
If less overhead is required, and requirements are met by a single instance of the Alpha Anywhere server, the Simple Web Socket Server Implemention is adequate.
If it is important that queues retain state when the server is restarted, or a load balancer is being used, which requires multiple instances of the Alpha Anywhere Application Web Server, the Redis implementation provides the ability to scale, and provides persistence of state information.
Turning on Socket Support for a Web Application
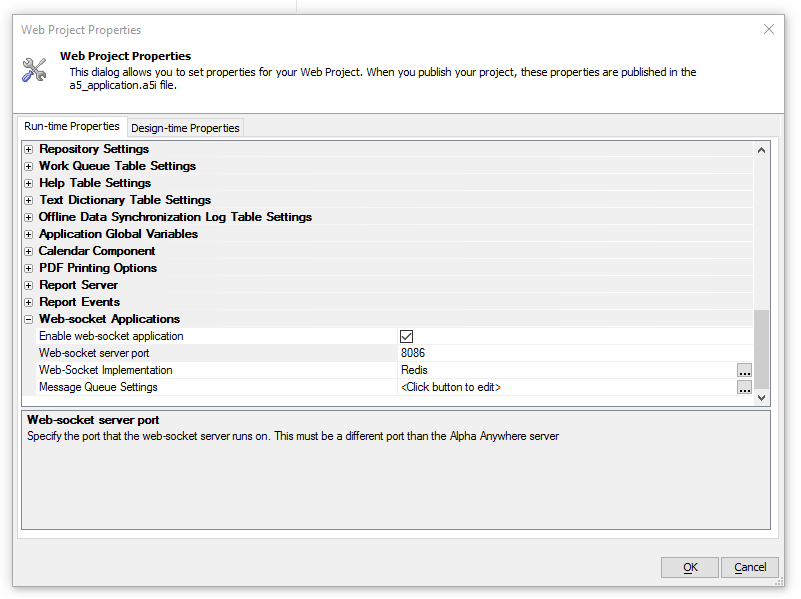
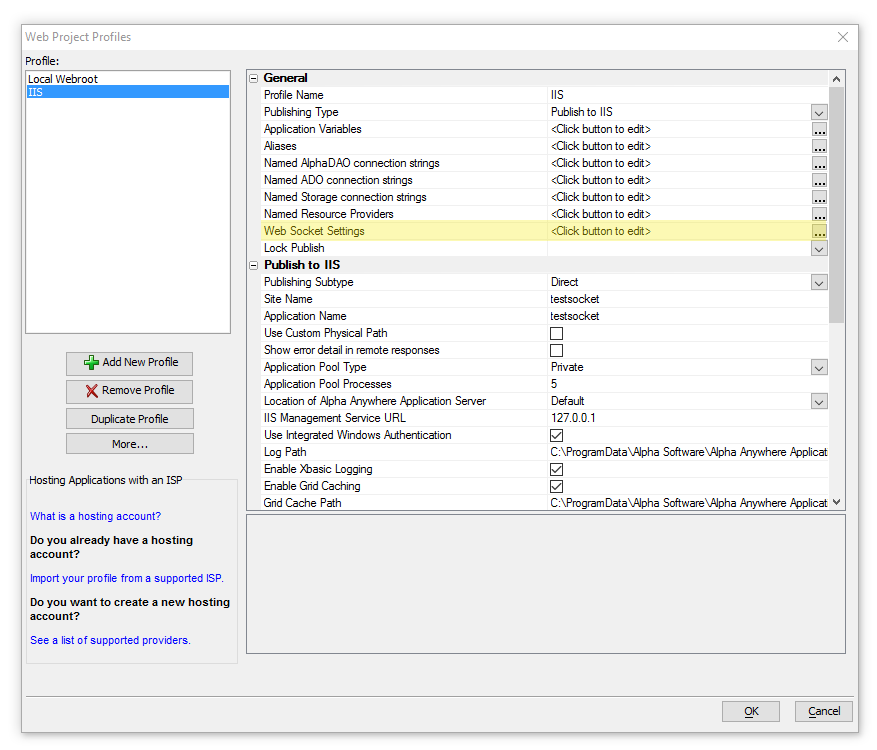
The Web Socket support is enabled by going to the Web Project Properties dialog and selecting 'Enable' in the Web Socket Settings section toward the bottom of the property grid control.
Relative Socket Port Assignment
If the port includes a leading '+' or '-' , the Web Socket Port will be the servers port plus or minus the value that follows.
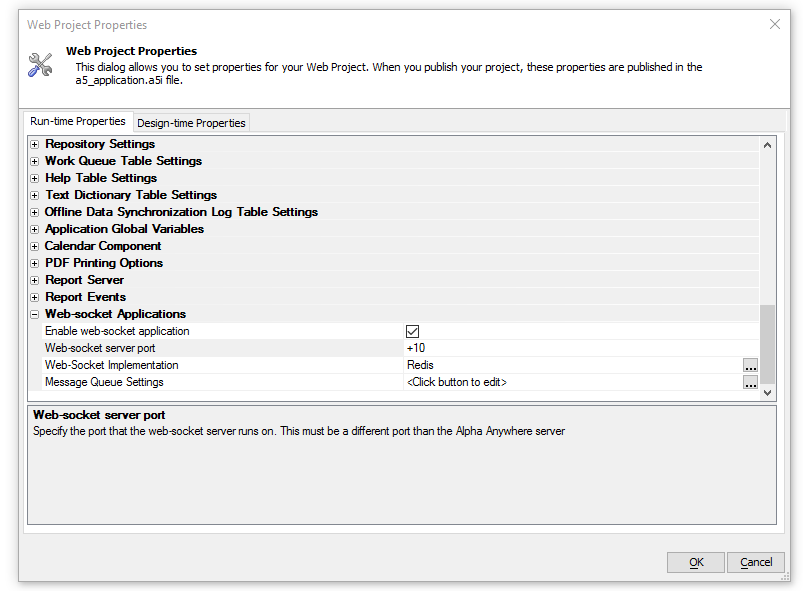
Relative ports allow for multi-core machines that include multiple installations of Alpha Anywhere to have uniquely assigned ports for each Web Socket Server. For example, if your machine has installations that use ports 8000, 8001, and 8002, and use use +10 as your relative web socket port, the web socket server for the web server running on port 8000, will be 8010, for the web server running on port 8001, the websocket port assigned will be 8011, and for port 8002, the web socket port will be 8012.
Changing Settings for the Web Socket Server Implementation
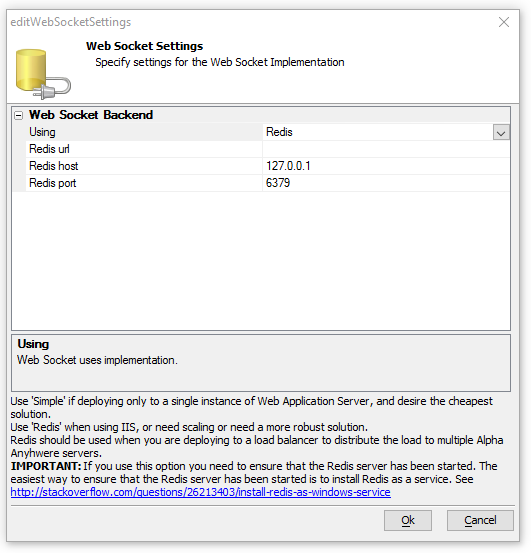
This is the dialog you get to pick the implementation to use. If you choose 'redis', extra options become available to specify where the Redis Server is located (if ommitted, localhost is assumed).
Modifying Settings for Profiles.
When publishing to IIS, you need to go to this and set 'Redis', because IIS requires this. At a future date, other options will be available, but for the initial release, IIS implementation requires Redis.
Installing Redis as a Service.
The redis server is redistributed with Alpha Anywhere, and can be installed as a Windows service by going to the command line window , and typing the following:
c:\program files (x86)\a5v12\>redis-server --service-install --loglevel verbose
After installing the redis service, go to windows services and make sure that redis server (a service called Redis) has started.
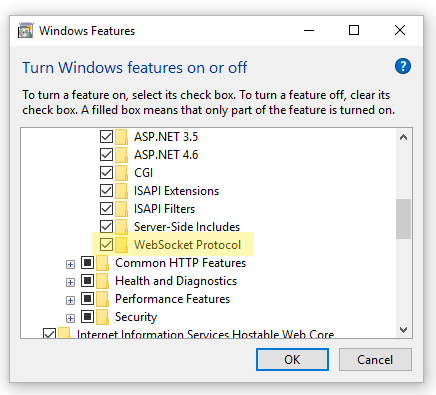
Running under IIS
Out of the box, IIS supports Web Sockets, but the feature might not be enabled. To ensure that Web Sockets work under IIS, go to 'Windows Features and Settings' dialog and make sure that the Web Sockets Feature is Enabled.
Defining message types
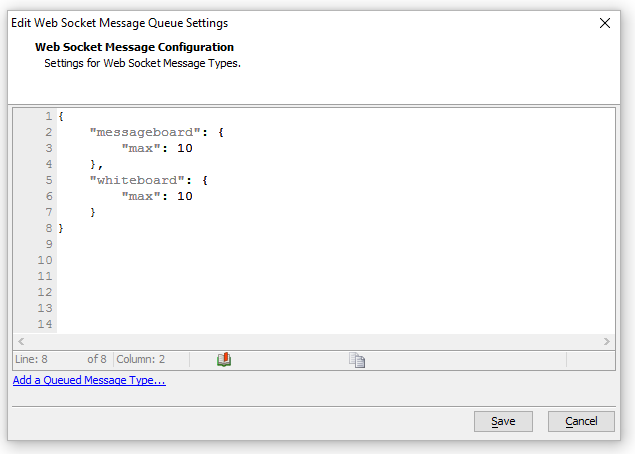
If you don't configure message types, then the only message you will be able to use under IIS is the 'messageboard' message which has a default definition. If you want to define more message types, you need to add the message types to the project using the 'Web Socket Message Type' dialog under Web Project Settings in Web Socket Settings section.
This dialog will display a JSON definition of the messages which you can either edit directly, or by using the hyperlink to add new message types. The only setting for a message type at this time is the 'max' parameter which defines the number of messages to remember.
Other Message Configuration Options
In addition to the 'max' option, there is the 'pattern' option that can be either 'queue', which is the default if not specified, or 'leaderboard'.
The leaderboard pattern keeps track of one entry per user. It requires that your JSON message have a 'name' field, which will be used to determine the key. If a name is ommitted, the message will not be remembered on the 'leaderboard' and new users will not see the message.
A good use of the leaderboard pattern is tracking the status of a user, because all that you care about is the current user's current status.
In addition to 'pattern' there is a logical 'echo' setting, which will cause broadcasts messages to be echoed back to the server. This is useful if you don't want to implement special handling for messages that originate with a client, or if you want confirmation that everyone else who was connected saw the message.
Below is an example of a message configuration for a 'player' message that follows the 'leaderboard' pattern and whose messages get echoed back.
{
    "player" : {
        "max" : 100000 ,
        "pattern" : "leaderboard" ,
        "echo" : true
    }
}
Comparison Between Patterns
To compare the queue patterns, lets see how Queue and Leaderboard treat the same JSON packates.
{ "name" : "Tom", "score" : 10 }
{ "name" : "Jim", "score" : 20 }
{ "name" : "Tom", "score" : 30 }
{ "name" : "Jim", "score" : 40 }
Queue Pattern
The Queue is purely sequential, and has a 'max' limit, since all the messages get played back to every new client that joins, it is important to limit the number of elements. The Queue pattern has no required fields since it doesn't need to uniquely identify the record.


Leaderboard Pattern
The Leaderboard requires a 'name' field, which keeps only the latest queue value.


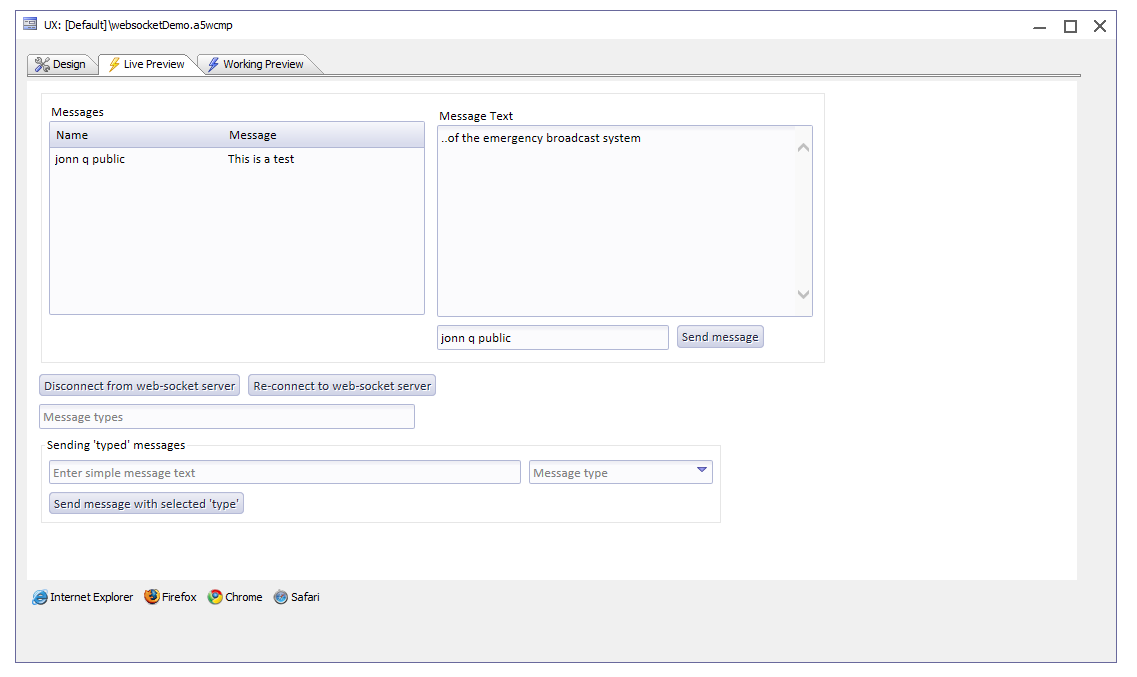
Quick Start to Using WebSockets.
There is a pre-built application that demonstrates web sockets that you can download here.
The Web Socket Demo implements a simple message board, and demonstrates a number of web sockets features that Alpha Anywhere Supports. The web socket demo component has a message area on the top left, that includes all the messages sent and received, a text area for typing the posted message, a text edit control for the required 'name' followed by a 'send' button that broadcasts the message.