Stripe - Process Stripe Payment
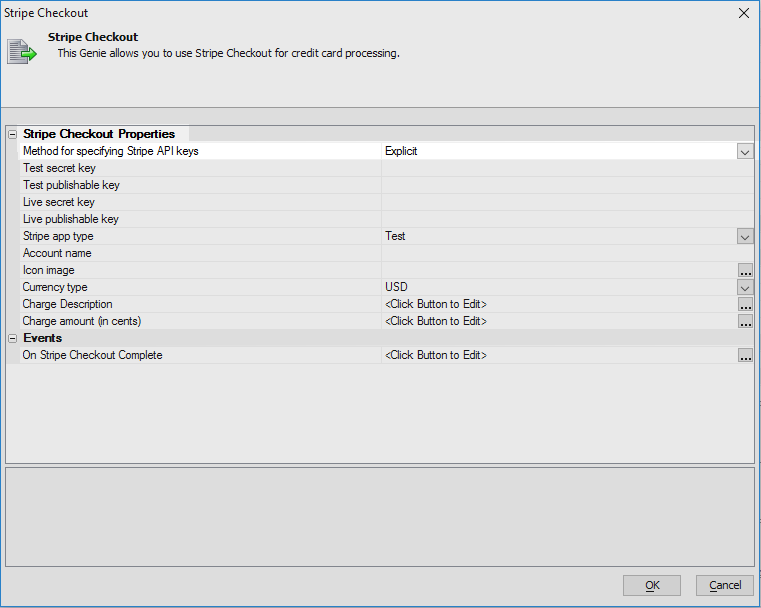
- Stripe Checkout Properties
- Events
- Specifying your Stripe API Keys:
- Entering the Stripe Checkout keys in the Project Properties
- Stripe App Type:
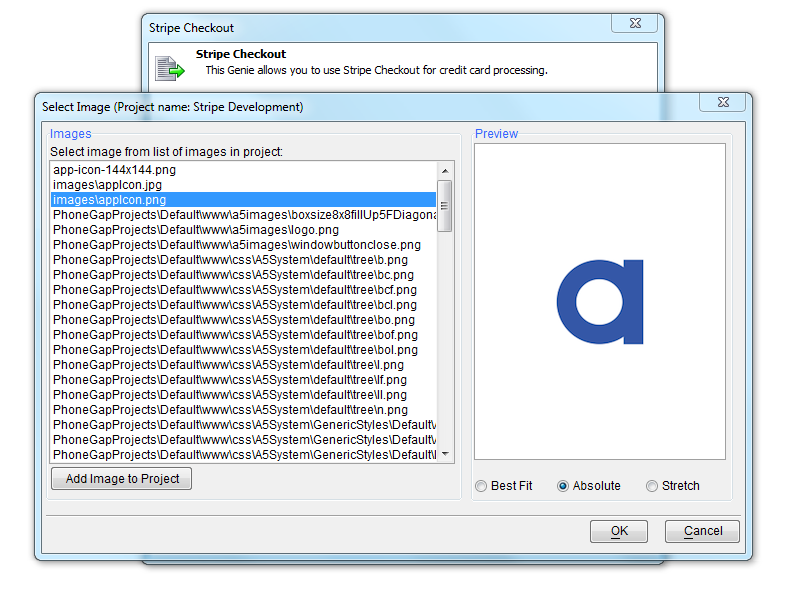
- Icon Image:
- Currency type:
- Charge description:
- Charge amount:
- OnStripeCheckoutComplete:
- HTTPS For Your Site
- Using an Embedded UX with Process Stripe Payment
Description
Process payment using Stripe.
Used with the UX component.
Stripe Checkout Properties
- Method for specifying Stripe API keys
Should the Stripe API keys be read from the project properties or do you want to specify explicit values for the secret publishable keys. The secret key is only stored server side and is never exposed to the client.
- Test secret key
This action is for test app use only, use it to specify your test secret key.
- Test publishable key
For test app use only, specify you test publishable key.
- Live secret key
For live app use only, specify your live secret key.
- Live publishable key
For live app use only, specify your live publishable key.
- Stripe app type
Set to test for app testing. Use the Stripe supplied credit card numbers for testing. No money is transferred. Set to live when ready to start charging credit cards with your app.
- Account name
Enter the account name as it should appear within the Stripe Checkout popup.
- Icon image
Specify the image for use as the app icon within the Stripe Checkout popup. The image must be 128px by 128px.
- Currency type
Enter the country currency code.
- Charge Description
This Javascript must return a character string for use as the charge description. You may want to read from an existing control, call another Javascript function or simply return the description as a character string, example: return '2 Widgets';
- Charge amount (in cents)
The Javascript you define can simply return a charge amount or read the amount from any control. You can also call another Javascript function that returns the amount. Example: return getChargeAmount()
Events
- On Stripe Checkout Complete
Fires after the Stripe Checkout charge has been authorized or denied. The results can be passed to a variable by calling the {dialog.object}.getStripeResults() method. This example Javascript code will display the JSON returned: var e = {dialog.object}.getStripeResults(); var_results = JSON.stringify(e.null.'\t'); alert('Stripe returned:' + _results);
Stripe Checkout, and the Stripe API, allow you to process credit card payments from within your desktop web or mobile app. You will need to obtain your unique test and live authentication/api keys from Stripe prior to working with Stripe Checkout within your app. See the Stripe Website to setup your account.
A typical use case is to assign the action to a button click event, once the total of all items to be purchased has been computed.
Video: Stripe Checkout
The Stripe API allows you to use the popular Stripe service to process credit card transactions.
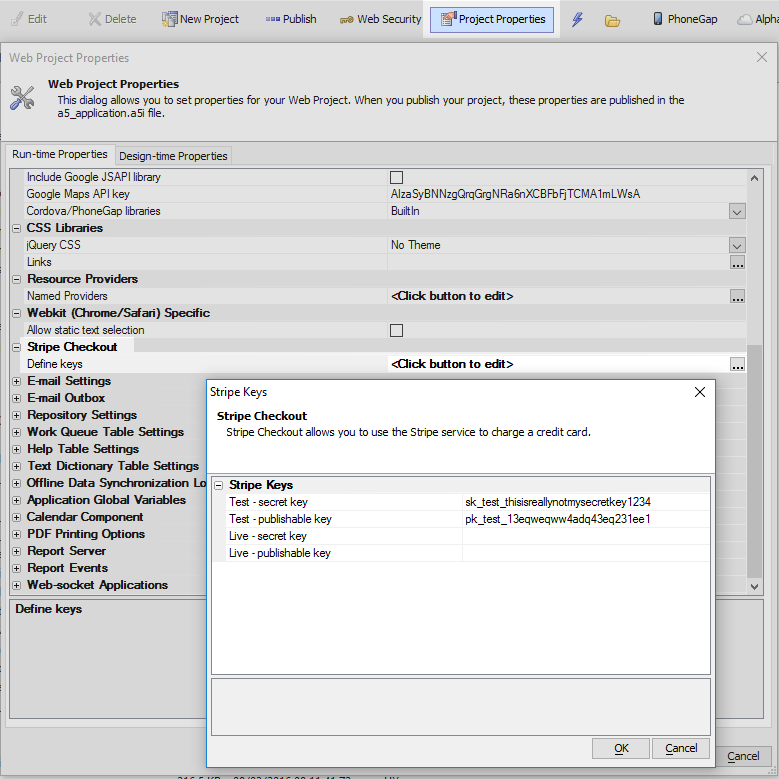
Specifying your Stripe API Keys:
Stripe will issue you a total of four authentication/api keys. One set is for testing and one set is for a live app. The keys can be entered in explicitly within the Action Javascript builder or you may specify the keys within your project properties (click the Project Properties button when the Web Control Panel has focus).
Entering the Stripe Checkout keys in the Project Properties
Entering the Stripe Checkout Keys in the Project Properties allows you to easily use Stripe Checkout within multiple components. Be careful to enter the test keys (typically prefixed with sk_test and pk_test) and the live keys (typically prefixed with sk_live and pk_live) in the appropriate fields. The secret key is used server side when the server is communicating to the Stripe API with the token supplied by Stripe Checkout. The secret key is never revealed client side.
Stripe App Type:
The app type can be Test or Live. Use Test for all of your testing and when you are ready to go live you must switch this property to Live and republish the app. If you are building a mobile app, make sure to rebuild the app with the Cordova CLI or Ionic Appflow.
Icon Image:
The icon image is displayed at the top of the Stripe Checkout component. The recommended minimum size is 128 x 128 px. Supported image types include .gif, .jpeg and .png.
Currency type:
This specifies the currency of the amount being charged. The code entered here is the 3 letter ISO country code. Stripe offers support for a worldwide range of currencies. You can accept payments in your supported currencies from almost any credit card and debit card no matter where the customer lives. Customers in other countries may be charged additional fees by their bank.
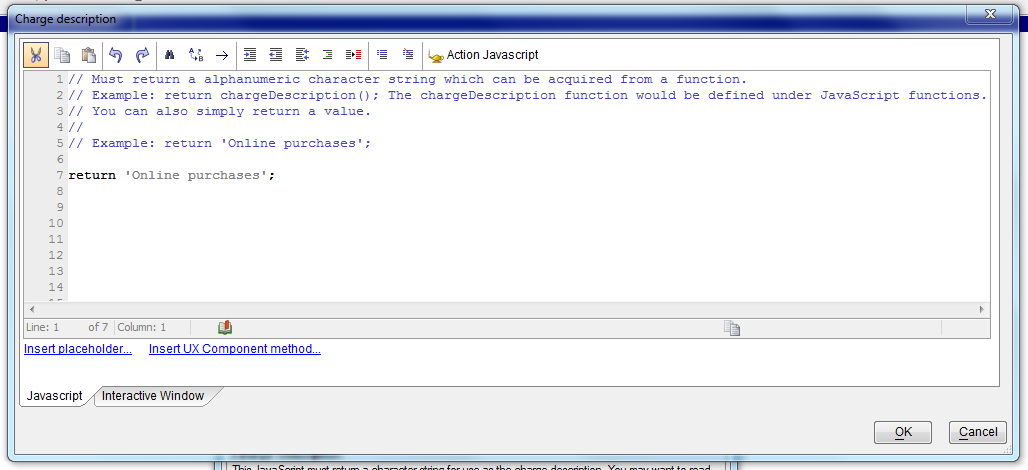
Charge description:
A general description of the product or service being purchased. The JavaScript you enter here can simply return a string (like the example below), return the value contained within a control or return the result of a JavaScript function, defined within the UX component's Javascript Functions property.
return 'Online Purchase';
Charge amount:
The amount (in cents) that is being charged. The JavaScript you enter here may simply return a number (example: return 1235; for a $12.35 charge), may read the value of a control (make sure you convert to cents!) or may return the result of a JavaScript function, defined within the UX component's Javascript Functions property.
return getAmount();
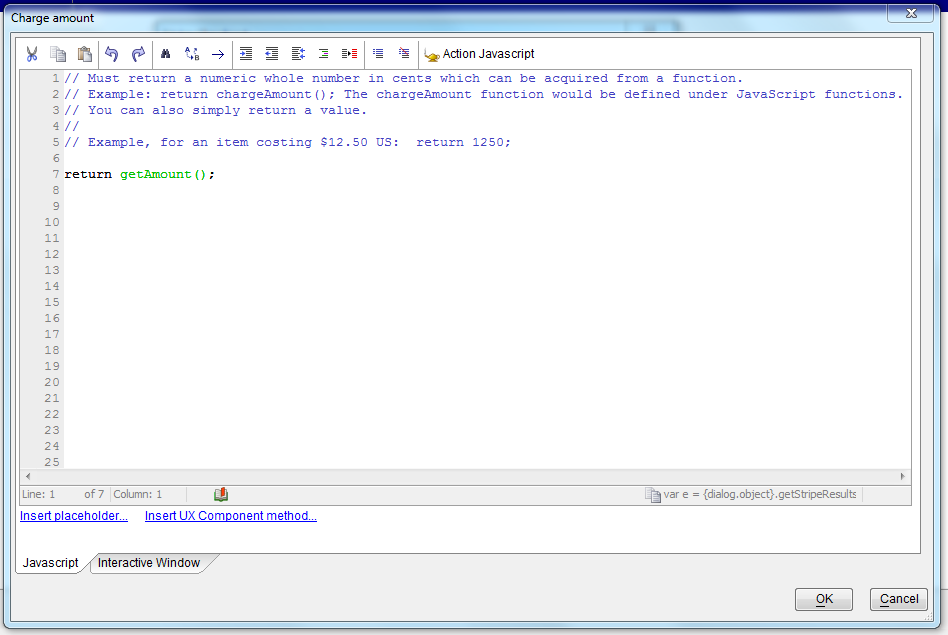
The getAmount() function is defined as follows:
function getAmount() {
    // get value and convert decimal value to cents, required by Stripe
    var n = $u.s.toNum({dialog.object}.getValue('totalAmt'));
    n *= 100;
    return Math.round(n);
}
OnStripeCheckoutComplete:
This event fires after Stripe has attempted to process the payment with the token supplied by Stripe Checkout. The JavaScript you enter here can examine the results returned from Stripe by calling the {dialog.object}.getStripeResults() method (see the sample code below). The {dialog.object}.getStripeResults method returns either a Stripe charge object with a wide range of properties or an error.
See Stripe Charges Doc for more information.
var e = {dialog.object}.getStripeResults();
stripeCheckoutComplete(e);
The stripeCheckoutComplete() function is defined as follows:
function stripeCheckoutComplete(e) {
    // uncomment below and load within FireFox / FireBug to examine the e object
    //debugger;

    // convert amt to dollars/cents as char string, show currency country suffix
    var amt = e.result.amount * .01;
    var strAmt = $u.n.toStr(amt,2,',','$',' ('+ e.result.source.country+')');

    // hide wait spinner if showing
    {dialog.object}.hideWaitMessage();

    // set values in controls
    {dialog.Object}.setValue('Amount',strAmt);
    {dialog.Object}.setValue('Status',e.result.status);
    {dialog.Object}.setValue('Description',e.result.description);
    {dialog.Object}.setValue('Card',e.result.source.brand);
    {dialog.Object}.setValue('Name',e.result.source.name);

    // refresh to show the results
    {dialog.object}.refreshClientSideComputations();
}
HTTPS For Your Site
All submissions of payment info using Stripe Checkout are made via a secure HTTPS connection. However, in order to protect yourself from certain forms of man-in-the-middle attacks, it is suggested that you serve the page containing the payment form with HTTPS as well.
Using an Embedded UX with Process Stripe Payment
If the Process Stripe Payment is added to a component using an embedded UX, the {dialog.object}.getStripeResults() method become unavailable if the embedded UX component is refreshed. The A5.stripe.getEmbeddedStripeResults method can be used in place of {dialog.object}.getStripeResults() in the event that the embedded UX is refreshed and the method is lost. The following example when added to the On Stripe Checkout Complete property will fetch the Stripe transaction results even if the embedded UX component has been refreshed:
var e = {};
if ({dialog.object}.getStripeResults) {
    e = {dialog.object}.getStripeResults();
} else {
    e = A5.stripe.getEmbeddedStripeResults();
}
See Also