{REGION}
Syntax
{REGION [ N ] } ... {ENDREGION [ N ] }
{REGION= Label } ... {ENDREGION}
Arguments
- N
Numeric. Optional. An integer that uniquely identifies the beginning of a region.
- Label
Character. A text label that uniquely identifies the beginning of a region. The {REGION=Label} syntax attempts to make column widths the same in all regions with the same label.
Description
Identifies a sequence of Xdialog commands that should be treated as a single entity.
Discussion
The {REGION} command is paired with an {ENDREGION} command to identify a sequence of Xdialog commands that should be treated as a single entity, typically as a single cell in a Xdialog. {REGION} and {ENDREGION} commands must be nested, as illustrated below (the indenting is for illustration purposes only). The {REGION} command is frequently used with the {COL}, {ROW} and {FRAME} commands.
{REGION1}
    {REGION2}
        {REGION3}
        {ENDREGION3}
    {ENDREGION2}
{ENDREGION1}Example
The following script uses the {Region} {Endregion} command pair:
result = ui_dlg_box("Title",<<%dlg%
{frame=1,1:Billing}
{region1}
First name:|[.32firstname] ;
Last name:|[.32lastname] ;
Address 1:|[.32address1] ;
Address 2:|[.32address2] ;
City:|[.32City] ;
State:|[State] ;
Zip:|[Zip]
{endregion1}|{sp}|
{frame=1,1:Shipping}
{region2}
First name:|[.32firstname] ;
Last name:|[.32lastname] ;
Address 1:|[.32address1] ;
Address 2:|[.32address2] ;
City:|[.32City] ;
State:|[State] ;
Zip:|[Zip]
{endregion2}|{sp}|
{Region3}
<10&OK>;
<10&Cancel>
{Endregion3}
%dlg%)
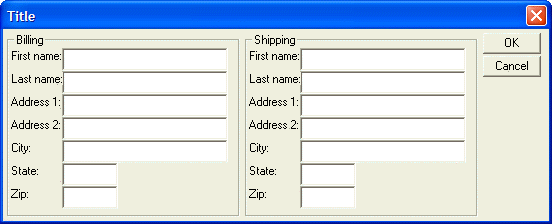
This script creates this dialog:
This dialog can be thought of as having one row and four columns.
Row 1, column 1 (Billing information) is sub-divided into 2 columns and 7 rows.
Row 1, column 2 is a divider column to create horizontal space between the billing and shipping information. Normally Alpha Anywhere does not allocate any space to blank cells. You force Alpha Anywhere to allocate space to a blank cell using the {sp} command.
Row 1, column 3 is sub-divided into 2 columns and 7 rows. It contains the Shipping information.
Row 1, column 4 is sub-divided into 1 column and 2 rows. This cell contains the buttons.
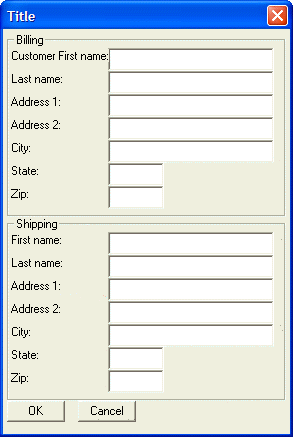
Note also that in this script the {Frame} commands specify one row and one column. This is because the {Region} {Endregion} command pair that encloses the billing and shipping information turns these regions on the dialog into single "logical" cells. As the following script demonstrates, the billing and shipping regions now have the same column sizes.
result = ui_dlg_box("Title",<<%dlg%
{frame=1,1:Billing}
{region=a}
Customer First name:|[.32firstname] ;
Last name:|[.32lastname] ;
Address 1:|[.32address1] ;
Address 2:|[.32address2] ;
City:|[.32City] ;
State:|[State] ;
Zip:|[Zip]
{endregion};
{frame=1,1:Shipping}
{region=a}
First name:|[.32firstname] ;
Last name:|[.32lastname] ;
Address 1:|[.32address1] ;
Address 2:|[.32address2] ;
City:|[.32City] ;
State:|[State] ;
Zip:|[Zip]
{endregion};
{Region3}
<10&OK> <10&Cancel>
{Endregion3}
%dlg%)
This script creates this dialog:
Note that you must include a ';' command after the {Endregion} to begin the next {Region} on a new row.
Limitations
Desktop applications only
See Also

