Define a View Query
Description
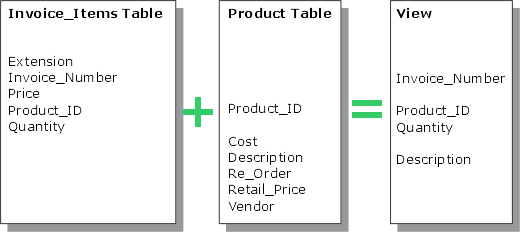
This procedure is part of the procedure for building a grid component. A view is similar to an Alpha Anywhere set or SQL join. It combines selected fields from two or more tables that are linked in one-to-one or one-to-many relationships.
"One" table as parent, "Many" table as child - creates as many records as there are in the "One" table.
"Many" table as parent, "One" table as child - creates as many records as there are in the "Many" table. This is essentially the same as flattening a set.
Select the Tables to Use
Select Grid > Query (DBF).
Click Tables in View to display the Add Table dialog box.
Select the table from the Table Name list.
Optionally, provide an alternative name for the table in the Alias field.
Click OK to add the table or Cancel to discard your inputs.
After the first table has been added, the Define Join dialog box appears.
Select the parent table in the relationship and click Add Table to display the Add Table dialog box.
Steps:
1. Select the new child table from the Table Name list.
2. Optionally, provide an alternative name for the table in the Alias field.
3. Select the Link Type. The options are:
"One-to-first"
"One-to-last"
"One-to-closest"
4. Select a value from the Include Parent list:
"Always"
"Only if Matching Child Exists"
"Only if Matching Child Does Not Exist"
Click OK to add the child table or Cancel to discard your inputs.
Select the child table in the Define Join dialog box.
Optionally, select a different field from the Link Expression list. The Link Expression defines how to associate the parent with the child. You may click Build
Expression to use the Expression Builder to help you define the expression.
Optionally, select a different field from the Parent Link Expression list. The Parent Link Expression defines how to associate the child with the parent. You may
click Build Expression to use the Expression Builder to help you define the expression.
If you made any changes the to the properties of the child table, click Apply Edits to save your changes or Cancel Edits to discard your changes.
Repeat step 7 for each additional child table that you want to include in the view.
Click OK to continue or Cancel to discard your inputs.
Select the Fields to Retrieve
In the Grid Builder click Fields in View to display the Select Fields in View dialog box.
Use the >, >>, <, and << buttons to add and remove fields from the available fields list.
Optionally, use the 'AZ up' and 'AZ down' buttons to sort the list of fields.
Optionally, use the following buttons to reorganize the sequence of fields.
Click OK to continue or Cancel to discard your inputs.
Define Arguments
Optionally, if you want to provide a value for use in the grid's filter expression, click Define Arguments to display the Define Arguments dialog box.
Enter a Filter Expression
Optionally, enter a logical expression that selects records from the table into the Filter field. You may click 'xy' to use the Expression Builder to help you define the expression. A blank filter expression retrieves all records in the table.
Optionally, check Unique records only to eliminate records with duplicate values.
Enter an Order Expression
Optionally, enter a character expression that orders selected records into the Order field. You may click the 'up and down arrows' icon to use the Order Builder to help you define the expression. A blank order expression retrieves records in record number order.
Optionally, click Ascending or Descending to change the sequence of records.
Enable Editing of Records
Optionally, check Read only to indicate that you do not need to define a primary key.
Click Define Primary Key(s) to define the field or character expression that will uniquely identify records.
Limitations
Web publishing applications only.
See Also


