Expression Builder
- The Expression Builder
- Finding the Expression Builder
- Toolbar Functions
- Copy
- Cut
- Paste
- Undo
- Redo
- Fonts/Auto help Settings
- Keyboard
- Add Expression to Library
- The result of a reports value
- A Basic Expression
- Auto Complete
- Using Fields in Expressions
- First
- Previous
- Next
- Last
- Insert a Field Name into an Expression:
- Insert a Field Value into an Expression:
- Descending order
- Ascending order
- Select Calculated Field:
- Using Functions in Expressions
- Insert a Function
- Using Arguments in Expressions
- Insert an Argument
- Using Variables
- Insert a Variable
Description
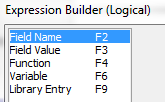
Whenever you want to enter an expression, clicking the 'xy' icon you displays the Expression Builder. The Expression Builder provides access to all the inputs required to build any type of expression. This includes...

Character Filter Expressions - evaluate to a logical value
Character Order Expressions
Field Values in any Table's Record
Calculated Fields
Functions
Program Variables
System Variables
Code Snippets in your Code Library
Arguments
Objects
The Expression Builder
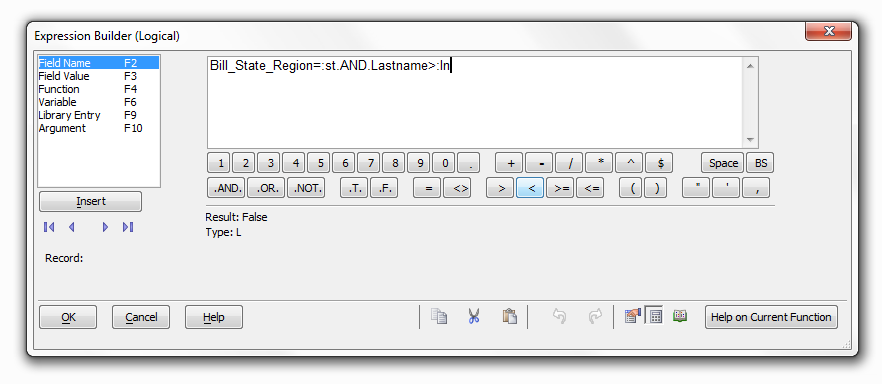
Finding the Expression Builder
You can access the Expression Builder in a number of ways. From the Control Panel you can find it by first opening a Form, Browse, or Set. Go to Query at the top of the screen and select Query by Expression from the drop down menu. Alternatively, click the Query by Expression button in the toolbar at the top of the screen.

In either case, the Query by Expression dialog will open. Click the Expression Builder button to the right of either the Filter Expression or Order Expression text boxes to open the Expression Builder. From the Web Project Control Panel you can find the Expression Builder in the Grid Builder. Click the Create a new grid Component button and click OK on the Select Grid Component Template dialog. The Grid Builder will open, on the Design page menu under Grid click on the Data Source link and on the Data Source page and select .dbf Tables. Go back to the Design page menu and under Grid click on Query(DBF). To the right of the filter text box click the Expression Builder button to open the Expression Builder. Note, you can not access the Expression Builder through the Query(AlphaDAO) page. SQL relies more heavily on expressions built through arguments than do .dbf files, which leans more on variables.

Toolbar Functions
The available functions on the Toolbar.

Copy
Allows you to highlight and copy anything in the Expression Builder's work area

Cut
Allows you to cut expressions or parts of expressions

Paste
Allows you to Paste parts of expressions you cut.

Undo
Undoes an action.

Redo
Click to do something that what undone

Fonts/Auto help Settings
Lets you set font and autohelp settings for the expression builder

Keyboard
Toggles the Expression Builder keyboard on and off. The keyboard is below the editing window

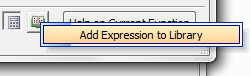
Add Expression to Library
Opens the Expression Library which allows you to store and retrieve frequently used expressions

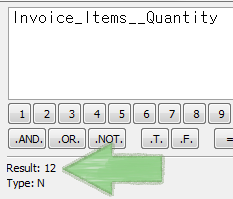
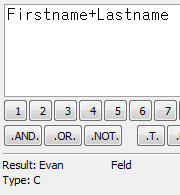
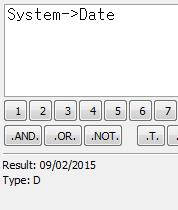
The Expression Builder automatically evaluates every expression and displays the value and data type of the result. This prevents you from trying to use an invalid expression. You can see the Result and Type for the current expression displayed in the lower middle portion of the dialog. This works even if there is only one entry in the builder. For Example, if there is a report on field that has a value of the number 12, you will see Result: 12, Type: N appear in the Expression Builder. Type abbreviations for Xbasic include N (Numeric), C (Character), D (Date), L (Logical), P (Pointer), T (Time), B (Blob), U (Collection), A (Any type), Integer (32 bit integer), Short (16 bit integer), {YourType} (A user defined type)
The result of a reports value
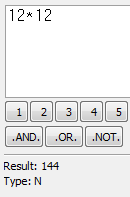
A Basic Expression
Open the Expression Builder and write 12 in the Builder's work area. The Expression Builder automatically assigns a Numeric Type and a Result of 12.
Add a multiply sign * to your expression, using either your keyboard or the Expression Builder Keyboard's multiply button.

Add another 12 to the end expression. The Result: is of course 144.
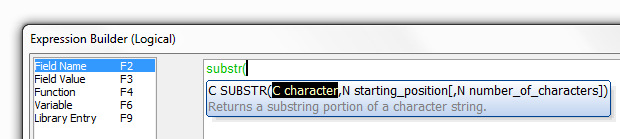
Auto Complete
The Expression Builder uses "auto-complete" technology to help you write functions. The Bubble Help shows a list of functions that start with the letters you type. As you type more letters, the list of possible functions gets narrowed down. The Expression Builder shows the syntax for each function and prompts you for each of the function arguments. Functions are color coded so that the expressions they are placed in are easier to read. Auto-complete feature helps with the syntax of Xbasic functions.
Using Fields in Expressions
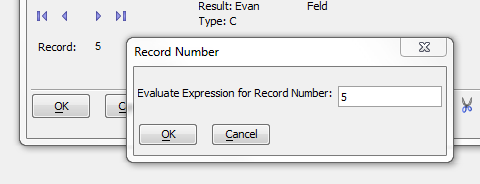
The Expression Builder makes it easy to insert different fields into an expression, simply hit F2 to open the Select Field dialog and click on the field you want to insert. Once a field is inside an expression, you can then evaluate that expression's Result and Type. If the inserted field contains multiple records you can use the navigational buttons to move between and evaluate each record individually.

First
Evaluates the first record in a given field in an expression

Previous
Evaluate the expression for the previous record.

Next
Evaluates the expression for the next record in a given field

Last
Evaluates the expression for the last record in a field.

The current record number being evaluated is displayed below the navigational buttons next to the Record: button. If you click the 'Record:' button you will open the Record Number dialog. If there is a specific record number you want to evaluate, you can type that number into the 'Evaluate Expression for Record Number' textbox and the Expression Builder will evaluate that record. Skip to any record in a field:
Insert a Field Name into an Expression:
Position the cursor within the expression.
Double click Field Name or click F2 to display the Select Field dialog box.
Optionally click the 'A..Z' icon to sort the list in ascending or descending order.

Select the field name you want to insert and click Insert. Field Names in an Expression.
Insert a Field Value into an Expression:
Position the cursor within the expression.
Double click Field Value or click F3 to display the Select Field dialog box.
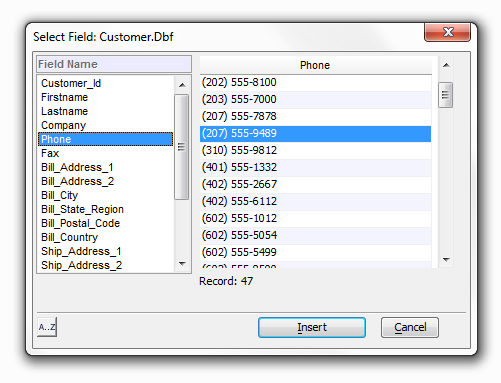
Optionally click A-Z to toggle between record number order and a sorted view showing unique keys only.
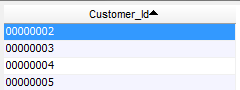
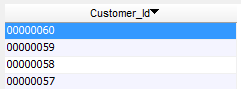
To list records in ascending or descending order click the field title at the top of the record list. Here the field title is Customer_Id
Select a field name and value. Click Insert. Inserted Field Value for a Phone Number:

Select Calculated Field:
To insert a calculated field into an expression first position the cursor within the expression.
Double click Calculated Field or click F5 to display the Select Calculated Field dialog box.
Optionally click A-Z to sort the list in ascending or descending order.
Select the calculated field and click Insert.
Using Functions in Expressions
You can insert functions into expressions. As noted earlier, there is also an auto complete for functions.
Insert a Function
Position the cursor within the expression.
Double click Function or click F4 to display the Function Finder dialog box.
Select the function and click Insert.
Using Arguments in Expressions
If you are working with .dbf files you can create arguments using the Define Arguments dialog. Once you have defined an argument you can then use it in the Expression Builder. Used in conjunction with the fields in your grid this can be quite powerful.
Insert an Argument
First define an argument in the Define Arguments dialog.
Next, Open the Expression Builder.
In the Expression Builder you will now see an Argument option, double click it or click F10
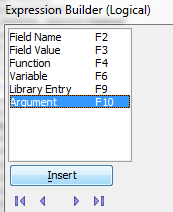
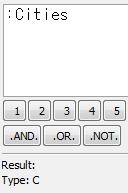
You should now see the argument appear in the Expression Builder. When you insert an argument a : character is automatically added to the expression to mark it as an argument.
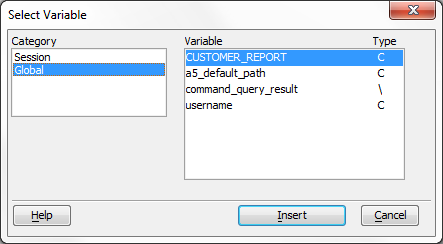
Using Variables
The available categories will depend on the context in which the expression builder is invoked. However, all contexts will have these contexts: Global and Session. A global variable is visible throughout Alpha Anywhere. For example, if the variable is defined by a script in one form, then any other form in your Alpha Anywhere session has access to that variable. A session variable is visible throughout an Alpha Anywhere session. A session is created when you open a new window in Alpha Anywhere (e.g. a new form, or browse window). All scripts on a form, for example, have access to a session variable. If you swap the layout displayed in a window (for example, by pressing the F8 key while viewing a form, to switch to a browse view), session variables remain visible to the new layout displayed in the window (because it is still the same session). If the Expression Builder is invoked from within a Layout, then the Layout category is available. A Layout variable is visible to all scripts and expressions in a form, but if the Layout in the window is swapped (for example, by opening a new form in the same window, or switching to a browse view), then the Layout variables are no longer available. Select Variable dialog:
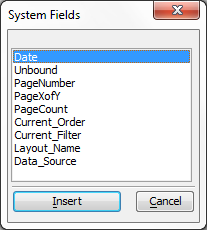
You can insert system fields into your expressions by hitting the F7 key and selecting a field from the System Fields dialog. System fields include Date, Unbound, Page Number, Page x of y, Page Count, Current Order, Current Filter, Layout Name, and Data Source. Date allows you to insert the current date into an expression. Unbound means there is no field associated with it. Data Source will insert the file path of the current table into your expression. The System Fields Dialog:
Insert a System Field
Position the cursor within the expression.
Double click System Field or click F7 to display the System Fields dialog box.
Select the field and click Insert. A System Field and Result:
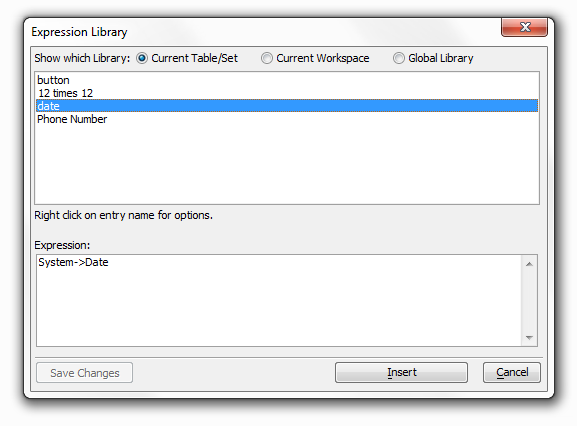
Using the Expression Library
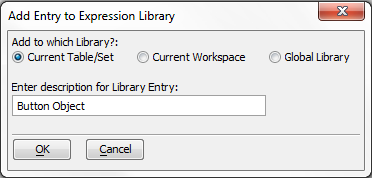
The Expression Library lets you store expressions. If you complete an expression that might have current or future use, click the 'Add Expression to Library' button twice to add it to a library.
The 'Add Entry to Expression Library' dialog will open and ask you to name your expression. It will also ask you to select one of three libraries for the expression to live in. The options are the Current Table/Set, the Current Workspace, or the Global Library. This is mainly a question of whether you want your entry to be viewed from other Tables and or Sets in your Workspace, or not, or if you want your expression to be visible from all of your workspaces.
Add an Expression to a Library
In the Expression Builder, click the Add Expression to Library button.
In the drop-down that opens click the Add Expression to Library option, if you highlight your expression you get a second choice here.
Select a library to add your expression to under the 'Add to which Library?' question. Select Current Table/ Set. This will make the expression is only be visible in the current table's library.
In the Add Entry to Expression Library dialog enter the name of your expression where it says 'Enter description for Library Entry:'. Click OK.
You should now be able to see your expression when you double click Library Entry or hit F9 in the Expression Builder.
Insert an Expression from a Library into an Expression:
Position the cursor within the expression.
Double click Library Entry or click F9 to display the Expression Library dialog box.
Select the expression and click Insert. The Expression Library shows Expressions and their descriptions
Object Properties
"Object Properties" appear in appropriate contexts in Desktop workspaces. You will not see or use these properties in the Grid Builder or the Web Project Control Panel, only in the Control Panel. If you are building a calculation value expression for a form or a browse layout, or are defining an expression in Action Scripting for an action that is bound to an event on a form or a browse, the Object Properties category will allow you to refer to any property of any object on the layout.
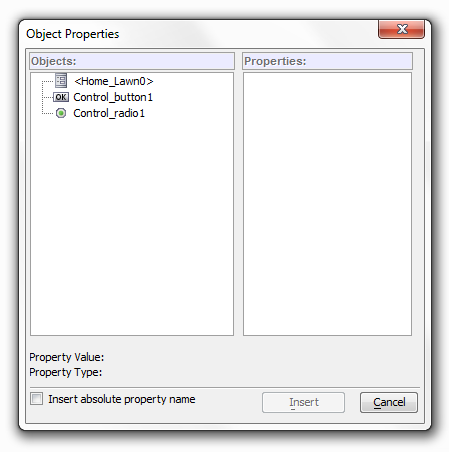
Insert an Object into an Expression.
Open the Control Panel. Open a Form and go to Design mode .
Go to the Task List drop down and click on Toolbox to open the Toolbox, if it is not already open.
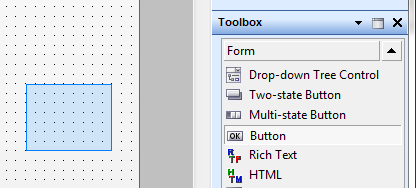
Scroll down the Toolbox list until you get to the 'OK' 'Button', click it.

Then drag out an area inside your the form to place the button.
Save your edit and close Design mode.
With the form open, go to the Expression Builder by clicking on Query, selecting Query by Expression, and clicking the Expression Builder button.
Press F8 to open the Object Properties dialog.
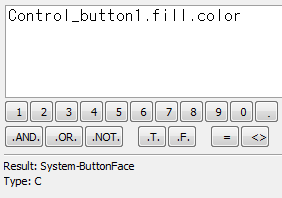
In the Objects list click on the Button you created, then go over to the Properties list and select a property to insert.
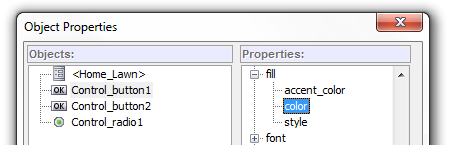
Click Insert.
See Also