Creating a Desktop Application
Description
In this lesson, you learn about designing a desktop application. You create a new workspace and DBF tables, and learn about defining data fields.
Designing a Desktop Application
In this lesson, you will start building a workspace application to support a film rental and sales business, called AlphaMovies.
To manage your inventory, you need to store and keep track of the following information about each film:
- Tape_ID
- Title
- Tape_Description
- Genre
- Language
- Rating
- Runtime
- Availability
- Sale_Price
- Last_Rented
In the AlphaMovies workspace, you create tables or Forms for managing film inventory, customers, orders, and such.
Alpha Anywhere File Types
Alpha Anywhere workspace objects, such as tables and indexes, are stored in associated files. Refer to Alpha Anywhere File Types for a list and description of Alpha Anywhere file types.
Creating a New Workspace
In the next procedure, you create a new workspace.
To create a new workspace:
Start Alpha Anywhere.
Select File > New Workspace from the menu bar. The Create New Workspace dialog box appears.
Use the Browse button to navigate to the location where you want to save your workspace.
Enter "AlphaMovies" in the Workspace name field. Make sure Create Workspace Directory is checked.
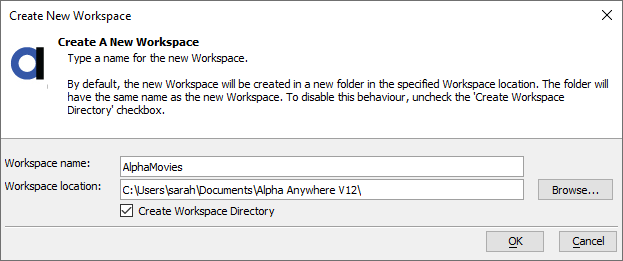
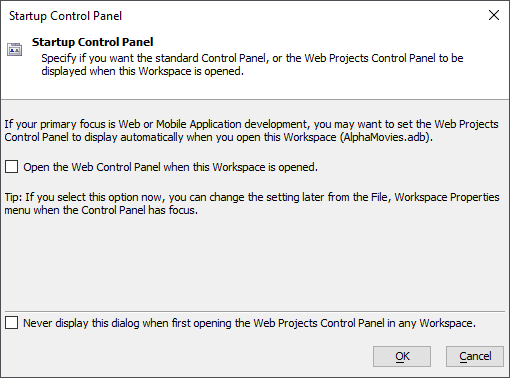
Click OK. If prompted, uncheck the Open the Web Control Panel check box and click OK. An empty, AlphaMovies Control Panel appears.
In the following procedures, you create tables for AlphaMovies and define their fields.
Creating DBF Tables
Alpha Anywhere tables store and arrange information in a workspace. Methods for creating DBF tables include:
- Using the Table Editor in Design Mode
- Using the Set Editor in Design Mode
- Entering field definitions in Text Mode
- Entering sample data with Sample Data
- Using the New Table/Set Genie.
- Importing text and workspace files from other programs, such as Microsoft Access, Excel, Outlook, and Visual FoxPro.
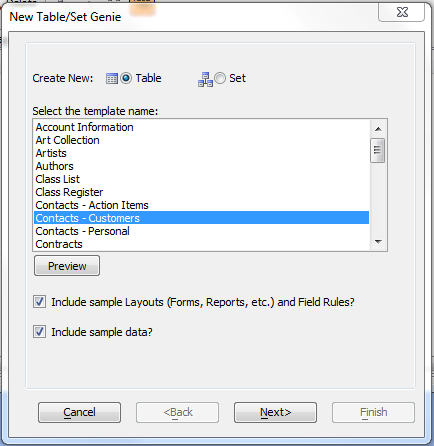
To take a quick look at the New Table/Set Genie:
Click the New button in the AlphaMovies Control Panel, and select Create Using Genie.
Select a template and click Preview to see the field definitions and indexes.
Click Cancel to exit.
Using the Table Editor
To create a new table using the Table Editor :
In the AlphaMovies Control Panel, click the New button, and select New Table (Design Mode). The Table Editor window appears. Additionally, Alpha Anywhere displays the Table Design toolbar.
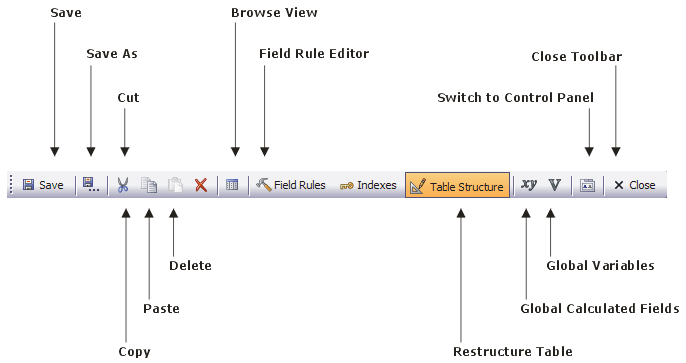
The following table lists the table design toolbar buttons and describes their functions.
 Save
SaveSave the table structure.
 Save As
Save the table structure to a new filename or location.
 Cut
CutRemove the selected information and copies it to the clipboard.
 Copy
CopyCopy the selected information to the clipboard.
 Paste
PasteInsert clipboard contents at the cursor position.
 Delete
Delete the selected information.
 Browse View
Display table records in Default Browse view.
 Field Rules Editor
Display the Field Rules Editor , for you to view, edit, or define filed rules. Only available when the table has been saved.
 Index Builder
Display the Index Builder, for you to view, edit, or create indexes. Only available after a table is saved.
 Active Window
Indicates the active window.
 Calculated Fields
Create or modify global calculated fields. Alpha Anywhere calculates global calculated field values as they are used.
 Global Variables
Create or modify global variables (variables that exist throughout an Alpha Anywhere application).
 Control Panel
Display the Control Panel.
 Close
CloseClose the Table Editor.
You use the Table Editor to describe table data, not for entering table data. In the Table Editor, each row creates one data field and defines its properties.
Defining Data Fields
Each Alpha Anywhere table can contain an almost unlimited number of records while each record can contain up to 1,024 fields storing individual bits of data. For more information, refer to Workspace Maximums.
A data field can contain up to 32 characters. Each field name must be unique, begin with a letter, and cannot contain spaces. If you enter a space in the field name, Alpha Anywhere converts the space to an underscore.
Data Field:
- Name
Name for each field in the table.
- Type
Type of data stored in the field, selected from a drop-down list of values. For more information, see the Field Types table.
- Width
Maximum number of characters allowed in the field. When specifying Date, Time, Short Time, Logical, Memo, RTF Memo, JPEG, Bitmap, Active X, and OLE data types, Alpha Anywhere assigns the correct width.
- Decimal
Number of decimal places for a Numeric data field type.
- Indexed?
Indicates that Alpha Anywhere create an index on the field.
In addition to assigning field names, data types, width, decimal places, and indexing, you can define other field properties using the Field Rules Editor, which is explained later in the lesson.
Alpha Anywhere supports thirteen field types. For more information on these types, refer to Create a New Table.
Numeric Data Fields
When you create a numeric field that contains decimal places, the width must include the numbers on both sides of the decimal point, and the decimal point, itself. For example, if the largest value you want to store is 99.99, you enter five in the Width column, and two in the Decimal column.
Store numeric information that is not used for numerical calculations, such as, zip codes and phone numbers, in a character field instead of a numeric field. A character field accepts zeros and formatting characters. For example, you could not enter a phone number, such as (617) 555-1212, in a numeric field, because it includes non-numeric characters. A zip code, such as 01803, would get stored as 1803 in a numeric field, because the first digit, zero, would be removed.
Indexing Data Fields
In the Table Editor, use the Indexed? column to specify whether to index a particular field. If you are modifying a table, or when defining an index expression or filters, use the Index Builder.
Creating DBF Tables
In the next procedure, you create DBF tables. For the first table, you use the Table Editor to define the data fields for your film inventory information.
You opened the Table Editor previously. In the Table Editor:
Enter the following information in the blank Table Editor window.
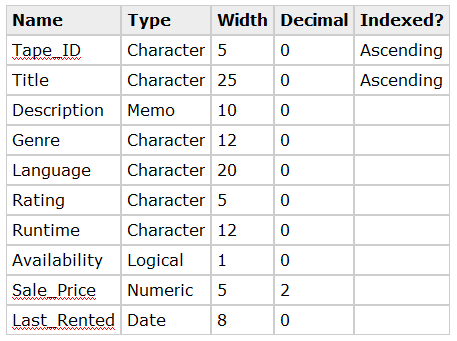
Click the Save button on the toolbar. The Specify Table Name dialog box appears.

Enter "Inventory" in the Table Name field, and click OK. Alpha Anywhere saves the table in the Workspace directory. The Inventory table object appears in the workspace Control Panel.
To create a customer information table, you use the New Table Genie.
In the Control Panel, click the New button, and select Create Using Genie. The New Table/Set Genie appears.
Select the "Contacts-Customers" template, check Include sample Layouts and Field Rules and Include sample data, and click Next. The Genie displays the Table Name, whether to save the table in the same directory as the workspace, and the Existing Tables in the Workspace.
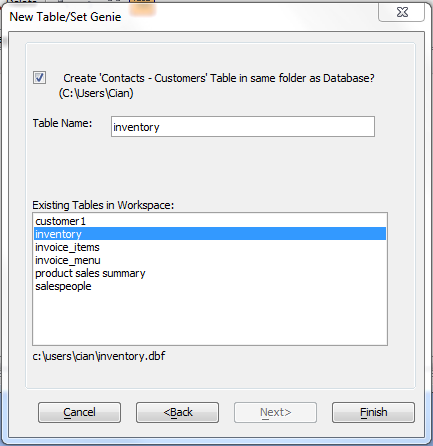
Change the Table Name to "Customers", and click Finish. The table structure closes and the Customers table appears in the Control Panel. Note that the Customers table has forms, reports, and labels.
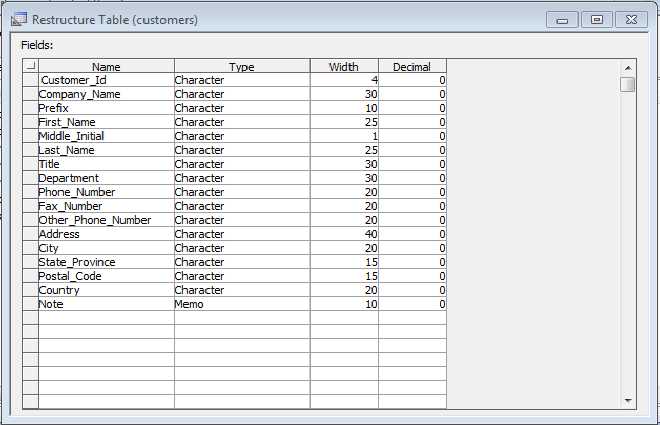
Select the Customers table in the Control Panel, click the Design button, and select Table Structure. The Customers table field data structure appears.
Click the Indexes button on the toolbar to see the indexed Customers table fields.
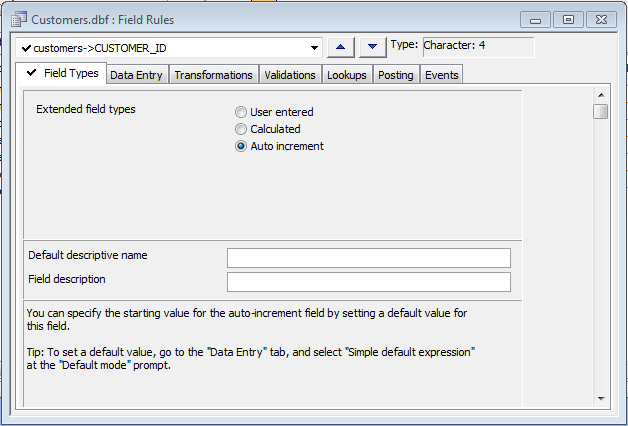
Click the Field Rules button on the toolbar. The Field Rules Editor appears.
In the next section, you learn about field rules and define some for the Inventory table.
Defining Field Rules
Field rules govern how you enter data in a table, and help ensure that data entry is accurate, consistent, and complete. You use field rules to control the information that you can enter in a field.
You can use field rules to perform the following tasks:
- Insert calculations or incrementing values
- Validate, format, and insert field values
- Change field entry case, and define auto-expanding abbreviations
- Ensure reasonable and accurate values
- Create table lookups for filling-in data
- Post data from one table to another
- Define Xbasic scripts for different events
For more information on field rules, refer to Types of Field Rules.
To define field rules:
First, look at the field rules defined for the Customers table in the Field Rules Editor.
You use the drop-down list box at the top, to switch between data fields, and the tabs, to switch between field rules. Data fields with check marks have field rules associated with them.
In the Customers table, the Customer_ID field employs the auto-increment field rule. The Company_Name field employs a transformation rule, which converts all letters to lowercase, and gives words initial capital letters.
Close the Field Rules Editor.
Right-click the Inventory table in the Control Panel, and select Edit Field Rules to open the Field Rules Editor. The Inventory table's Tape_ID field appears in the Field Rules Editor.
In Extended Field Types select the Auto-increment option.
When you define a Character, Numeric, or Date field with the Auto-Increment rule, Alpha Anywhere supplies an incremental and editable field value when you create a new record. If you overwrite the default value, successive records are incremented from the value you enter.
Auto-Increment fields are useful for assigning unique identification numbers for invoices, parts, products, and customers. By default, Character fields are incremented using numbers, for example 0001, 0002.
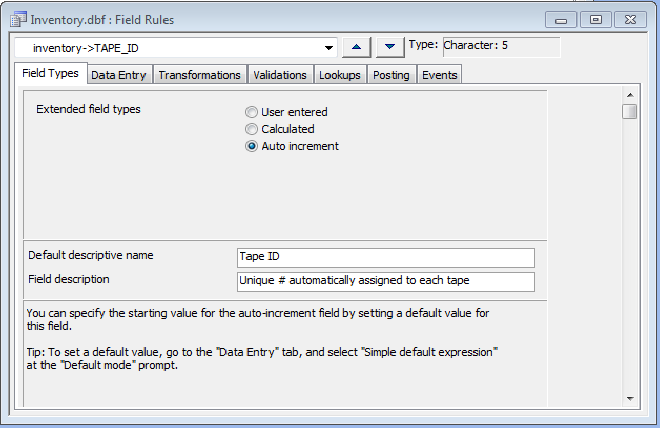
Enter a Default Descriptive Name, such as "Tape ID", and a Field Description.
Click the Data Entry tab.
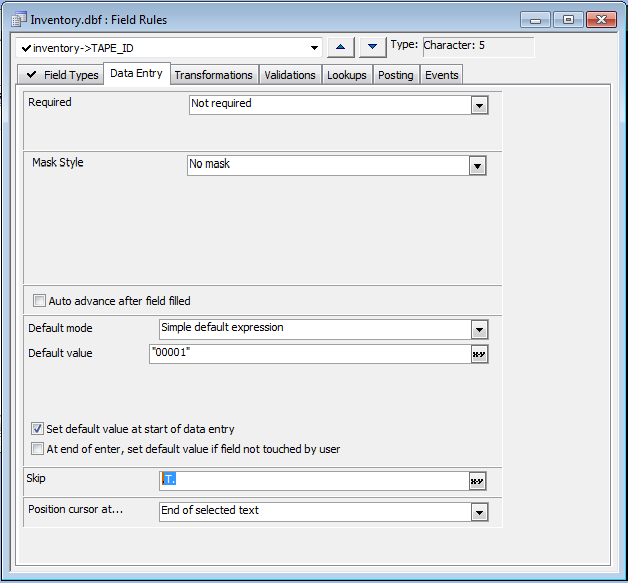
Select "Simple default expression" from the Default Mode drop-down list box.
Enter "00001" in the Default Value text box.
Check the Set default value at start of data entry check box.
Apply a skip field rule to the Tape_ID data field, to keep the value unchanged and unavailable for editing.
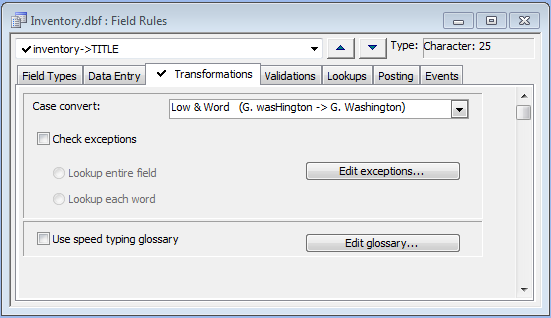
Select the Title data field, click the Transformations tab, and select "Low & Word" from the Case Convert list.
Select the Genre data field, and click the Lookups tab.
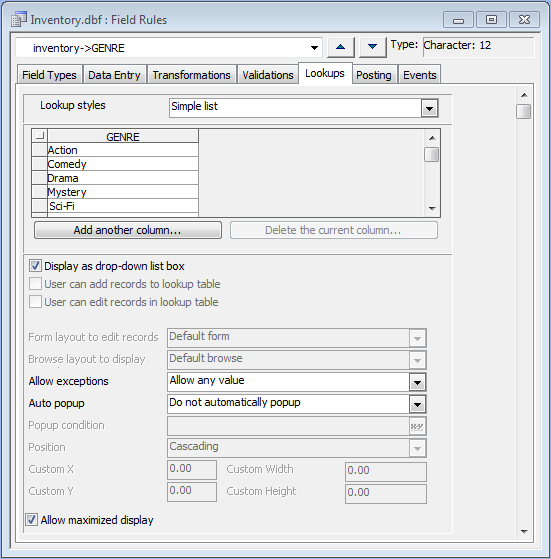
Select "Simple list" in the Lookup styles drop-down list box, and enter the following list values: "Action", "Comedy", "Drama", "Mystery", and "Sci-Fi".
Keep the default values for Display as Drop-down list box, Allow exceptions, and Auto popup.
Repeat steps 7, 8, and 9 for the Rating field, but enter the following simple list values: "G", "PG", "PG-13", "R", "NC-17".
Select the Language data field, and click the Lookups tab.
Select "Simple list" in the Lookup styles drop-down list box, and enter the following list values: "English", "French", "Spanish", "Italian", and "Other".
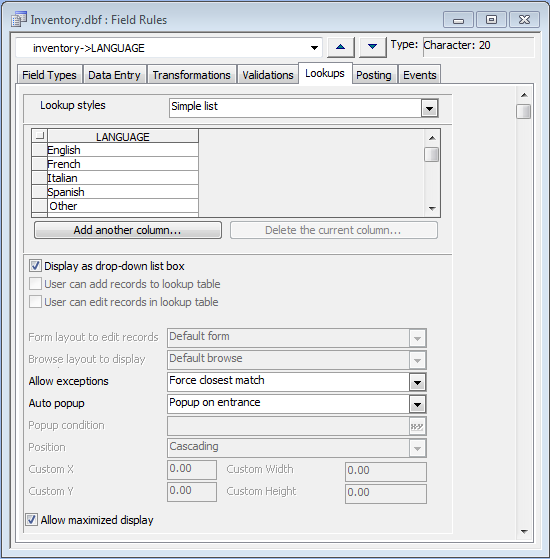
Keep the default value for Display as Drop-down list box, but select "Force closest match" in Allow Exceptions, and "Pop-up on entrance" in Auto popup.
Click the Save button on the toolbar, and close the Field Rules Editor.
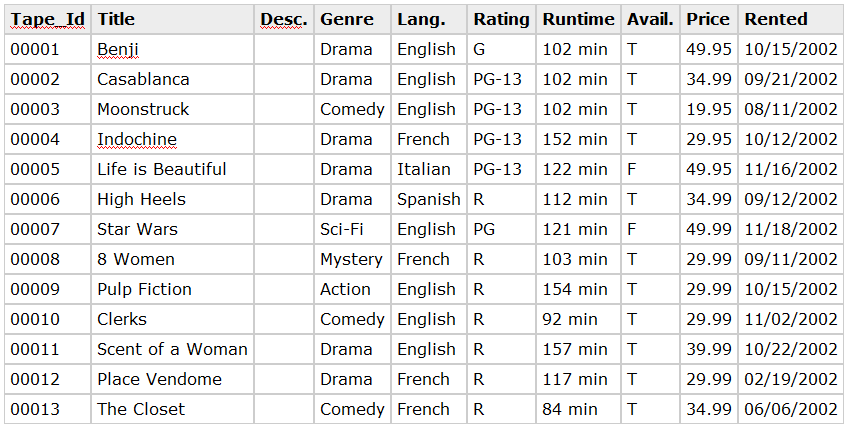
Now, you can open a Default Browse or Default Form for the Inventory and Customers tables, and enter new data records. Double-click on the Inventory table, and enter the following data:
Examine how the field rules govern data entry. Try applying some of the following field rules to see their effect.
Apply a simple mask to the Customers table phone_number data field or postal_code field.
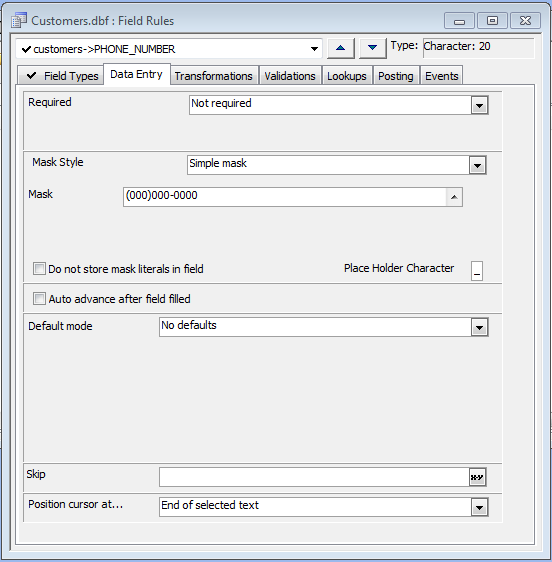
Make data entry required for some data fields.
Summary
In this lesson, you created a new workspace for a workspace application, and made some tables, and other workspace objects. You learned about defining data fields, creating an index, and defining field rules for data entry.
Limitations
Desktop applications only. Not available in Community Edition.
See Also