Setting Choices for Tree Controls
Description
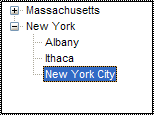
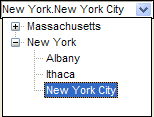
A data field displayed as a tree control or drop-down tree control accepts only values that are in its choice list. These images show a tree control in regular and drop-down formats.
Select the control, choose Object > Properties and display the Setup tab.
Select "List Box" or "Tree Control" in the Field-Type list.
Display the Choices tab.
Select one of the Choices for control. The options are:
" User Defined "
" Computed Automatically "
" Populated using Xbasic "
User Defined Choices
If you selected "User Defined" in step 4: Enter choices one per line in the following format. Note that you use a period "." to step down to the next level. A tree control may have up to 9 levels.
level1_value1.level2_value1.level3_value1.level4_value1
level1_value1.level2_value1.level3_value1.level4_value2
...
Optionally, click 'AZ up' or 'ZA down' to sort the entries in ascending or descending order.
Click OK to save your choices definition.
If you selected "Computed Automatically" in step 4, make a selection from the Source list. The options are:
1. " Values from a table/set "
2. " Expression (that returns a CR-LF delimited list) "
Populated Using Xbasic
If you selected "Populated Using Xbasic" in step 4: Right click the form and select Events > OnInit.
Add a statement with the following format.
TreeControlName.settings.dynamic_list =
The must return a CR-LF delimited list with periods between the field values.
Values from a Table/Set
If you selected "Values from a table/set" in step 8:
Make a selection from the From Table list.
Enter an expression in the Field/expression control. Optionally, select "" to display the Expression Builder to help you define the expression. Note that the expression should in the following format to create branches for the tree.
value1 + "." + value2 + "." + value3
Optionally, click the 'up down' icon to display the Order Builder to order the list choices that will appear.
A filter expression selects values from a lookup table based on one or more values in the current table. Optionally check Enable Filter Expression and click Edit Filter Expression to display the Filter Expression dialog box.
Optionally, check Display only unique keys to avoid duplicate entries in the list.
Optionally, click Preview to see the data that the list will contain.
Click OK to save your choices.
CR-LF Delimited List
If you selected "Expression (that returns a CR-LF delimited list)" in step 8:
In the Expression field enter a call to a function or script that returns a list of CR-LF delimited values. Optionally, click to display the Expression Builder dialog box. Note that the each line of data returned should be in the following format to create branches for the tree.
Optionally, enter an expression in the Watch Expression field. When this value changes, Alpha Anywhere will refresh the choice list.
Optionally, click Preview to see the data that the list will contain.
Click OK to save your choices.
See Also