[Column Spacer] Properties
Description
When designing a dialog component or a grid component with columnar formatting (where the Layout Options > Number of "Layout" Columns property is greater than 1), you may position controls by inserting column spacers after controls.The following example shows the effects of adding column spacers. In this case the grids Number of 'Layout' Columns property has been set to 2 and its Rows of data property is 3. Both of these properties can be found in the Layout Options section of the Grid Properties page.
Properties
- Column Span
Set the number of columns that the spacer will span.
- Inline Style
Set the Inline Style for the Column Spacer.
Adding a Column Spacer
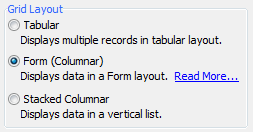
Open the Grid Builder. On the Design tab open the Component Type page. From the Grid Layout menu select the Stacked Columnar option.
On the Data Source page select either .dbf or SQL . Go to the Query(DBF) or Query(AlphaDAO) page and connect to the Table you will use for your data. Set the Primary key to a field you will use.
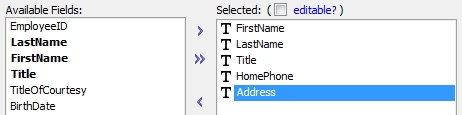
Go to the Fields page and move 5 fields from the Available Fields: list into the Selected: fields list.
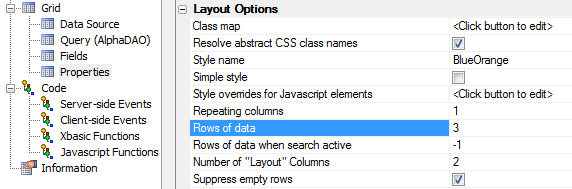
From the Design menu open the Properties page. Find the Layout Options section of the grid properties and change the Number of 'Layout' columns property to 2.
In the same Layout Options section, find the Rows of data property and enter a 3 next to it.
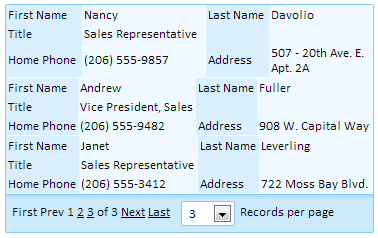
Go to Live preview . Without column spacers your grid should look something like this:

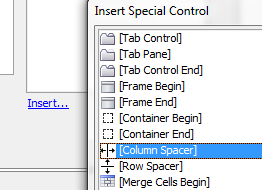
Open the Design tab again and go to the Fields page. Click on the Insert... hyperlink underneath the Available Fields: list.
The Insert Special Control dialog will open. Select the [Column Spacer] option and click OK .
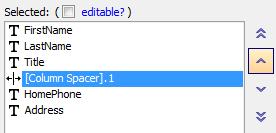
Position the [Column Spacer] control so that it is fourth in your Selected: fields list. To move the control in the list use the up and down arrow buttons.
Now go to Live Preview . The spacer should push your fourth field control down one row: