[Frame Begin]
Description
When designing a grid component with Columnar formatting, you may position controls by placing them into frames. A frame has a label and places a box around selected fields. You can use the frame feature in columnar layouts, such as columnar grids, search forms, and detail view forms. This example shows how to create a columnar grid with 2 frames.
Properties
- Frame label
Specify the title for the frame.
- Frame ID
Specify a unique ID to identify the frame. At run-time, the actual ID will automatically include the component alias and convert to uppercase. e.g. 'CUSTOMERGRID.FRAME.1'.
- Frame label style
Specify the style for the frame label.
- Frame label class
Specify an optional class name for the frame label.
- Frame border style
Specify the style for the frame border.
- Frame border class
Specify an optional class name for the frame Border.
- Frame pane class
Specify the optional class name for the frame pane (i.e. the container that holds the frame contents).
- Frame pane style
Specify the optional style for the frame pane (i.e. the container that holds the frame contents).
- Spacing - above
Specify the space above the container. Use CSS syntax. E.g. .2in, 20px
- Spacing - below
Specify the space below the container. Use CSS syntax. E.g. .2in, 20px
- Spacing - left
Specify the space to the left of the container. Use CSS syntax. E.g. .2in, 20px
- Spacing - right
Specify the space to the right of the container. Use CSS syntax. E.g. .2in, 20px
- Frame type
Specify the type of frame. 'Simple' uses the standard HTML 'frameset' tag. 'Modern' creates a frame with a title bar and enables the frame contents to be shown/hidden. Choices include.
- Has show/hide button
Specify if the frame title bar has a show/hide button to show and hide the frame contents.
Using Frames for Control Positioning
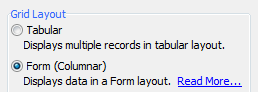
Open the Grid Builder and create a new blank grid. On the Component Type page select Form (Columnar) under the Grid Layout menu.
Under Data Source select either .dbf or SQL.
On the Query(DBF) or Query(AlphaDAO) page connect to the table that you will use to extract data. If using SQL make sure to set the primary key to a field you will use from your table.
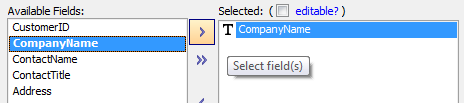
Go to the Fields page. There should be a number of fields in the Available Fields: list. Highlight a field
Click the right arrow to move fields from the Available fields: list to the Selected: fields list.
Add three more fields to the Selected: fields list. Next, check the editable? checkbox next to the Selected: fields title.
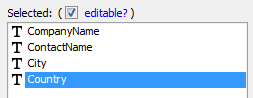
The Notice dialog will appear. Select all fields and click OK .

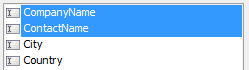
The fields you selected should now appear as textbox controls. Highlight the first two fields in your Selected fields: list by holding down the Shift key and clicking on each field.
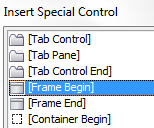
Click the Insert.. hyperlink underneath the Available fields: list.

The Insert Special Control dialog will open. Select a [Frame begin] control and click OK .
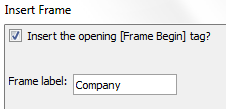
An Insert Frame dialog will appear. Give the frame a Label name that describes the two fields you selected. For example, "Customer" for a First and a Last name field or "Location" for an Address and a City field.
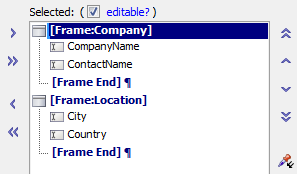
You should now see a [Frame:] control and a [Frame End] Control around the first two field controls in the Selected: fields list.
Add a second [Frame] control around the last two fields in your Selected fields list using the same steps.
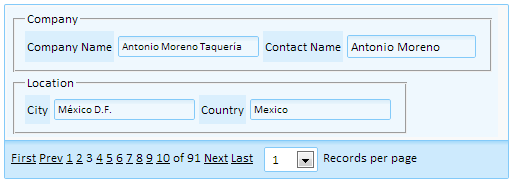
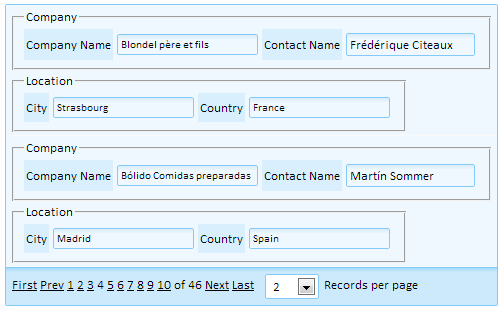
Go to Live Preview . You should see something like this:
 On the Grid > Properties page, under the Layout Options section, there is a Number of 'Layout' Columns property that specifies the number of columns inside each record column. By default this is set to 1. Below you can see how changing this property will alter the look of your [Frame] control.
Go to the Layout Options section on the Grid> Properties page. Change the Number of 'Layout' Columns property to 2. Go back to Live preview :
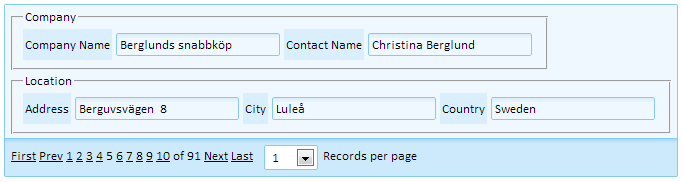
 Framed fields now appear next to each other on the same row.
On the Grid Properties page go to the Layout Options section and set the Repeating Columns property to 1 and the Rows of Data property to 2. Go to Live Preview :
On the Fields page add a third field to your second [Frame] control. You can use the Up and Down arrows to the right of the Selected: fields list to position the field vertically. Check field is editable? .

Layout Options > Number of "Layout" Columns property to 3.
 The three framed fields appear in the same row.