Define group breaks
Description
Do you want to add group breaks to your grid?
Define group breaks
Clicking the button next to the Define group breaks property will open a Define Group Breaks dialog box. This dialog will ask you to select the field that you want your group breaks to be based on; for example state, country, zip code, an so on. It will also ask you if you want to add a header and if you want the groups to be collapsible, or not. In this way, the Define Group Breaks dialog gives you the ability to toggle the visibility of groups with a single click. You can also use it to set either default or customized icons to indicate whether a group is open or closed. You can also add a counter, so you can see how many entries are in a closed group. If you have defined groups you can also alter the type of cursor used when a user hovers over a group. For more information check out this videoor view some of the text guides below.

Add a Group Break:
Open the Grid Builder and go to the Design page.
Under Data source select either a .dbf or a SQL grid.
Under Query(DBF) or Query(AlphaDAO) create a connection to a table that contains a countryor bill_state_regionfield; like the AlphaSports' Customer table.
Go to Fields and assign a number of fields to your grid using the arrow buttons to move Included a country field or a state field.

Go to the Properties page on the Design page and scroll down until you come to the Group break properties. Check the checkbox next to the Has group breaks property.
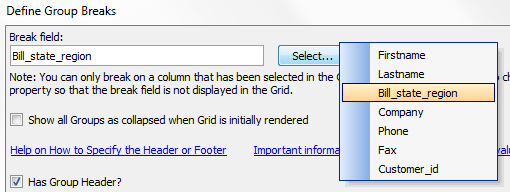
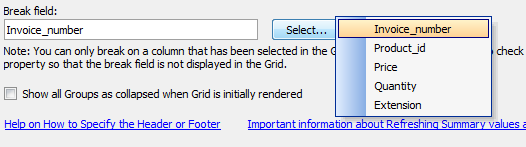
The Define group breaks property will become visible. Click on the button to the right of the Define group breaks property. This will open the Define Group Breaks dialog.
In the Define Group Breaks dialog, click the Select... button. From the dropdown choose the field you want to use to define groups, something like the Bill_state_regionfield.
Check the Has Group Header? checkbox to place a header at the top of each group. This will open a work area where you can write the code for your header.

You now need to alter the header so that it can make dynamic headings that apply to a given group. Strip out the second line in the Break Header: code and remove the filler text in the third line.

Type in State:between the tags.
 In the Break header code class="[class.gridDataHeader]"uses a substitute class name that will be replaced with a real class name at runtime. In this example you deleted colspan="{systemcolumnCount}"this is the row selector and any columns that appear to the left of the real data in your grid. Eliminating this code causes the group headings that you are creating to appear flush-left on your grid.
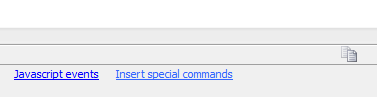
Click the Insert special commands link at the bottom of the Define Group Breaks dialog.
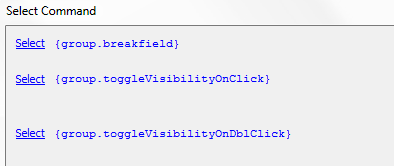
The Select Command dialog will open. Click the Select button next to the {group.breakfield} option, this option represents the value of the break for the current row in your grid.
If your Break header: looks something like this then click OK in the Define Group Breaks dialog to exit it.
 If you wanted to make the {group.breakfield}placeholder to standout, simply add some 'bold' tags around it, like so {group.breakfield}
Click on the Working Preview tab in the Grid Builder. You should now see groups based by state, each with its own header.
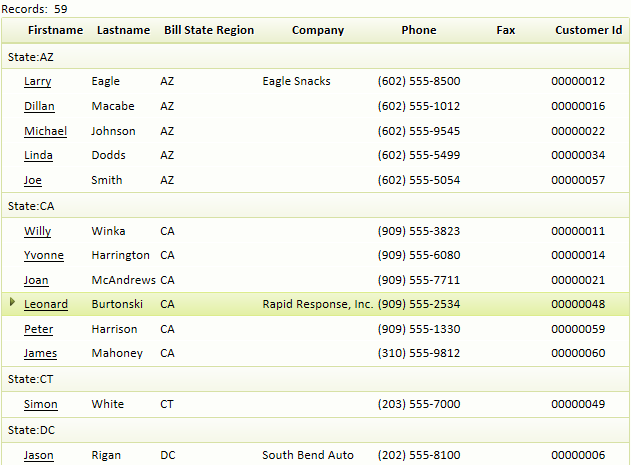 You might notice that in the grid above the Bill State Region data is repeated in both the Group heading and in its own individual column. There is an easy way to eliminate this repetition so that only the group heading appears on the grid. This video, Part 1shows how to do this and more, or you could also follow the guide below.
Hide a Field that defines a Group :
Go back to the Fields page and, in the Selected fields, click on the field that defines your groups; in this case the Bill_state_regionfield.
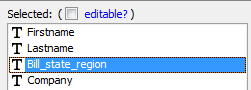
Scroll down the Field Properties list, on the right side of the Fields page, until you come to the Column Properties . Check the Hide column checkbox.

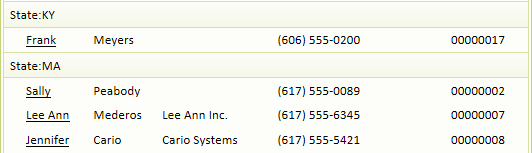
Go to Working Preview , you should no longer see the column for the field that defines your groups. The Bill_State_Regioncolumn remains hidden.
You can give a group header or footer some smarts that will allow it to create a summary of the data contained within a given group. This can be used in a number of ways. For instance, it could serve to create a total on all of the goods sold in a specific region or to count the number of members inside a group. For more detail watch this videoor read on.
Add Summary Information in a Group header/footer:
Using the Alphasports workspace open Grid Builder and go to the Design tab. Go to Data Source and add a .dbf or SQL table.
Open the Query(DBF) or Query(AlphaDAO) page. Under Table name: select a table relating to invoices, like the Invoice_itemstable
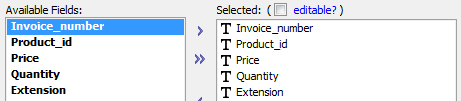
Go to Fields and move all of the fields for your table from Available fields to Selected.
Go to the Properties page in the Design menu. Scroll down the Properties list to the Group Breaks properties section

Check the Has group breaks property checkbox. Then click the [dot_img] button to the right of the Define group breaks property.
The Define Group Breaks dialog will open. Select the field you want to group by, in this case the Invoice_Numberfield.
Check the Has group header? checkbox. This will open a work area where you can adjust the header code.

Erase second row in code, this will left justify your group headers. Also replace the "Enter group break HEADER text here"filler with Invoice:

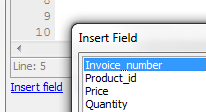
Click Insert field button. Select Invoice_Numberand click OK .
The inserted field placeholder should appear in the Define Group Breaks dialog. After the placeholder write ' Total for Invoice:'.

Click the Insert summary field button at the bottom of the Define Group Breaks dialog. The Insert Summary Field dialog will open.

If using the Invoice_items table choose the Extensionfield. Set Summary type to 'total', then click on the Build button.

The Display Format dialog will open. Click on the Select Pre-defined Format button and then select an appropriate format, in this case one with 2 decimals and a dollar sign.

Click OK to enter the Pre-Defined Format and OK again to close the Displat Format dialog. Click OK a third time to add the expression to enter the format into your Break header: code. You should end up with something like this...
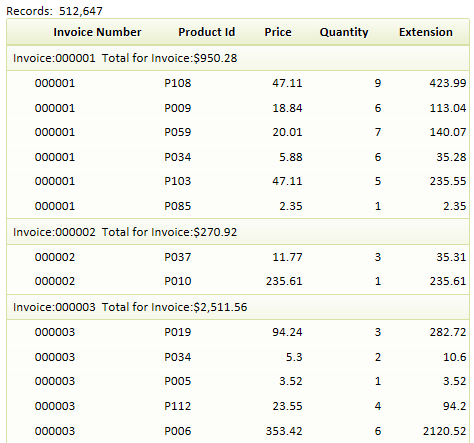
Invoice:{Invoice_number} Total for Invoice:{alltrim(str( convert_type([[groupSummary.Extension.total]],"N") ,250,2,"$("))}No Save and go to Working Preview. A Group Header showing the sum of Extension entries for each group.
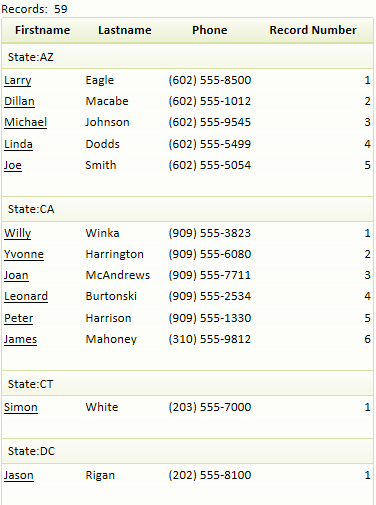
When you build a Grid there are two system fields, and , that you can place on your Grid. These two fields appear at the end of the available fields list on the Fields page of the Grid Builder. The starts at 1 and increments by 1 for each row on the Grid. However, when you have Group breaks turned on, you might like to display a value that starts at 1 after each Group Break. This can be easily done using a ' Custom ' control type. Here is how to do it.
Add Logical Record Numbers to a Group:
First create a grid with a Group break using the instructions above.
Go to the fields page and a dd an expendable field to the Selected Fields list. Use the arrow buttons to position the field at the end of the list.
In Field Properties list, on the Fields page, find the Display Settings properties. Under Display Settings find the Control type property.

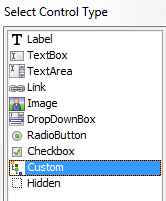
Click the button [dot_img] next to Control type. The Select Control Type dialog will load. Select the ' Custom ' control type and click OK .
Still on the Fields page, scroll down the Field Properties list until you find Custom Control Properties. Click the button [dot_img] next to the Definition property.

The Define Xbasic for Custom Control dialog will appear. Add the following Xbasic to the existing code...
if eval_valid("args.rtc.group1LogicalRowNumber") then
    YourField_render = "" + args.rtc.group1LogicalRowNumber
else
    YourField_render = "?"
end if
Example of inserted code. Here the Fieldname used was called 'YourField',

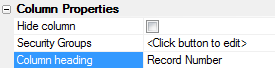
In the Field Properties under Column Properties write 'Record Number' next to the Column heading property.
Still in Column Properties, click on the Cell inline-style property. The Style Editor will open.

In the Text properties section of the Style Editor, find the Alignment property. From the drop-down select right. Click OK to close the Style Editor.

Now go to Working Preview . Your grid should appear something like this. Notice the 'Record Number' column at the right starts at 1 every time a new Group is started. Add a Record Number Column for each Group