Number of 'Layout' Columns
Description
The Number of 'Layout' Columns property takes all the information contained in a single record and displays it across a specified number of columns.
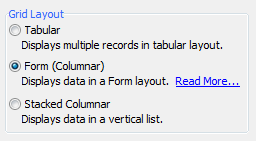
This property only works on columnar grids, i.e. Form(Columnar) or Stacked Columnar grids. You can set a grid component to columnar using the radio buttons in the Grid Layout menu on the Component Type page. To change the number of 'Layout' columns simply type the number of columns that you want in the input area next to the Number of Layout Columns property.
tmpl.LayoutColumns as N

Using the Layout Columns Feature:
Open the Grid Builder from the Web Projects Control Panel . Open the Design tab go to the Component Type page.
Select Form(Columnar) from the Grid Layout menu, you could also select Stacked Columnar.
Open the Data Source page and select either .dbf or SQL for your type of data.
On the Query(DBF) or Query(AlphaDAO) page create a connection to the table you want to use to retrieve data from. This uses the Alphasports Customerstable.
Go to the Fields page and move ten or so fields from the Available Fields: list into the Selected fields list.
Go to the Properties page on the Grid Builder's Design tab. Find the 'Layout Options' properties.
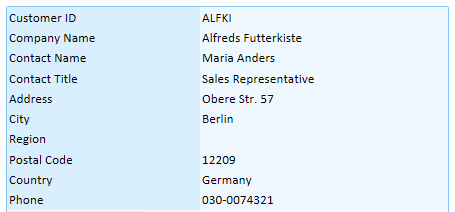
Under the Layout Options section find the Number of "Layout" Columns property. By default it should be set to 1.
Run your grid on the Working Preview tab and view the result.
Number of Layout Columns property set to 1

Number of Layout Columns property set to 2
Number of Layout Columns property set to 3

The controls wrap from left to right, then top to bottom. If the Number of "Layout" Columns property is set to a value greater than 1, you can further position the controls using:
Breaks
a break before or after a control forces the start of a new row.
Frames
a frame groups fields together inside a box, which may occupy one or more columns.
Colspan
the colspan value specifies the number of layout columns a control should use.
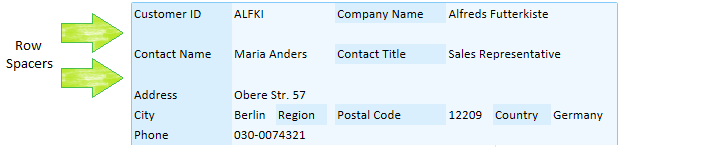
Column Spacers
a column spacer inserts a blank column after a control.
Row Spacers
a row spacer inserts a blank row after a control.
Merges
a merge groups adjacent controls together, so that they use a single common heading label.
When designing a grid component with columnar formatting (where the Number of "Layout" Columns property is greater than 1), you may position controls by adjusting their column span property and inserting row spacers after controls. The Column Span and Row Spacer properties are actually found on the Fields page of the grid builder. To change a Column span, open the Fields page, click on a selected field, and scroll down the Field Properties list to the Row Properties . Find the Column span property and change the number next to it to alter the number of columns the field encompasses. To add a Row Spacer , go to the Fields page and in the Selected fields list choose select a field, the row spacer will be placed under this field. Next click the Insert... text link below the Available Fields list. This will open the Insert Special Control dialog. Select the [Row Spacer] option and click OK . control The following example shows the effects of adding column spacers. In this case the grid has the following properties:
Using Row Spacers for Control Positioning:
From the Web Projects Control Panel open the Grid Builder. Once on the Design tab go to the Component Type page.
Select Form(Columnar) from the Grid Layout menu, you could also select Stacked Columnar.
Open the Data Source page and select either .dbf or SQL for your type of data.
On the Query(DBF) or Query(AlphaDAO) page create a connection to the table you want to use to retrieve data from. Like the previous example, this one also uses the Customerstable.
Go to the Fields page and move ten fields from the Available Fields: list into the Selected fields list.
Click on the Properties page to open it. In the Properties list locate the 'Layout Options' properties.
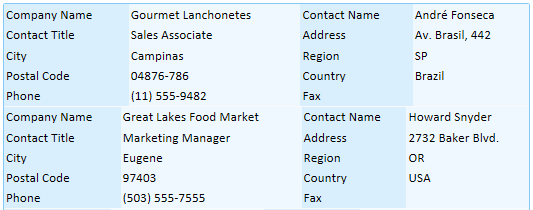
Under the Layout Options section find the Number of "Layout" Columns property and enter a ' 4 ' in the input box. In Working Preview your grid records should look something like this:

Now go to the Grid Builder's grid Fields page . Click on the first field in your Selected fields list. In the Field Properties list on the right scroll down to Row Properties.
Under Row Properties find the Column span property and set itto 2.
Now change the Column span property for the 2nd, 3rd, and 4th fields in your Selected fields list to 2 .
Click on the 5th field in your Selected fields list and change its Column span property to 4. Your grid should look something like this:
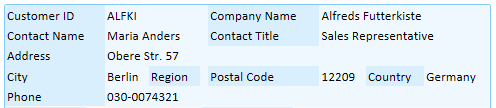 The 'Phone' field in the example above looks like its Column span is set to 4. The reason it appears like this, however, is because there are no fields following it.
On the Design tab's Fields page, highlight the 2nd field in your Selected fields list. Next click the Insert... link underneath the Available fields list.
The Insert Special Control dialog will open. Click on the [Row Spacer] control and click OK.
Highlight the 4th field in your Seleted fields list and add another [Row Spacer] underneath it. The result should look something like this... A Form Columnar grid with Row Spacers