Record navigator layout
 opens the Record Navigator Designer . This contains a number of pre-defined formats that let you adjust the look and feel of the record navigator. In addition to using the pre-defined designs there is also a custom options that allow you to adjust the record navigator at will.
"/>
opens the Record Navigator Designer . This contains a number of pre-defined formats that let you adjust the look and feel of the record navigator. In addition to using the pre-defined designs there is also a custom options that allow you to adjust the record navigator at will.
"/>Description
Clicking the Record navigator layout property button opens the Record Navigator Designer . This contains a number of pre-defined formats that let you adjust the look and feel of the record navigator. In addition to using the pre-defined designs there is also a custom options that allow you to adjust the record navigator at will.

tmpl
.RecNav.Page_Numbering_Style as N
.PagesTemplate_wout_PageCount as C
.Show_Page_Count as L
Add a Pre-Defined Page Navigator:
Make sure that No Navigation Bar is NOT selected in the Record Navigator position property.


The 'Use type-in box for page navigation' option lets users select the target page by typing the page number into an edit box and pressing Enter. This method gives users direct access to any page in the Grid (though not with A5V9 and below). To turn on this feature, open check the ' Use type-in box for page navigation ' checkbox in the Record Navigator Designer .

Create a User Type-in Box for Page Navigation:
Open the Design tab in the Grid Builder.
Go to the Grid Properties page. Scroll down to the Record Navigator/Grid Toolbar properties
View the result in Working Preview. Type-in box for page navigation:

If you check Custom layout design in the Record Navigator Designer then additional tools will be displayed to help you customize your page navigator. If you want to modify a pre-defined navigator simply click on the Pre-Defined Format radio button that you want and then click Custom layout design. The Customize region will show all links as they would appear in the selected format. Click OK to save your changes or Cancel to discard your changes.
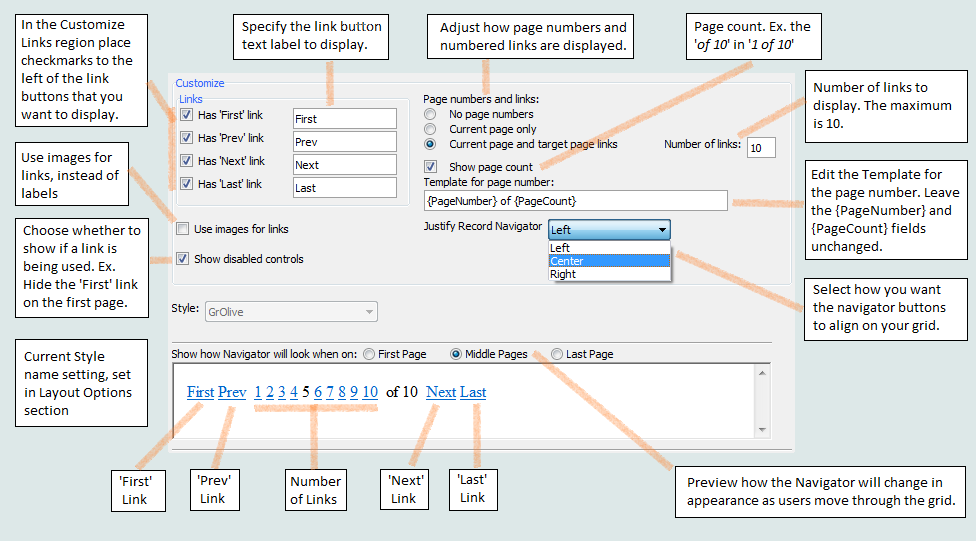
Create a Custom Layout:
Open the Grid Builder from the Web Projects Control Panel and go to the Design tab.
Under Data Source choose either .dbf or SQL .
Go to the Query(DBF) or Query(AlphaDAO) page and select a table from which to draw data.
Next assign some fields to the grid you are creating. Open the Fields page and use the arrows to fields from the Available Fields: list into the Selected fields list.
Make your way to the Properties page and scroll down the list of properties until you find the Record Navigator/Grid Toolbar section.
Under Record Navigator style select NavigationButtons.
Find the Record Navigator Position property and select Above Grid , Below Grid , or Above and Below Grid. Do not select the No Navigation Bar option.
Click the button [dot_img] next to the Record Navigator layout property to open the Record Navigator Designer .
In the Pre-Defined Format region select Custom layout . The Customize region of the dialog should quickly populate with tools.