Grid Data Source Menu
Description
The Grid > Data Source Menu provides two options that select the type of database connection that will be used: .dbf Tables or an SQL database accessed via AlphaDAO (Alpha Data Access Object). Selecting one or the other will show either the Grid > Query (DBF) or Grid > Query (AlphaDAO) settings.
Data Source: SQL Database accessed via AlphaDAO
(Recommended)
Selecting the SQL Database accessed via AlphaDAO option exposes the Query (AlphaDAO) pane where the query to populate the Grid component is specified.
Grid Query (AlphaDAO)
The Query (AlphaDAO) pane defines the Grid's data source, which is a SQL SELECT statement directed to a SQL back-end database. To access and manipulate SQL data, you will need to first establish a connection string.
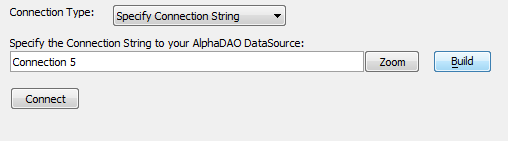
When you first access the Grid > Query(AlphaDAO) settings, it will ask you for a Connection Type:. If you don't want to give your connection a name, select Specify Connection String from the Connection Type: dropdown and click the Build button. This will load the Create SQL Connection String dialog.
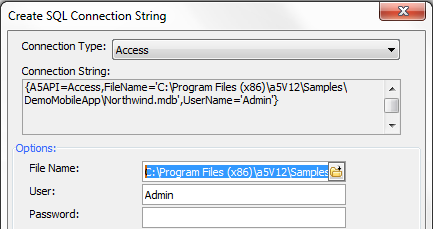
At the top of the Create SQL Connection String dialog you will notice another Connection Type dropdown. Here you can choose the database backend that contains the data you want to access. Most Connection Types will prompt you for additional information, such as a file location or a username and password, that is needed to access the database.
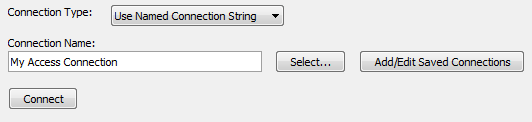
If you require multiple connection strings and store data in different databases, you may want to save your connections as Named Connection Strings. On the Query (AlphaDAO) pane, set Connection Type: to Use Named Connection String. Then, click Add/Edit Saved Connections to add a new named string.
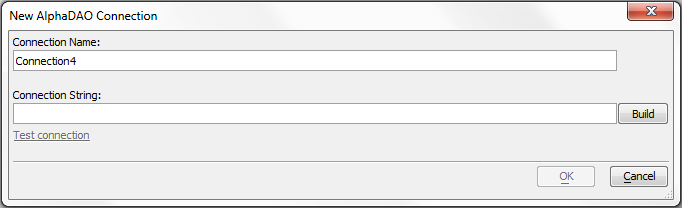
When the AlphaDAO Connection dialog appears, click New to create a new named connection. Enter a name for your connection in the Connection Name. Use the Build button to create the connection string or paste an existing connection string in the Connection String box. You can use the Test connection link to verify that your connection string works.
You can configure the Grid to use the named connection on the Query (AlphaDAO) using the Select... button. Select your named connection and click OK.
Once you have established the method to connect to your database, click Connect to open the connection and select the table(s) and fields to show in the Grid.
Building a SQL Connection String
Connection type
Specifies the type of connection to the database. Can be one of the following:
- Type
- Description
- Use Named Connection String
(Recommended) Allows you to select from the Connection Name list
- Specify Connection String
Create an ad-hoc connection. Click the Zoom or Build buttons to define a connection string.
After you have defined the connection to the database, you must click the Connect button to define the query to populate the Grid component with data.Use Named Connection String
 Connecting with a SQL Database Using a Named Connection String
If the Connection type is "Use Named Connection String", you will be asked to specify the connection name in the Connection Name textbox. If you know the named connection, you can type it into the textbox. Or, you can use the Select... or Add/Edit Saved Connections buttons to select and/or create the named connection.
- Button
- Description
- Select...
Select an existing named connection string.
- Add/Edit Saved Connections
Displays the Saved Connection dialog, where you can select, create, or edit a connection string.
Specify Connection String
 Connecting with a SQL Database By Building a Connection String
If the Connection type is "Specify Connection String", you must specify the connection string for connecting to the data source. The Zoom and Build buttons can be used to create the ad-hoc connection string.
- Button
- Description
- Build
Displays the Create SQL Connection String dialog, where you can create a connection string.
- Zoom
Displays the Edit Connection String dialog, where you can enter a connection string.
It is recommended that you use a Named connection string instead of an Ad-hoc connection.
Defining the Query
Once the connection to the data source has been established, you can define the Query that the Grid is based on. Click the Connect button to expose these options. You can choose one of three options:
- Query Type
- Description
- Table or View
The Grid is based on a SQL Table or View. Settings will be shown for selecting the table/view. You can specify an optional filter or order for the records. Arguments can be used in both the filter and order statements.
- SQL Select Statement
The Grid is based on a SQL Select statement, built using the SQL Query Builder dialog.
- Stored Procedure
The Grid is based on a Stored Procedure. If a Grid is based on a stored procedure, you must define the SQL statements necessary to count the number of records in the current query, sort the data, search the data, refresh a row, UPDATE/DELETE/INSERT records, and compute summary values (if necessary.) See How to Base a Grid on a Stored Procedure to learn more.
Configuring "Table or View"
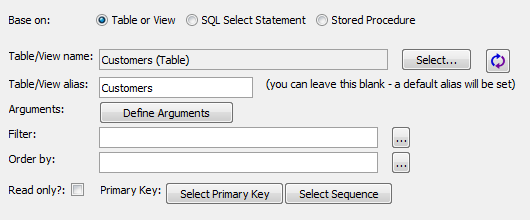 AlphaDAO Table Query
If the Grid query is based on a Table or View, then the following options are available to configure the query:
- Options
- Description
- Table/View name
(Required) The table or view that the Grid is based on. Use the Select... button to select the table/view. Use the
 Refresh button to fetch the information about the table/view from the database, including an updated list of fields.
- Table/View alias
Optional. This is the name that is used internally to refer to the table.
- Arguments
Optional. Arguments can be used in the Filter and Order expressions. Use the Define Arguments button to open the dialog for defining arguments.
- Filter
Optional. Specifies the expression that selects the records that will be included in the Grid. Use the
 smart field button to open the Specify Filter dialog to build the filter expression.
- Order by
Optional. Specifies the expression that orders selected records. Use the
smart field button to open the Specify Order dialog to build the order expression.- Read only
If checked, the Grid's fields will be displayed as read-only label controls.
- Select Primary Key
A primary key is required if you want to edit the data in the table. If the table/view does not have a primary key, you can manually specify it using this button.
- Select Sequence
If your database uses sequences to generate identity values (i.e. the primary key), this button can be used to specify the sequence.
Configuring "SQL Select Statement"
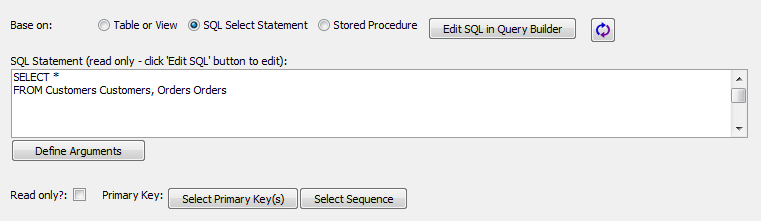 AlphaDAO SQL Query
If the Grid query is based on a SQL Select Statement, then the following options are available to configure the query:
- Options
- Description
- SQL Statement
(Required) The SQL Statement to retrieve records from the database. You must use the Edit SQL in Query Builder button to add/edit the SQL Statement. Use the
Refresh button to execute the SQL statement to update the field information from the database.- Define Arguments
Arguments can be used in the SQL query to retrieve records from the database (such as in the WHERE clause). You will typically define arguments in the SQL Query Builder dialog. The Define Arguments button can be used to quickly access existing Arguments and define new ones.
- Read only
If checked, the Grid's fields will be displayed as read-only label controls.
- Select Primary Key
A primary key is required if you want to edit the data. You can manually specify the primary key for the query using this button.
- Select Sequence
If your database uses sequences to generate identity values (i.e. the primary key), this button can be used to specify the sequence.
Configuring "Stored Procedure"
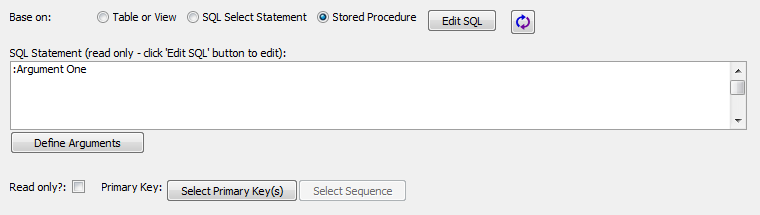 Stored Procedure Query
If a Grid is based on a stored procedure, you must define the SQL statements necessary to count the number of records in the current query, sort the data, search the data, refresh a row, UPDATE/DELETE/INSERT records, and compute summary values (if necessary.) See How to Base a Grid on a Stored Procedure to learn more.
If the Grid query is based on a Stored Procedure, then the following options are available to configure the query:
- Options
- Description
- SQL Statement
(Required) The SQL Statement to retrieve records from the database. You must use the Edit SQL button to define the Stored Procedure. Use the
Refresh button to execute the SQL statement to update the field information from the database.- Define Arguments
Arguments can be used in the SQL query to retrieve records from the database (such as in the WHERE clause). You will typically define arguments in the SQL to Run Stored Procedure dialog. The Define Arguments button can be used to quickly access existing Arguments and define new ones.
- Read only
If checked, the Grid's fields will be displayed as read-only label controls.
- Select Primary Key
A primary key is required if you want to edit the data. You can manually specify the primary key for the query using this button.
- Select Sequence
If your database uses sequences to generate identity values (i.e. the primary key), this button can be used to specify the sequence.
Data Source: .dbf Tables
Selecting the .dbf Tables option exposes the Query (DBF) pane where the query to populate the Grid component is specified.
Grid Query (DBF)
Display Data From
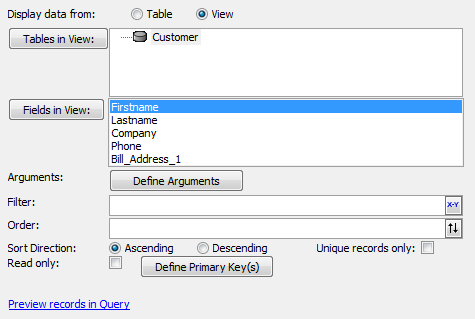
Specifies if the DBF query is based on a single table (Table) or multiple tables (View).
Table
Specifies that the Grid will interact with a single DBF table. Displays the Table name and Table alias fields.
View
Specifies that the Grid will interact with one or more DBF tables. Displays the Tables in View and Fields in View buttons.
Basing a Grid on a DBF Table
Depending on what you select from the Display data from option, the DBF data source will be derived from either a DBF table or view. Choosing Table means the Grid will be populated with data from a single DBF table. The table used is entered in the Table name textbox. Simply click on the dropdown to the right of the textbox and select one of the existing DBF tables saved in your workspace.
The Table alias, or the name used by Alpha Anywhere to refer to the table internally, is filled in automatically when you select a table name.
The Calculated fields option lets you input new fields into your Grid based on existing data in the table. If you click on Calculated fields, the Calculated Values dialog will open. To create new fields from existing ones simply type in the name of the new field and specify which existing fields will supply data to the new one.

The Calculated Values dialog has drop down lists of functions and existing fields to make this task simple. It also contains a number of additional tools as well as connections to the Expression builder, Fields (for inserting fields), and the Functions Finder.

The Define Arguments button opens the Define Arguments dialog which lets you specify arguments to be used in filter and order expressions.
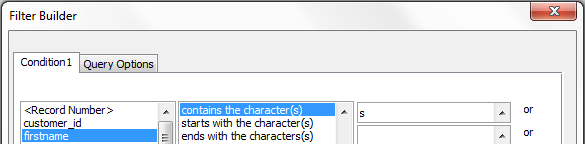
The Filter option lets you filter existing records for records containing certain characteristics. To create a filter click the  Filter icon. This will load the Expression Builder.
If you want help creating a filter in the Expression Builder, click the  Create Filter using Genie.
The Order option in the Table query lets you choose which field you will use to order records.
If desired, multiple order expressions can be specified. To do this, click the  button to the right of the Order option. This will open an Order Builder dialog that has dropdowns for all of your fields, including options to sort the data Ascending A..Z or Descending Z..A.
Below the Order option, Sort Direction lets you decide whether the records are sorted in an Ascending or Descending direction.
The Define Primary Key(s) button at the bottom of the table query lets you define whether to use record number or an expression for the tables primary key. Using an expression here is recommended, as a record's record number can change after a table is packed.
Table Query Options
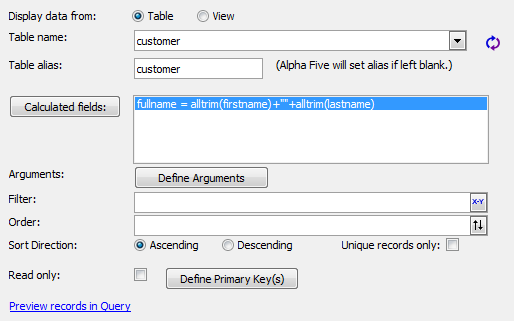
Table name
Displays a list of tables in the current database.
Refresh
Refreshes the contents of the Table name list.
Table alias
This is the name that is used internally to refer to the table.
Calculated fields
Calculated fields to include in the query.
Arguments
Displays the Define Arguments dialog, where you specify arguments to be used in filter and order expressions.
Filter
Specifies the expression that selects the records that will be included in the Grid.
Order
Specifies the expression that orders selected records.
Sort Direction
Specifies whether the order of records will be ascending or descending.
Unique records only
Specifies that the Grid will display unique records only.
Read only
Specifies that the Grid's fields will be displayed in label controls.
Define Primary Key(s)
Specifies the field(s) that uniquely identify each record.
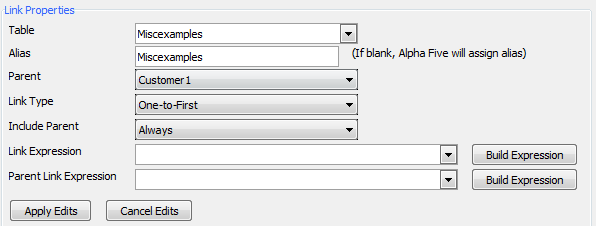
Basing a Grid on Multiple DBF Tables
If you choose View rather than Table, the Grid can be based on a combination of two or more DBF tables.
You can select the tables to add to the Grid's DBF query using the Tables in View button. Clicking Tables in View will open the Add Table dialog. Unless you specify otherwise, the Add Table dialog will also assign an alias to the selected DBF table.
If add additional tables to the first DBF table, you will be asked to both select the DBF table and define the linking properties between the new table and existing tables.
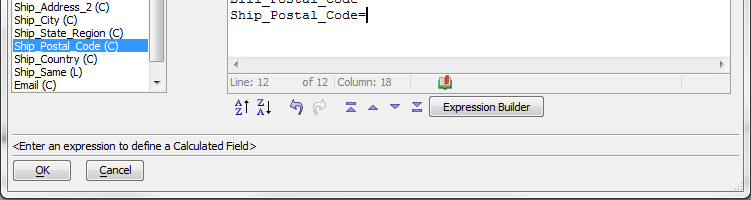
Clicking the Fields in View button loads the Select Fields in View dialog. Here you can create a list of fields and calculated field definitions.
The fields found in the selected DBF tables can be added to the Grid. The Select Fields in View dialog allows you to select the fields from a table that you want to work with in your view.
To add an individual field, simply select it from the list of the left and click the > right arrow button to add it to the view.
To move all the fields in your tables into the view, select a field in the list and click the >> double right arrows to bring them into the view.
Similarly, to remove fields from the view, select a field in the view list on the right and click the < left or << double left arrows to remove one or all of the fields from the view.
Once a field is in the view, you can place an = sign after the field to gain access to the Expression Builder. The Expression Builder button will appear at the bottom of the dialog as soon as you do this.
View Query Options
Tables in View
Displays the Add Table or Define Join dialog to add a table to a view.
Fields in View
Displays the Select Fields in View dialog, where you select the fields to display and define calculated fields.
Arguments
Displays the Define Arguments dialog, where you specify arguments to be used in filter and order expressions.
Filter
Specifies the expression that selects the records that will be included in the Grid.
Order
Specifies the expression that orders selected records.
Sort Direction
Specifies whether the order of records will be ascending or descending.
Unique records only
Specifies that the Grid will display unique records only.
Read only
Specifies that the Grid's fields will be displayed in label controls.
Define Primary Key(s)
Specifies the field(s) that uniquely identify each record.