The Define Arguments Dialog
Description
Arguments provide run-time values for use in the filter and order expressions of grid components. There are a couple places where you might regularly encounter the Define Arguments Dialog. One is in the Query section of the Grid Builder.
Finding Grid Query
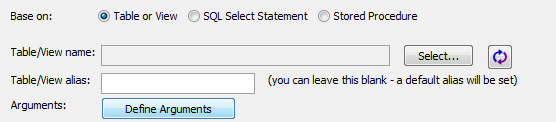
To get here, click the  button in the Web Projects Control Panel top open the Select Grid Component Template dialog. Select a template, or not, and then click OK to open the Grid Builder . On the Design page first choose a Data Source under the Data Source page, selecting either .dbf or SQL tables. Then look at the Grid> Query page. If you selected .dbf Tables as your Data Source then you should see a Define Arguments button halfway down the Query(DBF) page, regardless of whether you have defined a Table name. Click on this and it will open the Define Arguments Dialog . If you chose a SQL table for your Data Source, then you will need to first create a connection string to the SQL table that you will use before the Define Arguments button becomes visible in Query(AlphaDAO) . For more on connection strings see the 'SQL Connection String Dialog'page. Once you choose a connection and click Connect, then you should see the Define Arguments button open on the Query(AlphaDAO) page. Click it to open the Define Arguments Dialog .
Arguments that use a prompt to obtain their value:
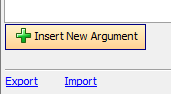
Once the Define Arguments dialog opens, click the Insert New Argumentbutton.
This will open the New Argument dialog. Enter the name of the argument into the Argument Definition > Namefield.
Select the data type of the argument in the Argument Definition > Data Typelist. The options are:
"Character"
"Numeric"
"Logical"
"Date"
"Time"
"Y-Shorttime"
"K-UUID"
Click OK to close the New Argument Dialog. You should see your new argument added to the Define Argument dialog's Existing Arguments list.
Go to the menu on the right side of the Define Arguments Dialog and look at the Argument Definition portion of the menu. You will notice the Name and Data Type have now been filled.
 Setting 'Get Argument value from'
Under the Argument Definition options go to the Get argument value fromoption. Define the type of source the argument's value will use. The options are:
"Always prompt for value"
"Get value from variable"
Select ' Always prompt for value ' option you will notice a Define prompt option appear in the Argument Definition section . If you click the button
 next to this option it will open the Define Prompt Dialog. Add the Prompt Text of the prompt that asks for the value for the Argument and click OK to exit the Define Prompt dialog. Click OK again to save your inputs, create the argument, and exit the Define Argument Dialog.
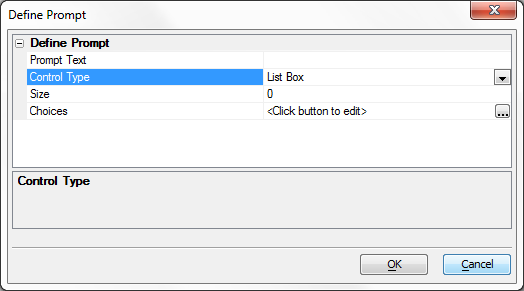 Prompt Text
The Define Prompt Dialog
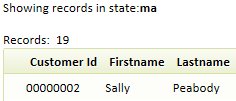
The Define Prompt dialog, located inside the Define Arguments dialog, has several properties associated with it. The Prompt Text is the text that will be displayed in front of the data choices control, for example 'What City?' or in the example shown below 'Showing records in state'.
The Control Type property lets you choose the control to use in defining a prompt. The options are a drop down box, list box, radio button, or text box. The 'Drop Down Box', 'List Box', and 'Radio Button' controls all have a Choices property. Clicking the button next to 'Choices' will display the Enter List of Choices dialog. Here you can enter all of the choices that will appear in the control.

The "List Box" control also comes with a Size property. Size specifies the number of lines to display in the list box. Entering a value of 0 here means that the list box will display as many lines as there are choices. Clicking OK to go back to the Define Arguments dialog.
Arguments that get their value from a variable:
Open the Define Arguments dialog and click Insert New Argument .
In the New Argument dialog, fill in an Argument Name and select a Data Type . Click OK .
Back in the Define Arguments dialog go to the Argument Definition section on the right-side of the dialog.
Select ' Get Value from variable ' in the 'Get argument value from' option, you will need to define the variable. Under the Variable section of the Define Arguments menu click the
button to the right to open the Select Variable Dialog.Click the Add New Variable button to add a new variable.

This will open the New Variable dialog. Define a name for your new variable and also select your variable's scope. Your options are...
Session Variable
Cookie
Page variable
Click OK to create the argument or, optionally, repeat this procedure to create another argument.
Click OK to save your inputs or Cancelto discard your inputs when you have completed defining arguments.
The Select Variables Dialog
The Select Variable dialog lets you add variables to your arguments. If there are existing variables in the Variables list, you can simply highlight them and click OK to add them to an argument. To create a new variable simply click the Add New Variable button. This will open the New Variable dialog. under Variable name write the name of the variable you want to create.

In the New Variable dialog you will also need to choose the Variable scope . The options are a Session variable, a Cookie, or a Page variable. A 'Session variable' lives for the lifetime of any given session. For example, if someone logs on to an app and starts clicking on buttons, a session variable will be remembered between every call the person makes. A 'Cookie' variable will live a lot longer than a session variable. The user can close down their app and the browser and the cookie variable will still be there. A 'Page variable' only occurs on the page you are on and can not see past that page. Use the 'Page variable' option if you want to set the value of the argument to the value of the field in the current record.

Once you select the Scope of your variable click OK to return to the Select Variable dialog. Highlight the variable you would like to assign to the argument under the ' Variables ' list and click OK to return to the Define Arguments dialog.