Dynamically Re-populate the Choices in an Edit-Combo using Javascript
Description
Text box controls can be used to create edit combo boxes. The choices shown in an edit-combo can then be dynamically repopulated at run-time using Javascript.
Re-populate a Simple "Static" Choices based Edit-Combo box.
For a video explanation describing this process watch this video or use the guide below.
In the UX Builder's UX Controls page open the 'Data Controls' menu. Click on the [TextBox] option to add a textbox control to the component.

Highlight the text box control. Scroll down the textbox control's properties list on the right. In the 'Lookup' section check the 'Lookup' property.

Click the dropdown next to the 'Lookup type' property. Select the 'Edit-Combo List' option.

Click the [...] button next to the 'Lookup definition' property.

In the Edit Combo Builder from the 'Choices are' selection choose the 'Static' option.
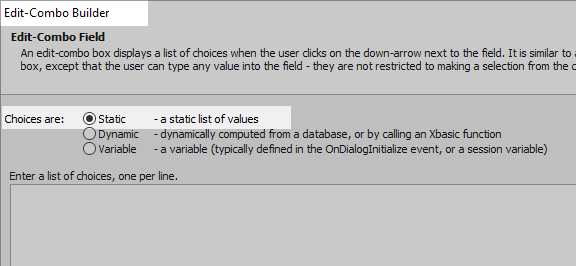
Enter the choices to appear in the Edit-Combo box.
 If you are using the iOS7 style, setting the 'Width' property under the Window Properties section to something like 1in might be a good idea. Alternatively you can increase the 'Height' property.
Open the 'Other Controls' menu. Click on the [Button] option to add a button to the component.

Highlight the button. In the Button Properties section of the properties list set the 'Button text' property to read 'Set Choices Simple'.

Scroll down the properties list to the 'Javascript' section and click the [...] button next

Click on the 'Text mode' radio button in the Edit Click Event dialog. Add the following code and click Save.
var _d = ['alpha','beta','gamma'];
var obj = {Dialog.object}.getControl('TEXTBOX1');
var newData = _d;
obj.setData(newData);
Run the component in Live Preview. First click the dropdown in the Edit-Combo box, note the static choice selections you defined.

Click the 'Set Choices Simple' button and then reopen the Edit-Combo box. You should see a different set of selections.

About 'Static' data
In the example above, if you were to look at the source dialog and looked at the Edit-Combo definition by searching a5.edit you might see something like this.

The static data for the edit-combo is a simple array. When the 'Set Choices Simple' button was defined this array was replaced with another simple array:
['alpha','beta','gamma']
More complex data sources use arrays of objects, each of which can contain their own properties. The Guide below describes how to dynamically repopulate a more complex Edit-Combo.
Re-populate a SQL based Edit-Combo
In the UX Builder's UX Controls page open the Data Controls menu and click on [TextBox] to add a textbox control.

Highlight the textbox control. In the properties list in the 'Lookup' section check the 'Lookup' property checkbox.

From the 'Lookup type' property dropdown select 'Edit-Combo'.

Check the [...] button next to the 'Lookup definition' property.

In the Edit Combo Builder select the Choices are: 'Dynamic'' radio button.

In the Edit-combo Definition section. Set the Dynamic type property to AlphaDAO and the 'Connection string' to the to Northwind database,

Set the 'Table name' property to be Customers.

From the 'Fields to display' property select COUNTRY.

Set the 'Field to Return' to be 'Country'. Click OK to close the Edit-Combo Builder.

Highlight the textbox control. Open the 'Other Controls' menu and click on the [Button] option to add a button control to the component.

Highlight the button control. In the properties list under 'Button Properties' set the Button text property to read "Set Choices".

Scroll down the properties list to the Javascript section. Click on the [...] button next to the onClick property.

In the "Edit onClick Event" dialog check the 'Text mode' radio button. Add the following code and click save.
var obj = {Dialog.object}.getControl('TEXTBOX1');
var newData = [
     {COUNTRY: 'Alpha Corp'},
     {COUNTRY: 'Beta Corp'},
     {COUNTRY: 'Gamma Corp'}
     ]
obj.setData(newData);
Here the array of objects containing the COUNTRY property, that was defined in the 'Customers' table's Country field, is being replaced by an array of objects defined in Javascript.
Run the component in Live Preview. First click on the Edit-combo drop down to see the list of countries from the 'COUNTRY' field.

Now click the 'Set Choices' button and click on the Edit-Combo again. The selection should be different.
