Populate a UX Tree Control from a Database using an Ajax Callback
Description
How to create an Ajax callback to populate a tree control using a database. This example uses the Northwind Customers table.
You can also see the guide explained in this video.
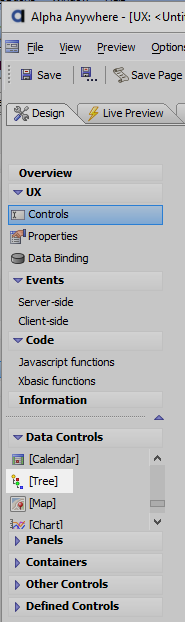
Open the UX Builder's UX Controls page. In the Data Controls menu click on the [Tree] option to add a tree control to the component.
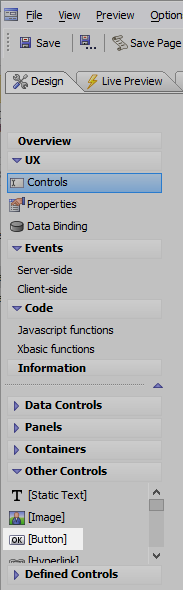
Scroll through the 'Other Controls' menu and click on [Button] to add a button control to the component. Give this control the name 'Populate Tree'
Highlight the button control and view its control properties. Scroll down to the "Javascript - (Touch, Mouse, Pointer Events)" section. Click the
 button next to the 'click' property.

The Edit Click Event dialog will open. Select the 'Action Javascript' radio button and click on the 'Add New Action' button.

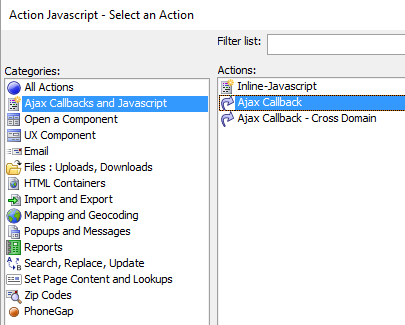
The Action Javascript - Select an Action dialog will open. In the Categories list select "Ajax Callbacks and Javascript". In the "Actions" list on the right select "Ajax Callback". Click OK
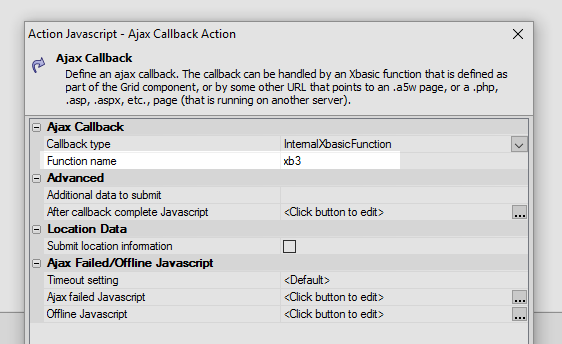
You will now be prompted to set some properties for the callback. Set the 'Function name' property to be 'xb3'. Save and close.
Now go to the Code > Xbasic functions page. Add the following function definition to the code page:
function xb3 as c (e as p)
dim cn as sql::Connection
cn.open("::Name::Northwind")
sql = "select country, city, contactname from customers order by country"
cn.Execute(sql)
rs = cn.ResultSet
txt = rs.ToString(-1,-1,.f.,"|")
txt2 = *tree_to_outline(txt,chr(9))
txt3 = a5_treeTextToJSON(txt2)

dim js as c = ""
js = js + "var tObj = {dialog.object}.getControl('tree1')" + crlf()
js = js + "var d = " + txt3 + ";" + crlf()
js = js + "tObj.populate(d);"

xb3 = js

end function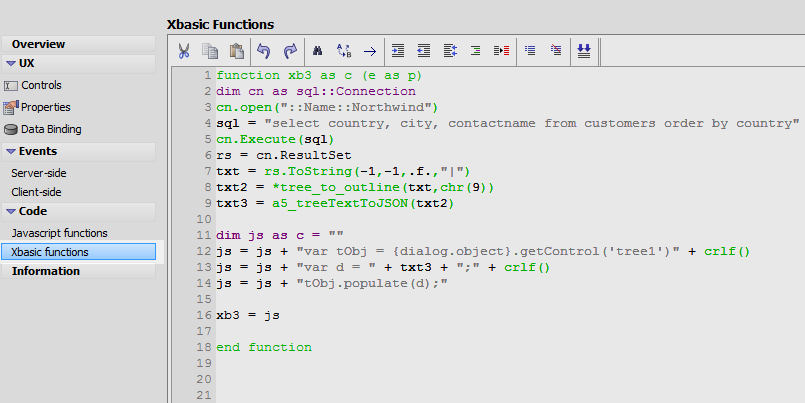
Note this line of code:
cn.open("::Name::Northwind")This assumes you have created an SQL connection to the Northwind database and called it 'Northwind'. In order to view your SQL Connections click on the SQL Tools Menu in the toolbar at the top of the workspace. From the list select the AlphaDAO Connection Strings option.

Double check the name of the connection string you are using. If there is no Connection String then create one. Then insert the Connection String's name into the code:
cn.open("::Name::Your_Connection_String_Name_Here")
Run the component in Live Preview.

Press the Populate Tree button.
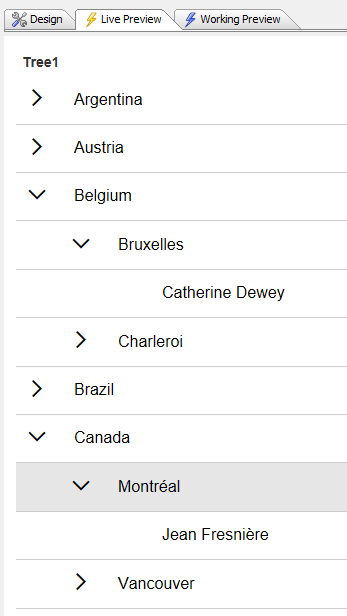 The populated tree uses Country, City, and Customer fields.