Two-factor Authentication
- Overview
- How to Set up Two-Factor Authentication
- Token Expiration
- Allowing Users to Set their Two-factor Authentication Preferences
- Two-factor Authentication Preferences Component
- How to Programmatically Set A User's Two-factor Authentication Preferences
- How to Require All Users to Use Two-step Authentication
- Sample Login Components
- TabbedUI Component
- Videos
Description
Enable Two-factor Authentication to provide a more secure way for users to log into your applications.
Overview
Two-factor authentication can be implemented as a user-preference (i.e. some users of your application may choose to enable it while others might want to continue using single-factor authentication). Users who elect to turn two-factor authentication on can then select the way in which they will get the authentication code. If you want to force all users of your application to use two-factor authentication you can write Xbasic code (discussed below) to automatically set the user preference.
Two-factor authentication provides a more secure way for users to log into an application. The log-in process is divided into two stages. In the first stage the user is prompted for their userid and password. If the userid and password are successfully validated, the log-in process advances to the second stage where the user is prompted to enter an authentication code.
If the user enters the correct authentication code they will then be logged into the application.
There are various ways in which the user can get an authentication code after their userid and password have been validated in the first stage. The options are:
- SMS
A SMS message is sent to the user's mobile device. The SMS message contains the authentication code.
An email is sent to the user with the authentication code
- Google Authenticator
The user will open the Google Authenticator App on their mobile device to get a authentication code.
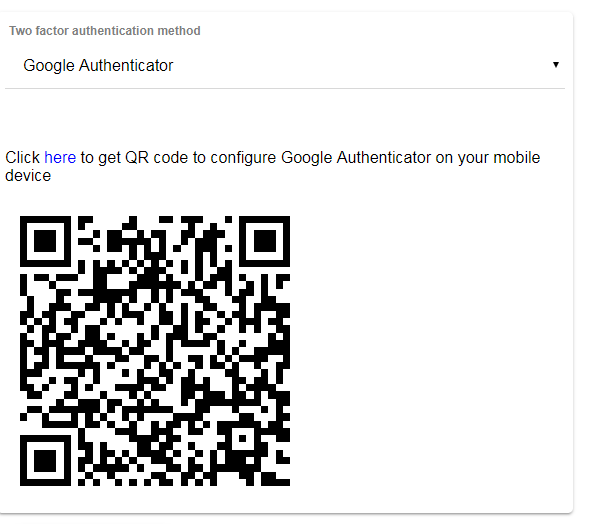
Before the user can use the Google Authenticator App they will first have to register the application. You can generate a QR code to help the user register your app in Google Authenticator (see below).
How to Set up Two-Factor Authentication
Before you can turn on Two-Factor Authentication you must first define an Extended User Information table for your Web Project.
This table is used to store each user's preferences for Two-Factor Authentication. For example, if a user specifies that they want to use SMS to receive their authentication code, the user's mobile phone number will be stored in this table. If the user specifies that they want to use Email to receive their authentication code, the user's email address will be stored in this table.
Once you have defined the Extended User Information table for your Web Project you can set up your Two-factor Authentication properties.
- To set up the Extended User Information table click the Project Properties button on the Web Projects Control Panel. Expand the Extended user security info property and define your settings. VERY IMPORTANT: When you define the fields for the Extended User Information table you must include a field called OtherOptionsJSON of type M.
- To set up the Two-factor Authentication properties click the Project Properties button on the Web Projects Control Panel. Expand the Two-factor Authentication property and define your settings.
Token Expiration
If a user elects to receive their two-factor authentication via SMS or Email you can set an expiration on the token. The default expiration is 2 hours (7200 seconds). If a user does not use the token they received to complete stage 2 of their login within the allowed time, the token will expire and the user will have to start their login flow from scratch. You can set the token lifetime in the Web Project Properties.
Allowing Users to Set their Two-factor Authentication Preferences
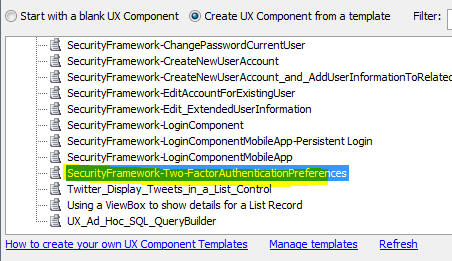
Your Web Application will typically have a page where user's can go to define their two-factor authentication preferences. A sample UX component is provided for you to include in your Web Application. You can customize this sample component. To use this sample component, create a new UX Component and select the SecurityFramework-Two-FactorAuthenticationPreferences template. See "Two-factor Authentication Preferences Component" below for more information.
Two-factor Authentication Preferences Component
A sample UX component is provided to allow you to let users of your application specify if they want to turn on two-factor authentication, and if so, what their preferred method is for getting the authentication code.
If you want to allow users of your application to choose whether or not to use two-factor authentication then you will want to include this sample component in your application.
When you create a new UX component, select the SecurityFramework-Two-FactorAuthenticationPreferences template.
Here is how the component will look for a user who has turned two-factor authentication on and who has selected the Google Authenticator app as their method for obtaining the authentication code.
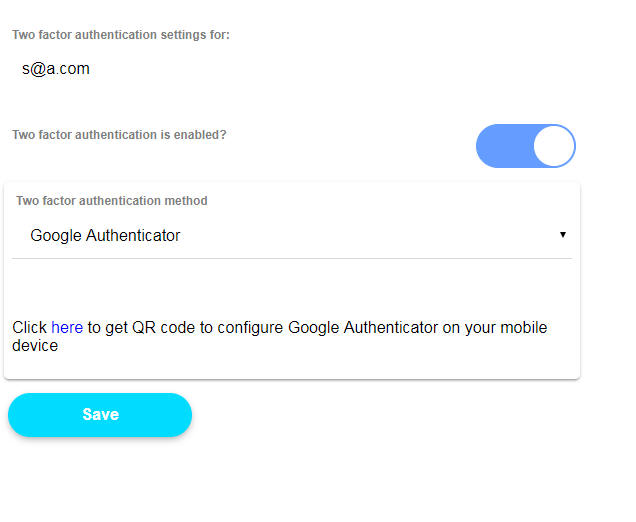
If a user selects Google Authenticator as their method, the user can then click on the hyperlink shown in the above image to obtain a QR code that can be used to configure the Google Authenticator app on their mobile devices.
If the user selects SMS, the dialog will allow the user to enter their mobile device's phone number.
If the user select Email, the dialog will allow the user to enter the e-mail address where the authentication code should be sent.
How to Programmatically Set A User's Two-factor Authentication Preferences
Two Xbasic functions make it easy to get and set a user's two-factor authentication settings. These are the a5_setTwoFactorAuthenticationSettings() and a5_getTwoFactorAuthenticationSettings() functions
Setting Two-factor Authentication Options
Syntax:
p result = a5_setTwoFactorAuthenticationSettings(c userid,c json)
Where:
- result
An object with error and errorText (if error is .t.) as properties.
- userid
The user's user id
- json
JSON string defining the two-factor options. For example:
{
    "requireTwoFactorAuthentication": true,
    "method": "Google Authenticator",
    "mobilePhone": "",
    "email": ""
}
Getting Two-factor Authentication Options
Syntax:
c result = a5_getTwoFactorAuthenticationSettings(c userid)
Where:
- result
A JSON string showing user's settings. (Use json_parse() to convert the string to an Xbasic dot variable)
- userid
The user's user id
An example of what the returned result might be:
{
    "requireTwoFactorAuthentication": true,
    "method": "Google Authenticator",
    "mobilePhone": "",
    "email": ""
}
How to Require All Users to Use Two-step Authentication
By default, the security framework uses single-step authentication. Once a user has entered a valid user id and password they are logged into the application.
If you want to force all users to use two-step authentication you must programmatically set their two-step authentication preferences. This must be done on a user by user basis since each user's settings are unique (unless the method is Google Authenticator). Settings are unique for each user because in the case of SMS, it is necessary to store the user's mobile phone number and in the case of Email, it is necessary to store the user's email.
Each user's initial log in to your application will be a single-step login. However, in the server-side onLogin event you can redirect the user to a page where you can prompt for their mobile phone number or email address and then you can store their preferences.
On subsequent logins the user will go through the two-factor login process.
Sample Login Components
When you create a new UX component there are three sample template components that you can use for user login. These are:
- SecurityFramework-LoginComponent
- SecurityFramework-LoginComponentMobileApp
- SecurityFramework-LoginComponentMobileApp-PersistentLogin
Each of these sample components has been updated to support two-factor authentication (if two-factor authentication is turned on for that user). If the user does not have two-factor authentication turned on, then these components will use a single step login process.
When creating a Login component as a UX you should be sure to set the permission for the component and for the page that hosts the component as Always Allowed.
TabbedUI Component
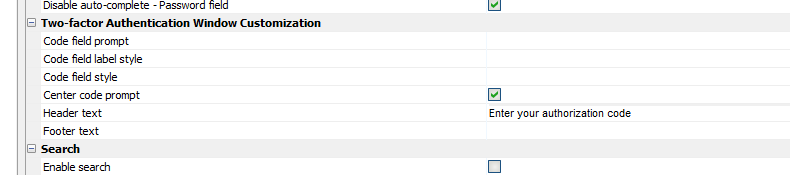
The TabbedUI component allows you to integrate a login window as part of the component. The TabbedUI builder now has a section for customizing the UI that is shown when the prompt for the authorization code is shown.
Videos
Introduction to Two-factor Authentication
Two-factor authentication is a more secure than single-factor authentication because even if a user's password is stolen, the user account is still protected because the person who stole the password will likely not be able to get the authentication code to complete the login to the application.
In this video, we demonstrate a login component that utilizes two-factor authentication.
Configuring the Extended User Information Table for Two-factor Authentication
Before you configure a web project to use two-factor authentication, you first have to create an Extended User Information table for your web project.
This video shows how to create an Extended User Information table.
Configuring a Web Project to use Two-factor Authentication
In order to use two-factor authentication in a web project you must configure settings in the application Project Settings.
In this video, we show how two-factor authentication settings are defined.
Setting User-preferences for Two-Factor Authentication
Two-factor authentication is a preference setting for each user in your application. Some users may elect to turn two-factor authentication on, while others may prefer single factor authentication. If a user turns two-factor authentication on, they must specify which option they wish to use - SMS, Email or Goggle Authenticator.
A sample UX component is provided to allow users to set their two-factor authentication preferences. In this video we show how to use this sample UX component.