Writing Dialog Event Scripts
- Initialize Events
- Validate Events
- AfterValidate Events
- Activate Events
- Declarations
- Redirecting to a Different Page
- CurrentForm
- Type
- Details
- CurrentForm.Has_Error
- Type
- Details
- CurrentForm.Error_Message
- Type
- Details
- CurrentForm.RedirectTarget
- Type
- Details
- CurrentForm.InitialExecution
- Type
- Details
- CurrentForm.Controls . ControlName
- Type
- Details
- CurrentForm.Controls . ControlName.Value
- Type
- Details
- CurrentForm.Controls . ControlName.Property
- Type
- Details
- CurrentForm.Controls . ControlName.Has_Error
- Type
- Details
- CurrentForm.Controls . ControlName.Error_Message
- Type
- Details
- Print Report Genie
Description
Web publishing applications only. Form event scripts provide an opportunity to respond to or process the input from a dialog (form) web component. You can run scripts when the following events occur.
OnClick - Available only for AdvancedButton objects. The OnClick script runs every time the button is clicked.
Initialize - The Initialize event fires once, the first time the Form is run.
Validate - The Validate event fires when a form is submitted.
AfterValidate - The AfterValidate event fires after the Validate event.
Activate - The Activate event fires every time the form is run.
Initialize Events
The Initialize event fires once, the first time the form is run. If the form is submitted back to itself (as is typically the case, so that the values in the Form's controls can be validated), the Initialize event is not fired. The Initialize event is typically used to set initial values for controls on the Form. If you need to execute code every time the Form is run, use the Activate event.
Validate Events
The Validate event fires when a form is submitted. Use this event to check that the value in a control is valid. If your script determines that an error has occurred, then you should set the following object properties:
CurrentControl.Has_Error = .t.
CurrentControl.Error_Message = ""
You can also use this syntax:
CurrentForm.Controls..Has_Error = .t.
CurrentForm.Controls..Error_Message = ""
If the CurrentControl.Has_Error property is ".T.", then the form will be redisplayed with the error message shown at the top of the form. The user can then make corrections and resubmit the form.
AfterValidate Events
The AfterValidate event fires after the Validate event, but only if no object on the form has had its .Has_Error property set to ".T.". A typical use of the AfterValidate event is to redirect control to another page in the application. For example:
If Condition1 = .t. Then
    Response.Redirect("Page1.a5w")
Else
    Response.Redirect("Page2.a5w")
End If
Activate Events
The Activate event fires every time the form is run. It fires after the Validate and AfterValidate events. A typical use of the Activate event is to programatically populate drop down list boxes on the Form.
Declarations
When you display the Form Events dialog and select "Declarations" from the Event list box, you to define any User Defined Functions that you want to be available to all Xbasic event code.
Redirecting to a Different Page
In a dialog component, you place the code that will redirect to another page in the AfterValidate event. If the user has selected the destination from a DropDownBox, the name you assigned to the DropDownBox control is the name of the variable that contains the value. You cannot use SYS_OPEN()in an event because it will hang the Application Server. You cannot use any Xbasic in an event that results in user interface being displayed. Assume that the control's name was menuselect and that the entry that is associated with the URL was " assi ". Assume that the URL was "
" http://www.nksoa.org/ftp/assignhelp/assignhelp.html ".
In your AfterValidate event you would put something like the following:
IF substr(menuselect,1,4) = "assi"
 URL_var = "http://www.nksoa.org/ftp/assignhelp/assignhelp.html"
 response.redirect(URL_var)
 end if
Optionally, select a different event to respond to from the Event drop-down list.
Write your Xbasic script.
Optionally, click Insert and select a menu entry to insert code into your script. The options are:
CurrentForm
CurrentForm.Has_Error
CurrentForm.Error_Message
CurrentForm.RedirectTarget
CurrentForm.InitialExecution
CurrentForm.Controls . ControlName
CurrentForm.Controls . ControlName.Value
CurrentForm.Controls . ControlName.Property
CurrentForm.Controls . ControlName.Has_Error
CurrentForm.Controls . ControlName.Error_Message
Print Report Genie
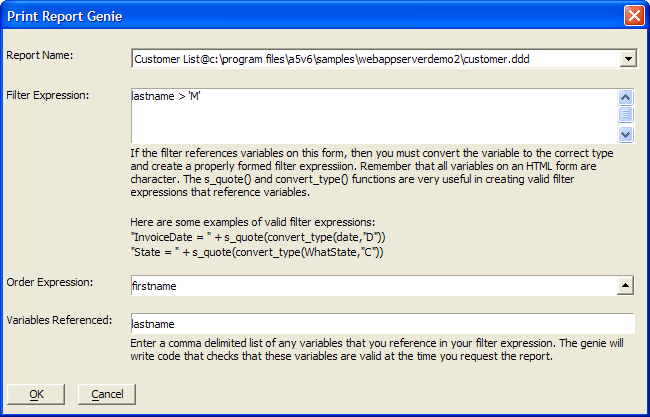
The Print Report Genie generates Xbasic code for the AfterValidate event of dialog components. However, you can use this genie to generate Xbasic code, which you can copy for use on A5W pages. To use the Print Report Genie :
From the Web Projects Control Panel open a dialog component in the Dialog Component Builder.
Display the Form > Properties page.
Select Server Events > AfterValidate.
Click Insert > Genies > Print Report to display the Print Report Genie.
Click the 'down arrow' icon in the Report Name list to select a previously created Alpha Anywhere report from your database.
Enter a Filter Expression. To select all records enter .T. .
Optionally, enter an Order Expression. Click the 'down arrow' icon to use the Order Builder.
Enter a comma delimited list of all variables that you use in the filter expression into the Variables Referenced field.
Click OK.
The screen shown above inserts the code shown below. Note how the script places the PDF report in the session_folder with a default name of "tempreport.pdf" and then prints it. If you wish, you can modify this code. For more information see REPORT.SAVEAS().
IF eval_valid("lastname") = .f. Then
    goto skipreport
end if
dim filter as c
dim order as c
Filter = lastname > 'M'
Order = "firstname"
Dim filename as c
filename = session.session_folder + chr(92) + "tempreport.pdf"
filename = report.saveas("Customer [email protected]_Path\customer.ddd","pdf",filter,order,filename,.f.)
if file.exists(filename)
    currentform.RedirectTarget = session.session_url + "tempreport.pdf?" +time("hms3")
end if
skipreport:
See Also
