Displaying and Printing Bitmaps
Description
Xbasic offers a large number of functions that will create, draw, display, and print bitmaps.
The General Process
The general process when working with bitmaps is to:
Optionally, read graphical data into a blob variable.
Create a bitmap in memory, either from graphical data or by using various drawing functions.
Optionally, modify the bitmap with various drawing functions.
Optionally, save the bitmap.
Display the bitmap on a form or Xdialog, or
Send the bitmap to a printer.
Reading Graphical Data
As the following example shows, it is easy to read binary data into a blob variable with the FILE.TO_BLOB() method.
dim png_data as B
png_data = file.to_blob("c:\documents\Xbasic Reference\Images\toucan.png")
Creating a Bitmap in Memory
One way to create a bitmap is to use the UI_BITMAP_LOAD() function to extract graphical data from a blob variable. This example creates a bitmap in memory named "test1". This bitmap is implicitly sized by its content data.
ui_bitmap_load("test1", png_data)Another way to create is bitmap is to use the UI_BITMAP_CREATE() function to create a blank "slate" of a particular size. This example creates a bitmap in memory named "test2" that is 4 inches wide and 1 inch high.
ui_bitmap_create("test2", 4, 1)Or you might grab a piece of the screen image with the UI_BITMAP_CREATE_FROM_SCREEN() function. The following example captured a 4 by 2 inch rectangle from the upper left corner of the screen.
ui_bitmap_create_from_screen("test3", 0, 0, 4, 2)Modifying and Displaying the Bitmap
The are a large number of Graphic Functions that you may use to modify the bitmap image. These functions are embedded into the Code section of the UI_BITMAP_DRAW() function.
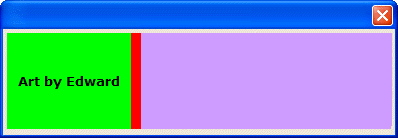
ui_bitmap_create("test", 4, 1)
ui_bitmap_draw("test",<<%code%
set_font("Verdana,10,b", "black", "green")
set_brush("green")
inner_Rect(0, 0, 1.3, 1)
set_brush("red")
inner_Rect(1.3, 0, .1, 1)
set_brush("Lavendar")
inner_Rect(1.4, 0, 2.6, 1)
text("Art by Edward", .65, .5, "center")
%code%)
ui_dlg_box("", "{image=test}")
ui_bitmap_drop("test")
Printing the Bitmap
If you were going to print this lovely image, the code would look like this. First, dim the variables and define the bitmap in a variable named page_description, which contains the same Code section included in the UI_BITMAP_DRAW() function.
dim page_description as C
dim program_name as C
dim printer as C
page_description = <<%code%
set_font("Verdana,10,b", "black", "green")
set_brush("green")
inner_Rect(0, 0, 1.3, 1)
set_brush("red")
inner_Rect(1.3, 0, .1, 1)
set_brush("Lavendar")
inner_Rect(1.4, 0, 2.6, 1)
text("Art by Edward", .65, .5, "center")
%code%
Now, print the bitmap using the UI_PRINTER_DRAW() function:
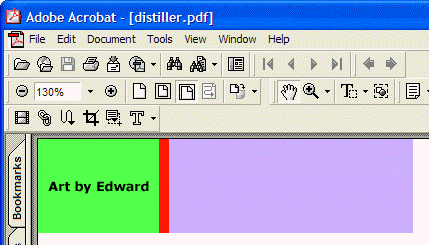
printer = "Acrobat Distiller"
program_name = "C:\Program Files\Adobe\Acrobat 5.0\Distillr\AcroDist.exe"
ui_printer_draw(printer, "please wait", "c:\distiller.ps", page_description)
if (file.exists("c:\distiller.pdf")) then
    file.remove("c:\distiller.pdf")
end if
cmd = program_name + " c:\distiller.ps"
sys_shell(cmd)
wait_until(file.exists("c:\distiller.pdf"), 1, 10)
Saving a Bitmap
The following example creates and saves this picture to a file.
dim pretty_picture as B
dim ptr as P
ui_bitmap_create("test", 4, 1)
ui_bitmap_draw("test",<<%code%
set_font("Verdana,10,b", "black", "green")
set_brush("green")
inner_Rect(0, 0, 1.3, 1)
set_brush("red")
inner_Rect(1.3, 0, .1, 1)
set_brush("Lavendar")
inner_Rect(1.4, 0, 2.6, 1)
text("Art by Edward", .65, .5, "center")
%code%)
pretty_picture = ui_bitmap_save("test")
ptr = file.create("c:\pretty_picture.bmp", FILE_RW_EXCLUSIVE)
ptr.writeb(pretty_picture)
ptr.close()
ui_bitmap_drop("test")
Interactive Window
These functions may be tested in the Interactive window. For example:
' turn on graphics mode
mode graphics
' draw a rectangle
fill_rect(1, .5, 3, 2)
' draw a line
line(1.1, 2, 2, 2.5)
' turn off graphics mode
mode text
See Also