SimpleChart Style Xdialog
Description
The SimpleChart style Xdialog displays numeric data in the form of a bar, pie, or line chart. To create a list view style Xdialog.
Create a new Action Script.
Select "Xdialog Windows" in the Category list.
Select "Display an XDialog Box" in the Action list.
Click OK to display the Script Genie.
Enter the name of new variable in the Variable Name field.
Optionally, change the value of the Prompt field.
Optionally, change the selection in the data Type list.
Select "SimpleChart Control" in the Style list.
Set the Width and Height of the resulting dialog box.
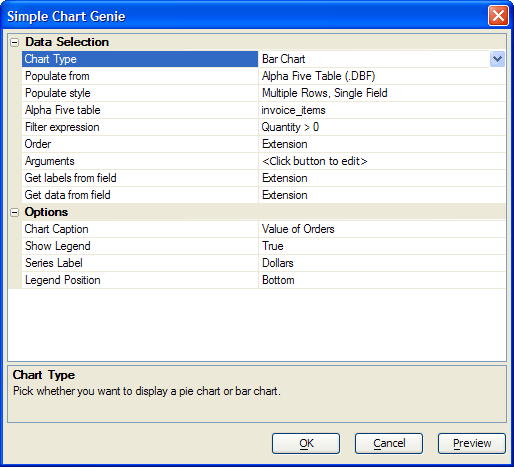
Click Define SimpleChart Control to display the SimpleChart Genie.
Continue with Data_Selection.
Data Selection
Make a selection in the Data Selection > Chart Type list. The options are:
"Bar Chart"
"Line Chart"
"Pie Chart"
Make a selection in the Data Selection > Populate from list. The options are:
"Static list"
"Alpha Anywhere Table (.DBF)"
If you chose "Static list" in step 2:
Click the '...' button in the Data Selection > Static data field to display the Static List dialog.
Optionally, redefine the Column delimiter character.
Enter the data to be displayed in the chart, one entry per line. The data should be formatted . The must be numeric.
Press OK to continue.
If you chose "Alpha Anywhere Table (.DBF)" in step 2:
Make a selection in the Data Selection > Populate style list. The options are:
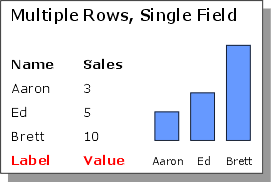
"Multiple Rows, Single Field" - labels come from the data
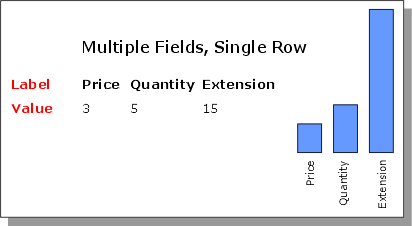
"Multiple Fields, Single Row" - labels comes from the field names. This picture illustrates how 2 fields from multiple records are used for multiple rows, single field
This picture illustrates how 1 record is used for multiple fields, single row
Make a table selection in the Data Selection > Alpha Anywhere table list.
If you selected "Multiple Fields, Single Row" in step 4, click the '...' icon in Data Selection > Fields to select the fields to display in the Select Fields dialog.
Optionally, click the '...' icon in the Data Selection > Argument field to display the Define Arguments dialog. This allows you to prompt the user for values or read values from variables. You can use these values (arguments) in the Data Selection > Filter expression field.
Optionally, enter an expression that limits the records to display in the Data Selection > Filter expression field. Optionally, click to use the Expression Builder to help you define an expression that evaluates to a logical value.
Optionally, enter an expression that orders the records to display in the Data Selection > Order field. Optionally, click to use the Order Builder to help you define an expression that incorporates at least one field name.
If you selected "Multiple Rows, Single Field" in step 4, click the '...' icon in Data Selection > Get labels from field to select a table field.
If you selected "Multiple Rows, Single Field" in step 4, click the '...' icon in Data Selection > Get data from field to select a table field. This must be a numeric field.
In the Options > Chart Caption field enter the title that will appear at the top of the chart.
In the Options > Show Legend field select whether you want to show the data legend.
If you selected "Bar Chart" or "Line Chart" in step 1, in the Options > Series Label field enter the description of the values shown on the vertical axis.
In the Options > Legend Position list select the position of the legend. The options are:
"Top"
"Bottom"
"Left"
"Right"
Optionally, click Preview to see how the chart will appear.
Click OK to continue.
Finish the Dialog Definition
Click Next >.
Optionally, enter the title of the dialog box in the Dialog Title field.
Optionally, enter text to appear at the top of the dialog box into the Header Text field.
Optionally, enter text to appear at the bottom of the dialog box into the Footer Text field.
Optionally, modify the bottom labels in the Button Text fields.
Click Next >.
Optionally, modify the name of the variable in the Variable Name field that will capture the return value of the Xdialog box.
Optionally, change the Scope of the return variable to one the following values. A variable's scope refers to where the variable can be seen, i.e. which other scripts can access the variable.
"Shared". Variables are available throughout the current form.
"Global". Variables are available anywhere in Alpha Anywhere.
"Local". Variables are available only in the current script.
Click Next >.
Optionally, modify the comment that describes the action.
Click Finish.
See Also


