Using the New Form Genie
Description
When you create a new form for a table or set, the New Form Genie lets you create customized form layouts in a fraction of the time that it would take to manually layout out a new form. The New Form Genie lets you:
Select which fields from the table or set to include on the form
Create forms with tabbed objects and select which fields go on each tab page
Layout the fields on the form in multiple columns
Create forms with embedded browse objects
Assign a stylesheet to the form
Select Table or Set
To create a form with the New Form Genie :
Display the Forms tab of the Control Panel.
Click New.
In the Data Source list select the table or set that will provide the data.
Click Next >.
Select a Design Approach
Select how to start the form design. The options are:
Blank Form
you can then drag fields from the Drag Drop List and controls from the Toolbox and place them on the form.
Default Form
you can then rearrange, delete or modify the fields on the form. This is often a good starting point for forms based on sets.
Custom Form
allows you to select the fields that appear on the form
Click Next >.
Select a Layout Style
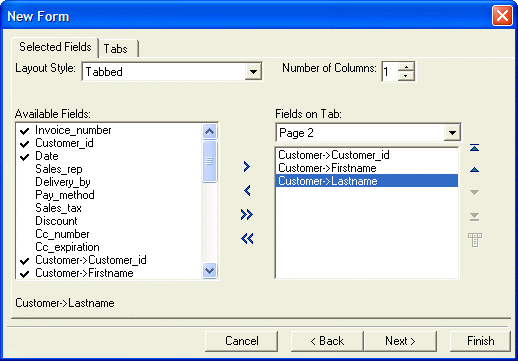
If you selected "Custom Form" in step 5, the Selected Fields tab appears. Otherwise, continue with step 12.
Select the Layout Style. The options are:
"Default (Single Column)"
"Multi-Column"
"Tabbed"
If you selected "Multi-Column" in step 8:
1. Enter a value in the Number of Columns field.
2. Select a column number from the Fields in Column drop-down list.
3. Select each field that you want to display on the column in the Available Fields list and click the '>' icon to add it to the Fields in Column list. Click the '>>' button to add all fields to the form.
4. Select each field that you want to remove from the column in the Fields in Column list and click the '<' icon. Click the '<<' icon to remove all fields from the column.
5. Use the following buttons to reorganize the fields within a column.
6. Select each of the remaining column numbers from the Fields in Column drop-down list and repeat steps 9c and 9e.
If you selected "Tabbed" in step 8:
The default design includes two tabs, plus regions above and below the tabs. To change the number of tabs display the Tabs tab.
To change a tab name, select it in the Tabs list, enter a new name in the Tab Name field, and click Change.
To delete a tab, select it in the Tabs list and click Delete.
To add a tab, select "Tabs list, enter its name in the Tab Name field, and click Add.
The default design has one column per tab. To change the number of columns on a tab, select the tab page in the Fields on Tab drop-down list, and change the value in Number of Columns.
Select each field that you wish to display from the Available Fields list, select a location from the Fields in Column drop-down list, and click the '>' icon to add it to the Fields on Tab list. Click the '>>' button to add all fields to the selected destination.
Select each field that you want to remove from an area on the form and click the '<' icon. Click the '<<' button to remove all fields from this area.
Use the following buttons to reorganize the fields within an area on the form.
Click Next >.
Select a Stylesheet
Select a design for the form from the Stylesheet list. Refer to Overview of Stylesheets to learn more about stylesheets.
Click Next >.
Finish Design
Optionally, change the Horizontal and Vertical Spacing Between Fields.
Optionally, click Show Xbasic to see the code that will create the form.
Click Finish.
If you select to create a new form, starting with the Default Form (containing all of the fields in the table or set), the New Form Genie will create a form with as many tabs as Needed to display all of the fields in the underlying table or set.
See Also


