Alpha Cloud - Alpha Anywhere Developer's Guide
Managing TLS(SSL) Certificates for Web Sites Accessed Using Your Own Domain Name
About Certificates
Certificates For Alpha Cloud Managed Host Names
Using a Custom Domain Name with TLS(SSL)
Uploading Certificates
Creating a CSR - Certificate Signing Request
Managing Certificates
About Certificates
When a browser URL begins with https instead of http, the communication between the browser and the web site uses the HTTP protocol, but does so using secure communication. Transport Layer Security (TLS) and the more commonly recognized Secure Socket Layer (SSL) provide an encrypted transport between browsers and web sites. To make this all work, the browser and the web site must complete an exchange of messages called a "handshake" which will include the server offering up a standard X.509 certificate. The certificate verifies that the web site is in fact who it claims to be. Each certificate is signed by a certificate authority in a chain of authorities that ultimately link back to an authority that is already known to the browser.
Note: It is also possible to use a test (or self-signed) certificate. In this case, the browser will display a warning message that the certificate is not trusted and the user will have the option of continuing. Production sites with any need for security (most will have this) will need a TLS (also called SSL) certificate installed on the server that has been signed by a verified certificate authority.
Certificates For Alpha Cloud Managed Host Names
Alpha Cloud automatically generates and manages a host name for each web site so that you can test your deployed web sites immediately. Host name generation is discussed in detail in the section Adding Your Web Sites to Your Own Domain.
Alpha Cloud also manages TLS (also called SSL) certificates for the automatically generated host name, so it can be used for both insecure (HTTP) and secure (HTTPS) access to your web site.
Using a Custom Host Name with TLS (also called SSL)
In most cases you will also want to assign your own host name to your web site. As discussed in Creating Your Own Custom Host Name, you can set up a host name from your own domain.
You are responsible for purchasing (and periodically renewing) a certificate for your host name in order to support TLS (HTTPS - also called SSL) for your web site when referenced using your own host name. Once you have purchased and downloaded a certificate, you can upload it to Alpha Cloud, and it will be automatically installed on each server that handles requests for your web site.
The Importance of Securing Your Server Certificate and Your Private key
Important Note: The security of your TLS (also called SSL) certificate, and the private key required to deploy it are very important! If a malicious individual is able to access the private key for your certificate, they can pose as your web site and potentially gain access to confidential information. While Alpha Cloud encrypts your certificate in transit and at rest, there is always risk involved when transferring and deploying server side certificates. It is important to make sure that any compromise to security is contained. Please consider the policies below as a minimum of what needs to be done to protect your certificate and your web applications.
- Purchase a certificate for each host name (web site) you deploy on the Alpha Cloud. Don't use wild-card certificates. This will limit exposure to a single web site.
- DO NOT use the same certificate for your own on-site web sites and Alpha Cloud web sites. A compromise on either site will expose the other site and make it harder to track the cause of the breach.
- Protect your copy of the certificate, but more importantly the private key that you create when you purchase it.
- In the event that your private key is compromised or lost, contact your certificate provider immediately! They will be able to invalidate your current certificate and issue a replacement using a new key
Creating a CSR - Certificate Signing Request
Although some sites from which you can purchase and renew certificate services will let you enter everything directly on their web sites, most require you to upload a special file called a Certificate Signing Request (CSR). This CSR file contains all of the descriptive information about the certificate you are purchasing as well as the public key to be used by the certificate.
You can create a CSR by clicking on the button entitled "Create Certificate Request" on the Upload TLS Certificate dialog. This dialog will also create a private key that you will upload to Alpha Cloud with the certificate you purchase. This process is discussed in the next section.
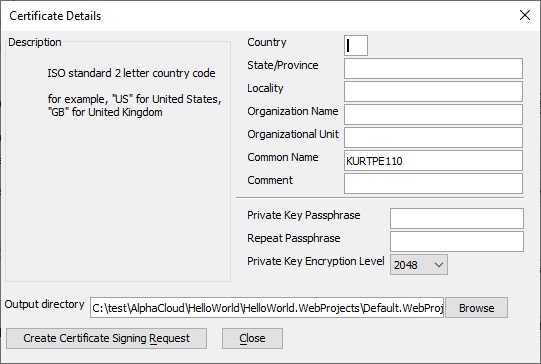
Note: By default, the private key and CSR are stored with your web project in a folder called Alpha Cloud. This makes it easier to find and upload the private key when you download your certificate. The folder is excluded from publication and is NOT copied to Alpha Cloud during publication.
Uploading Certificates
Once you have purchased and downloaded a certificate, you can upload it to Alpha Cloud, and it will be automatically installed on each server that handles requests for your web site.
From within Alpha Anywhere, you can upload new or updated certificates to Alpha Cloud. When you renew a certificate and upload it, Alpha Cloud automatically deploys the new one when the old one expires. You can also disable a certificate that has been uploaded (for example if your believe it may have been compromised).
Before you begin, make sure you have your server certificate and private key ready for upload.
Certificate File Formats
Depending on how you created your certificate, the certificate file may be in one of a few formats. You can tell the format by the extension on the certificate file. Alpha Cloud will load and upload the following formats:
- .pfx (also called PKCS#12) - This is a file that contains both the certificate and the private key. If you have the tools to create such a file, it will make the upload process a little easier.
- .crt - This file contains only the certificate and you will also need to choose a file with the private key in it.
- .cer (Alternate form of .crt files) - This file contains only the certificate and you will need to choose a file with the private key in it.
Note: .crt and .cer files should be encoded in ASCII PEM format (contains a readable header and footer and a base64 encoded body).
Private Key Files
If you have a certificate in a .crt or .cer file, you will need to provide the name of the .key file that contains your private key. Alpha Cloud will automatically convert the file to a .pfx file (see above) before uploading your certificate to the cloud for storage. Your key file may be in PKCS#7 or PKCS#8 format (it will have a heading that either says "BEGIN PRIVATE KEY" or "BEGIN RSA PRIVATE KEY".
Intermediate Certificate Files
Each certificate is signed by a trusted provider. In the simplest case, the provider who signs your certificate is a root level provider and the certificate they sign your certificate with is already installed on the server. Often root level providers delegate authority to issue certificates to other providers, who can delegate to still other authorities. If your certificate is signed by an intermediate authority, you will need to provide a chain of certificates, each signed by the next authority up the hierarchy until a root certificate is referenced. These certificates are sent to each TLS (also called SSL) client as proof that the certificate being presented to a browser or web client is in fact valid. If your certificate is a CRT or CER file, there is a good chance you have been provided with intermediate certificates (possibly bundled into a single file). You will need to provide these certificates at the time you upload your TLS (also called SSL) certificate.
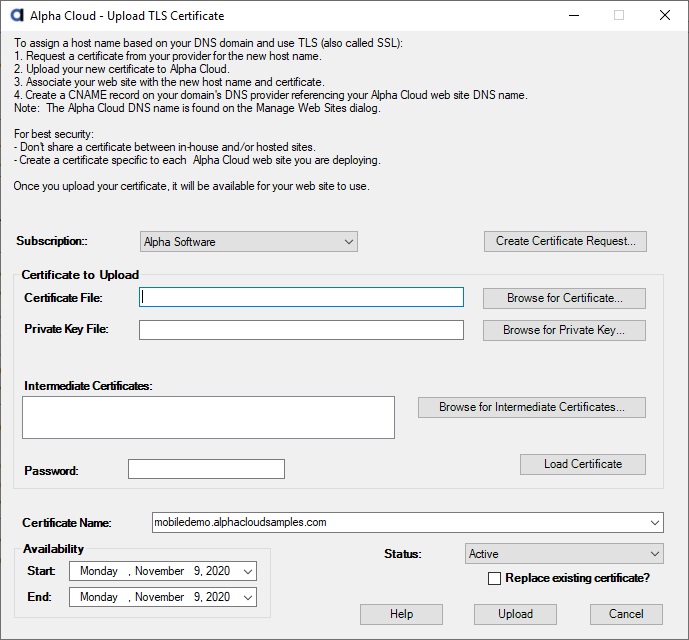
Using the Certificate Upload Dialog
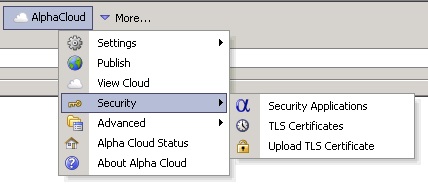
- Click the Alpha Cloud toolbar icon on the web control panel and select "Security" and then "Upload TLS Certificate" from the drop down menu.
- If you have access to more than one subscription, make sure you are accessing the correct subscription.
- Type the full path and name of your certificate file into the text box labeled "Certificate File" or click the button entitled "Browse For Certificate" to choose the certificate to upload.
- If you have selected a .pfx certificate file format, you may need to supply a password to load it. If so, type the password and the certificate will load.
- If you have selected a .crt or a .cer certificate file format, you need to provide a key file. Type the full path and name of your certificate file into the text box labeled "Private Key File" or click the button entitled "Browse for Private Key" to choose the key file to upload.
- If you need to include intermediate certificates in your upload (as discussed above) click the button entitled "Browse for Intermediate Certificates" to choose the intermediate certificate files to include.
- The default status of a newly uploaded certificate is "Active", if you do not want to make the certificate available immediately, select "Disabled" from the dropdown entitled "Status".
- As a safety, the dialog will not allow you to upload a duplicate certificate. If you need to replace a certificate with the same name and available start date, check the box entitled "Replace existing certificate?"
- Click the button labeled "Upload" to upload your certificate to the cloud.
Note: After your certificate is uploaded you will need to open the Manage Web Sites dialog to set the host name and choose the certificate for the web site.
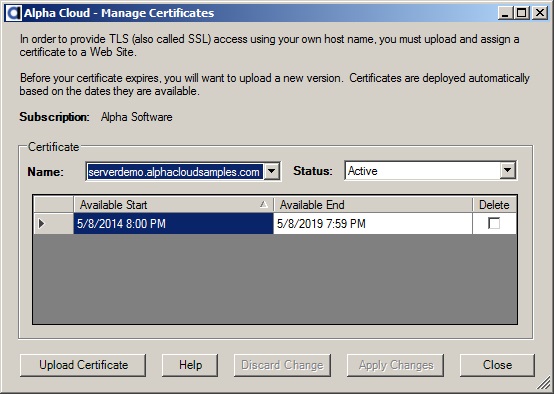
Managing Certificates
For each unique certificate name (the full host name of the certificate), Alpha Cloud can store one or more certificates. This way renewed certificates can be related back to older certificates for the same name. When a newer certificate becomes effective, Alpha Cloud will automatically deploy it instead of the older one.
You can use the Manage Certificates dialog to view and manage the certificates you have uploaded to the Alpha Cloud for the currently selected subscription.
- Click the Alpha Cloud toolbar icon on the web control panel and select "Security" and then "TLS Certificates" from the drop down menu.
- Select the certificate from the list entitled "Name".
You can change the status of the certificate to either "Active" or "Disabled".
Important: If you disable a certificate that is assigned to a web site, the web site may stop working!
- To permanently delete a certificate from the cloud (such as an expired certificate), click the checkbox labeled "Delete" beside the item you want to delete.
- Click the button labeled "Apply Changes" to change the status and/or delete certificates.
- To undo changes before you apply them, click the button labeled "Discard Changes".
- When you have finished managing your certificates, click the button labeled "Close" to exit the dialog.